

Just as I was going to put a film through a few different cameras with an assortment of lenses to check how they (the lenses) compare with each other, Yr ‘Umble Ed – Mike Evans – asked if I’d write about the differences between film and digital cameras, and their response to over-exposure.
The idea is that film is thought to be more ‘forgiving’ with over-exposure, allowing details to be ‘recovered’ from very bright, over-exposed areas, whereas digital cameras just ‘white out’ or ‘blow-out the highlights’ irrecoverably when over-exposed. And what about ETTR (Expose To The Right)? We will explore that theory later in the article.
Here’s what I mean:
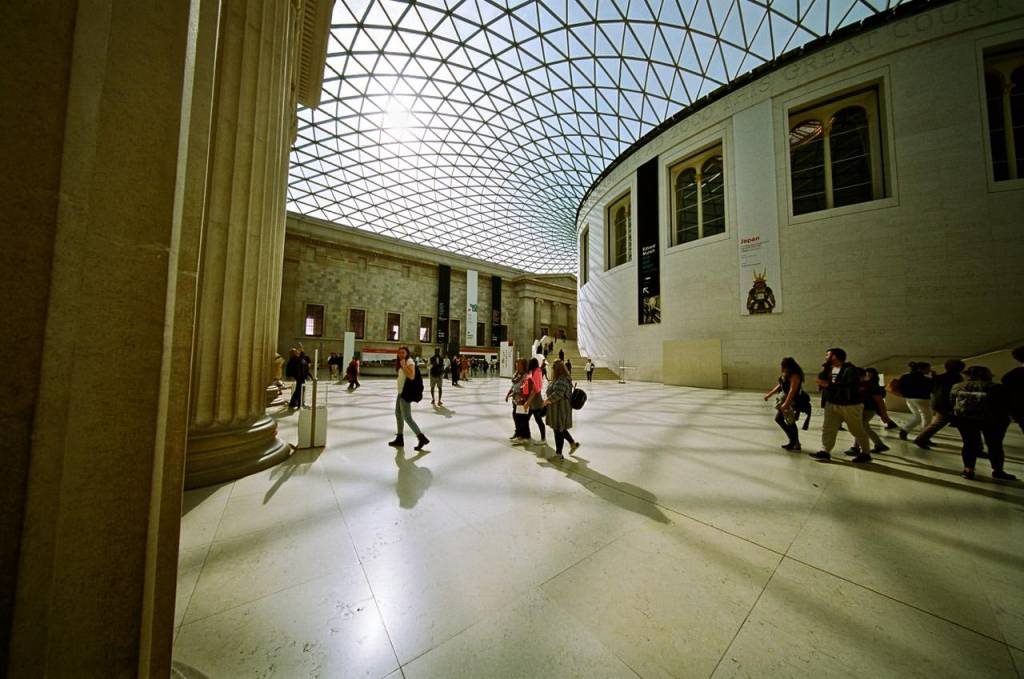
Pic 1 100 Film 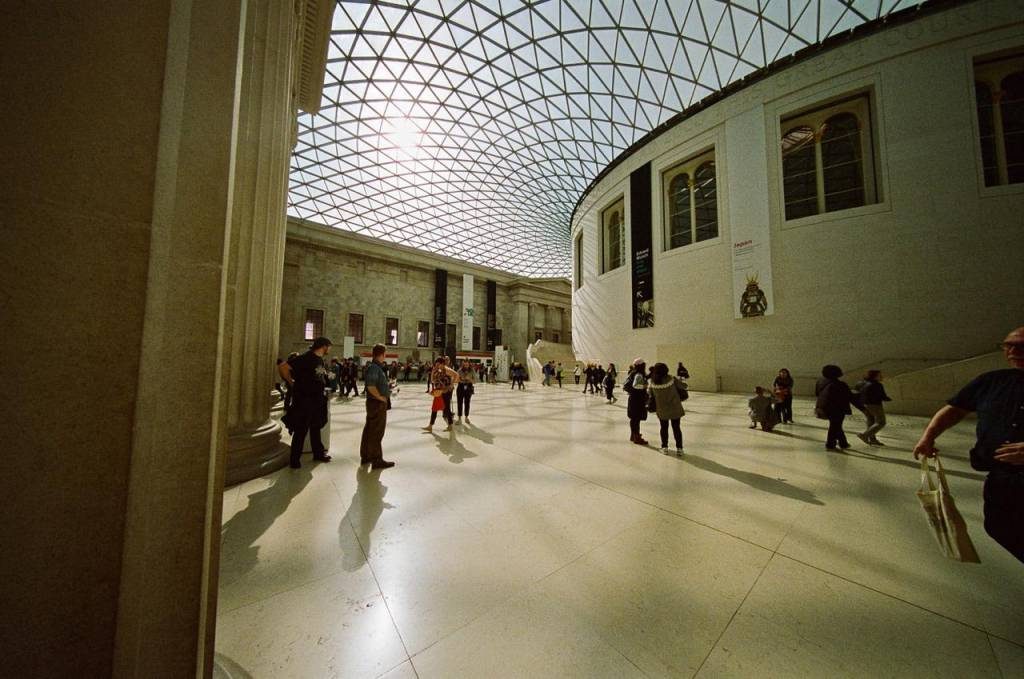
Pic 2 800 film 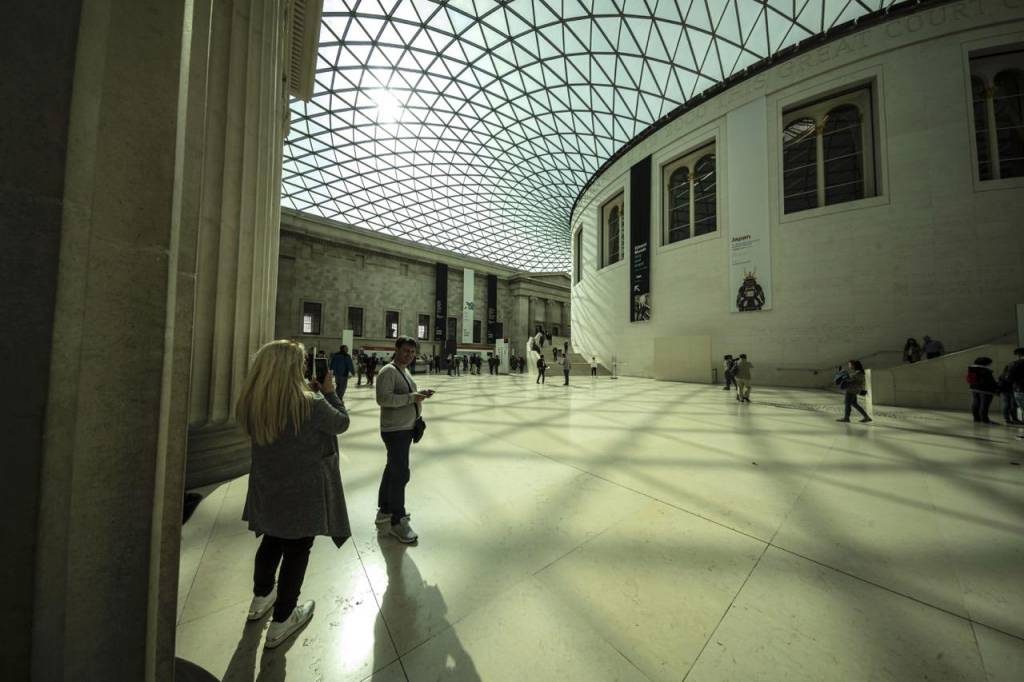
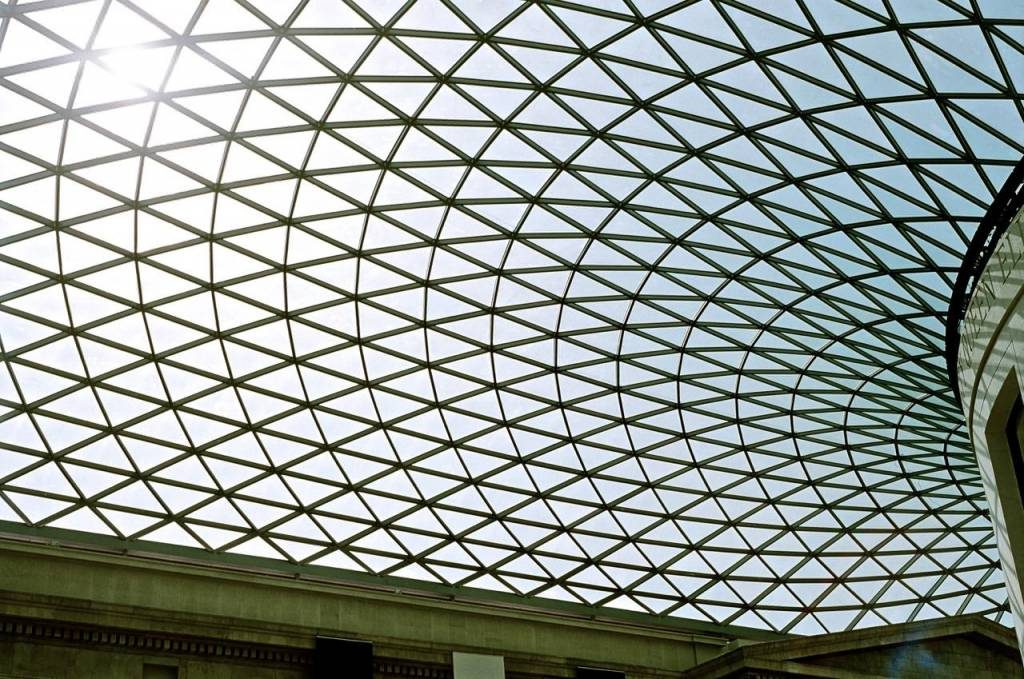
Pic 3 100 RAW
The digital picture (the third above) – shot on Auto White Balance, but adjusted to ‘Daylight’ in Adobe Camera RAW to match the colours of the film photos – goes to pure white in the brightest highlights, just as the film (in photos 1 and 2) – rated as ‘Daylight’ – also goes to irretrievably pure white in the brightest highlights.
But there’s fractionally more detail remaining of the roof frames – here in the Great Court of the British Museum – in the first two film photos than in the digital photo. The detail is “eaten away” more severely in the digital photo. There’s (marginally) less detail of the roof frames to retrieve from the digital pic than from the other two. Digital photos, apart from those taken with Sigma’s ‘Foveon’ sensors, get part of their information from adjacent pixels on the sensor. So, if any adjacent pixels are overloaded and ‘whited-out’, there’s no way to gather any extra detail from them. Hence a “sudden” transition to completely white at the brightest highlight:

Pic 4, magnified ISO 100 Kodak Ektar 100 colour negative film 
Pic 5, magnified ISO 800 ‘Lomography’ (repackaged Kodak, I think) Colour Negative 800 film 
Pic 6 magnified digital, Leica M10-P digital photo, camera set to ISO 100
All were taken with the same Voigtländer 10mm lens, on an M7 (with ISO 100 and ISO 800 negative films) and with an M10-P (digital, at ISO 100). Note that the two films pick up slightly more blue in the sky than the M10-P, particularly the ISO 100 film, unless that’s a result of the commercial scanning of the films to get them here onto a computer screen.
The less-sharp cutoff of fine detail in the film images goes along with the accepted idea that film retains more detail in highlights than digital does, although here there’s not very much difference.
The smooth transition to ‘white-out’ in the film pictures is generally described by the film having a ‘shoulder’, where its response to bright light (at the top of the next graph) gradually flattens out, so that more detail, or differentiation of tone, can be gathered by the film emulsion before it reaches its maximum gathering of bright light, and then goes absolutely white – or really, being a negative, goes absolutely black.
The films – both kept cool, and both in-date – are ISO 100 Kodak Ektar (professional) and ISO 800 ‘Lomography’ (re-packaged Kodak 800, I understand, and it certainly behaves like it). The overall results from the two films are certainly more ‘grainy’ than the far smoother digital photo when they’re all magnified to the same size:

Pic 7 ISO 100 film magnified crop
Pic 8 ISO 800 film magnified crop 
Pic 9 ISO 100 digital magnified crop
The digital M10 looks far better in this dimmer region of the photos than either of the film scans. But the M10-P is nominally rated up to ISO 50,000 by its makers, though I usually set a ceiling of 25,000. The main reason that the lettering is more legible in the digital picture is that the film scans are only six megapixels, whereas the digital pic was shot at 24 megapixels, and so needs less magnification to produce the same size of crop. But the coarse ‘grain’ of the film, compared with the fine-detail-capable sensor, also makes the teeny lettering less legible.
The response curve of film, with its ‘shoulder’, generally looks like this:
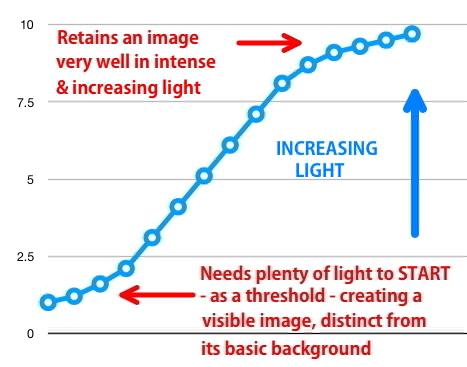
Pic 10 – Film S-curve 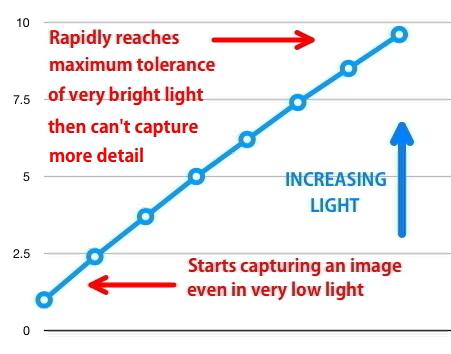
Pic 11 – Digital straight line
As a result, once the sensor reaches maximum stimulation by light, it just can’t hold further detail and simply “whites out” instead of storing some fine detail within the brightest highlights, as those two film shots have, just about, done.
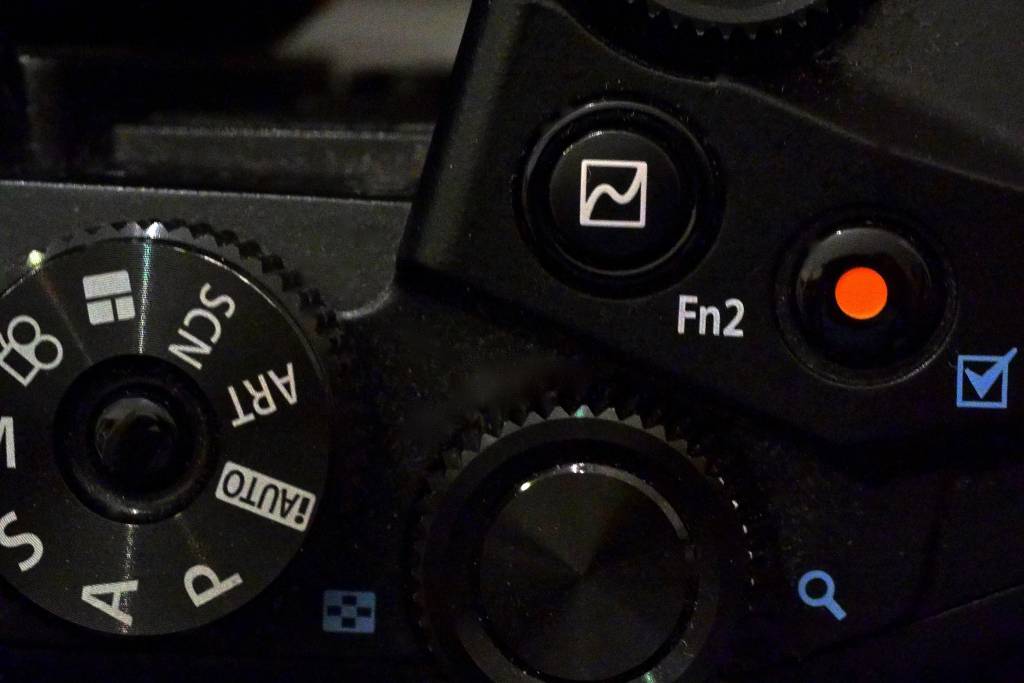
Doesn’t that first curve, the one with the ‘shoulder’, look like the adjustment option on Olympus cameras – say an E-M1, or PEN-F? So can some cameras be adjusted to respond more like film, and so avoid having these ‘blown’ highlights?
Let’s see. But first, I’ll say what my conclusion was after a whole load of testing, and after gathering expert opinions (no, sorry, one expert opinion – from the people who design cameras, film, etc. After taking shot after shot with different parameters, various settings, multiple lenses and multiple camera bodies there’s one conclusion: The best results came from setting all the cameras to auto-exposure (if available) and letting the cameras choose optimum exposure. Sounds like heresy, huh?
Auto gave unimpeachable results with a huge range of brightness in each photo. I used a digital Leica M10-P, a Nikon Df (for Dave Seargeant of course) an Olympus PEN-F, a Sony A7s and a Sony A7r MkII. The film cameras, which I didn’t use on auto-exposure (except once), were a Leica M7 and a Contax IIIa (because of the reputation of its Zeiss ‘Sonnar’ 135mm f/4 lens, which I used for comparison with a Leica 135mm f/4 on a Sony A7RMkII, as well as on the original 1960s Contax film camera). However, because this article is long enough already, I haven’t included those pics here.
A huge amount of scientific and artistic effort has gone into devising the response to light of digital cameras (Nikon, Leica, Sony, Olympus, and all the rest) and nowadays relying on cameras’ own auto exposure gave me the best results. Every time. (Although that could just be because I’m a hopeless photographer or, maybe, because twiddling over- and under-exposure settings comes naturally, through practice, to me.
But now, back to the story..
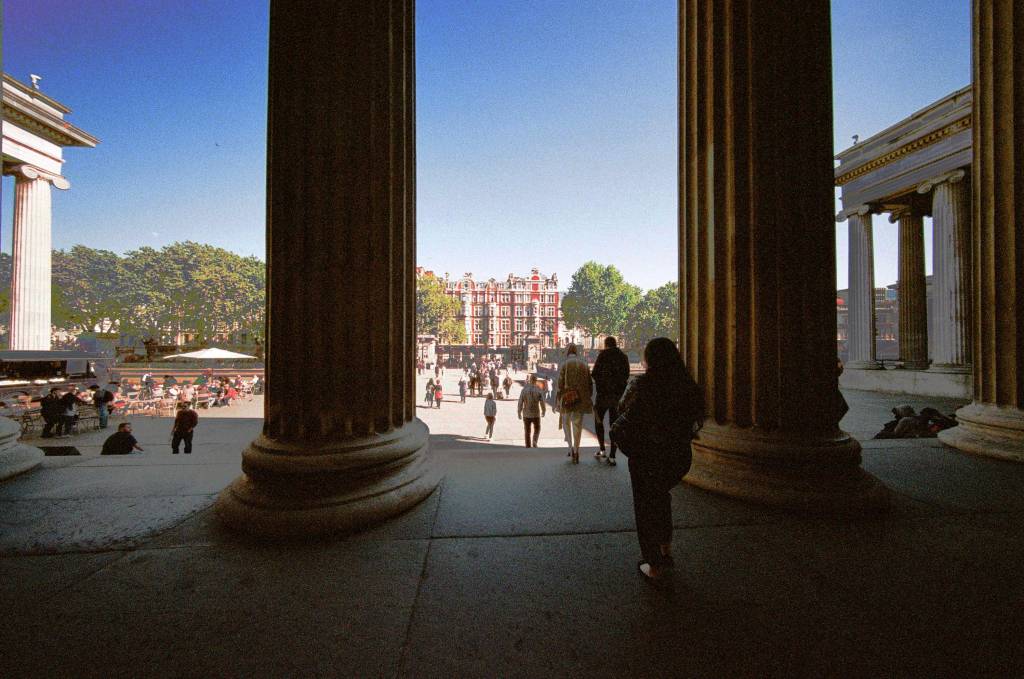
These next three photos were all taken with the same Leica 50mm APO-Summicron lens, supposedly the best ‘standard’ lens that money can buy, on factory-set M7 and M10-P cameras, so the shutter speeds (as well as the constant aperture, and thus the exposures) should be accurate for each photo:
Pic 13 – ISO 100 film, M7, 50mm APO-Summicron at f11, 1/60th. Metal framework almost completely “eaten away”. 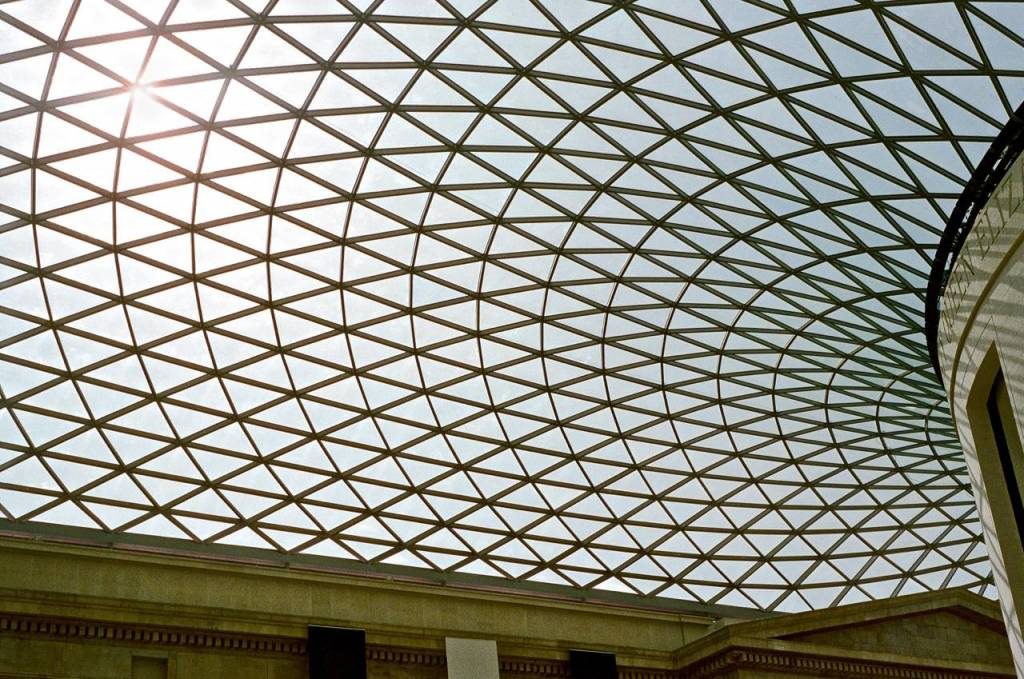
Pic 14 – ISO 800 film, M7 50mm APO at f11, 1/500th. Metalwork slightly less “eaten away”. 
Pic 15 – ISO 100 digital, M10-P 50mm APO-Summicron at f11, 1/60th. Sightly more ‘blown out’ than both films; an irrecoverable white blob with no details of the metalwork within it.
Note that these images were all processed to gather maximum detail from that over-exposed highlight where the sun is bursting through.
It’s conventional wisdom that the emulsion – the light-sensitive coating – on a roll of colour negative film has some kind of
Is that over-exposure tolerance an innate capacity of some light-sensitive silver compounds, or do/did the chemists, who formulated film emulsions, use some special trick to produce that characteristic ‘shoulder’ curve of film’s response, so that details in highlights are preserved better than the sensors, and the rest of the electronics, in digital cameras can achieve?
I went to the horse’s mouth to ask the best-qualified and most knowledgeable person I could think of regarding film: Bob Shanebrook, who wrote the textbook “Making KODAK Film” which describes the genesis of Kodak’s film products, and which includes “..detailed descriptions of photographic film image-forming mechanisms for black-and-white films, color negative films, Ektachrome Films, and Kodachrome Films”.
If anyone knows about the formulation of Kodak film – and that soft ‘shoulder’ response curve – it’s Bob.
He tells me that “The extended density range” (the capacity of film to absorb light without ‘overloading’ and thus failing to hold highlight detail) “is accomplished by combining multiple emulsions, typically named ‘fast’, ‘mid’, and ‘slow’. The need is to have the densities ‘blended’ so the curve shape is very smooth”. So it’s not just one emulsion, but a blend of several with different responses!
Incidentally, anyone my age may remember ‘Verichrome Pan’ black-&-white film, a great advance on previous films of the 1950s, because it was ‘double-coated’. Two separate coats of emulsion were layered onto the plastic base, so that very fine detail could be stored on the film, even in really bright light.
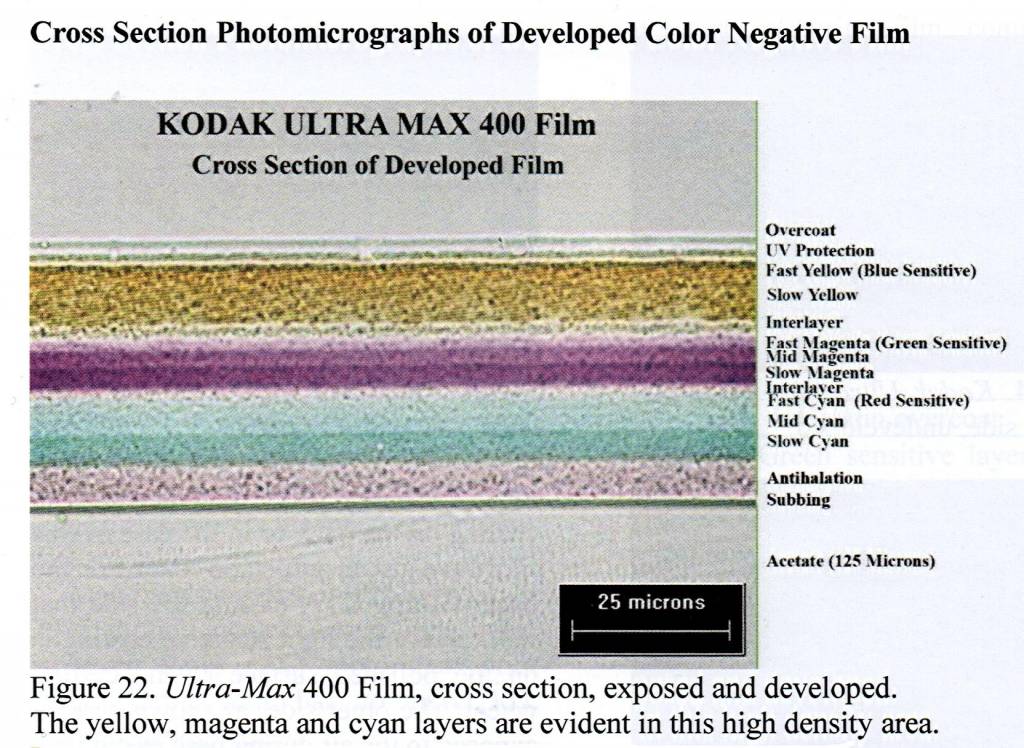
A diagram from Bob’s book – actually a scanning electron microscope image – shows the several layers of different emulsions applied to Kodak Ultra MAX 400 colour film (the so-called slow, medium and fast emulsion layers) so that the film won’t just ‘overflow when the light bucket’s full’, but will keep recording fine detail – in, for instance, a bride’s white dress in very bright sunlight.
There are eight separate light-sensitive emulsion layers here, not counting the various protective layers, and the acetate film base itself. With three magenta layers, three cyan emulsion layers and two yellow emulsion layers, all balanced to give the truest possible colour reproduction, you can see how that smooth bright-light-detail ‘shoulder’ response has been carefully formulated and physically engineered
Now for a bit of history..
Back in 2003, the late Michael Reichmann, who started the ‘Luminous Landscape’ website years ago, begat the ‘ETTR’ movement: ‘Expose To The Right’. This means that with any digital camera you’d get the best performance (both in highlights and in shadows) by using the ‘histogram’ graph which many cameras offer on their display screen (and/or in their electronic viewfinder) so as to adjust the exposure (before taking the shot) to make it increasingly brighter until the brightest highlights appear very close to the rightmost edge of the graph. But, it should be added, not so far that the highlights slide right off the edge
That, supposedly, gives the best capacity – or it did in 2003 – to retain maximum detail in bright areas of a photo, and also to gather maximum light in the darkest areas, so that shadow detail can later be retrieved (or made visible) using Photoshop or some similar editing program.
Michael R began his explanation by saying, “let’s assume for the purposes of illustration that a digital SLR has a dynamic range of 5 stops. It’s usually closer to 6 stops, but let’s not quibble“. However, current 2019 digital cameras generally have a dynamic range of about 10-12 stops according to DPR and DxO. So do Michael’s observations (well, actually, he was quoting Thomas Knoll, creator of the original Photoshop) still have relevance today?
Here’s a link to Reichmann’s original essay; but you may have to take out a (minimal) subscription to his website to read it. An updated version of his article appeared eight years later, in 2011, but that’s still eight years ago, and that’s online here. This updated 2011 version says, “most current DSLRs and digital backs have a dynamic range somewhere between 8 and 12 stops”.
Essentially, Reichmann said (to paraphrase), “expose RAW images to the right, even when taking pictures of dark scenes, and they’ll have the best possible signal-to-noise ratio (a cleaner image). Then, afterwards, move everything back towards the left of the histogram (make the image darker again) when processing the RAW file”.
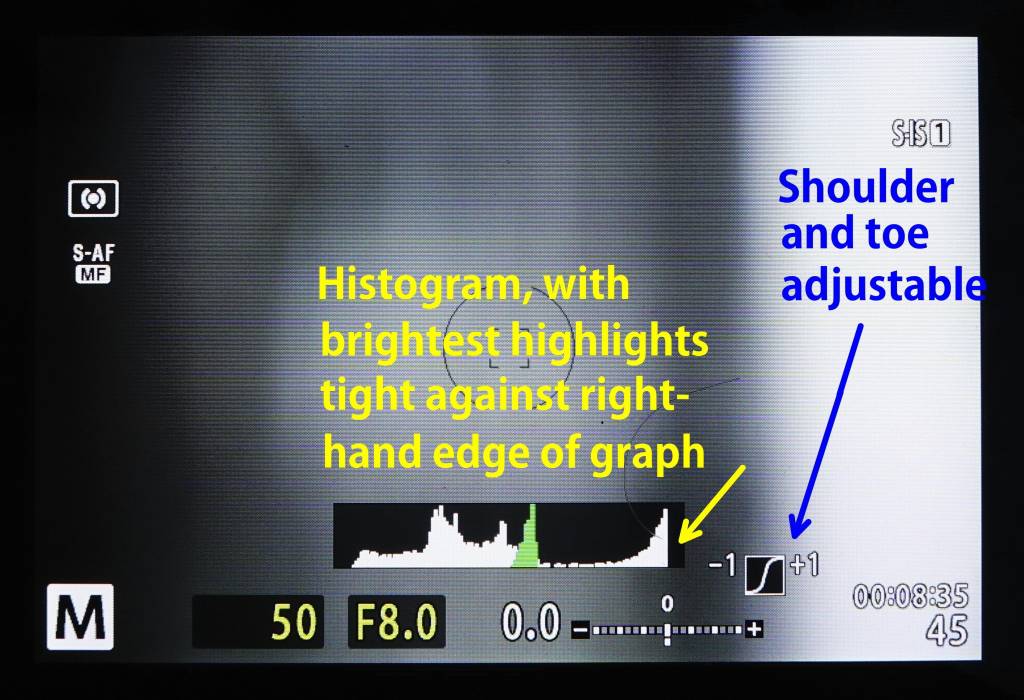
This rear screen of an Olympus PEN-F shows that instead of a straight-line response to light, as in that Picture 8, up above, the camera can be adjusted. In this case, it is to give a gentler ‘shoulder’ response to the brightest light, similar to
The broad ‘histogram’ graph shows that there’s plenty of bright white (that’s the tall columns jammed up against the rightmost edge of the graph, which correspond to the brightest white areas of the picture) and there’s a good range of mid-tones in the centre, too, but with no absolute black — which would have been shown by a tall section of bars way over to the extreme left of the graph.
The science
Now “Here comes the science bit..” (Jennifer Aniston, in the L’Oreal ads)
(This, as an aside, reminds me of the Dolby noise processors in cassette tape recorders. Remember them? When a tape is dragged past erase and recording heads, that dragging always recorded a hiss on the tape. So how to get rid of that? If you just turn down the treble when replaying the tape, you lose the highest frequencies which you actually wanted to hear (an orchestral triangle, say, or cymbals). The famous Ray Dolby’s solution was to ADD extra hiss (in that same particular frequency range of the unavoidably-recorded hiss) to every recording, and then, on replay, to REMOVE that added hiss (with a Dolby hiss filter) which also removed the unwanted hiss created by the tape being dragged past the heads during recording! Essentially, he added more, then took it all away afterwards).
‘ETTR’ adds extra light into the darkest areas of a photo – that’s light as distinct from the inescapable spurious hiss-akin electronic random ‘noise’ of the digital circuitry – and then by sliding the whole picture to the left (darkening it again) when processing the RAW file, that gives improvements in the dark parts of the image by having boosted its ‘signal-to-noise’ ratio through adding more light when the photo was taken.
ETTR is all well and good, if you’re an architectural photographer with a 2003-vintage 6-megapixel 5-stop camera on a tripod. But when you want a quick snap, you just can’t achieve ETTR – well, I couldn’t – while juggling focus and shutter speeds. However, I do visually assess each photo before I take it, and I use the +/- over/under-exposure option (which is there on most cameras) to apply less or more exposure based on my own experience. For instance, when shooting something black, under expose; when shooting something meant to look especially bright and white, over expose.
Here are a few domestic photos of what’s on our windowsill, including a crinkled sheet of shiny plastic. I shot these photos to just teeter on the edge of over-exposure. These are all jpeg photos (because the film scans are jpegs) all shot at ISO 800, with a 50mm (or equivalent) lens, at f/11 (but f/8 with the little Pentax Q-S1, as its lens doesn’t close down to f/11) and at 1/1000th (Pentax Q-S1 at 1/2000th).
The Nikon 50mm f/1.8G (designed to match the retro Df digital camera) and the teeny Pentax 8.5mm f/1.9 lens both have significant barrel distortion in RAW photos, but the Nikon Df and the Pentax automatically correct that in jpegs. The Leica 50mm APO-Summicron (on both the M7 and M10-P) and both the Leica/Panasonic 25mm f1.4 and the Olympus 12-100mm f4 (for micro-four-thirds) have no visible distortion in RAW photos.
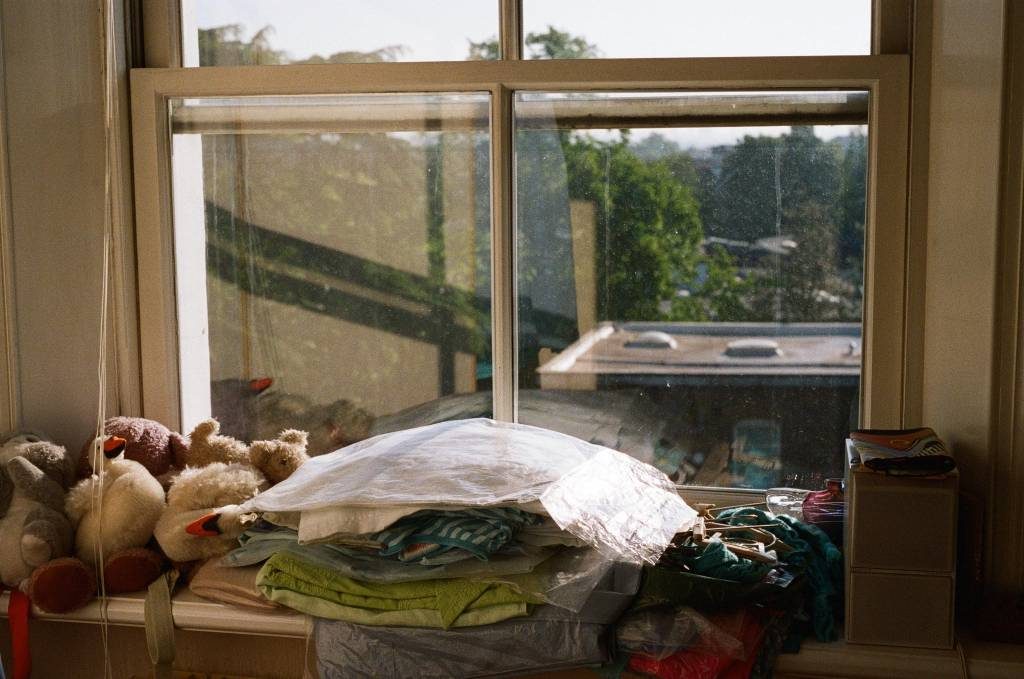
Pic 18 – ‘Daylight’ film, 50mm Leica APO, shot at f/11 and 1/1000th 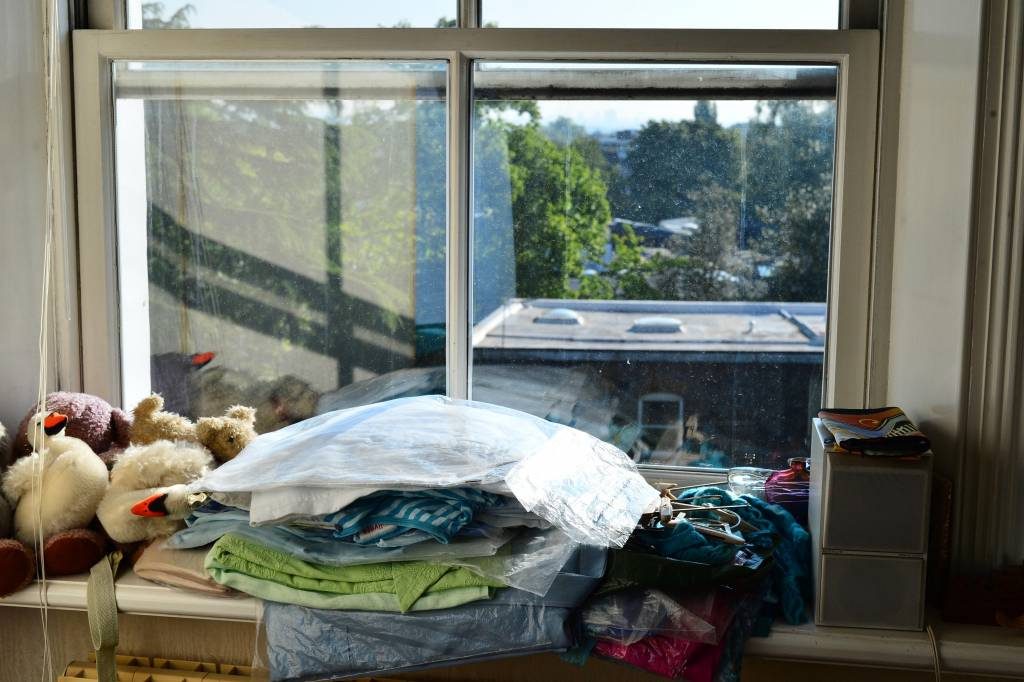
Pic 19 – Nikon Df, 50mm f/1.8G at f/11, 1/1000th “full-frame” 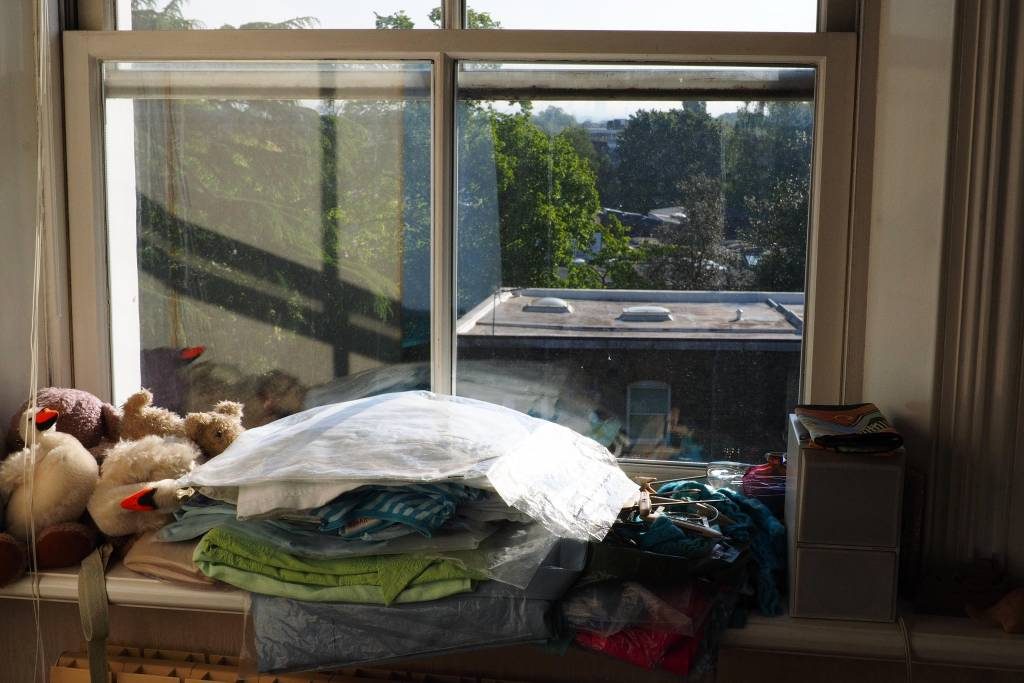
Pic 20 – Olympus PEN-F, Leica 25mm f/1.4 at f11, 1/1000th “micro four thirds” 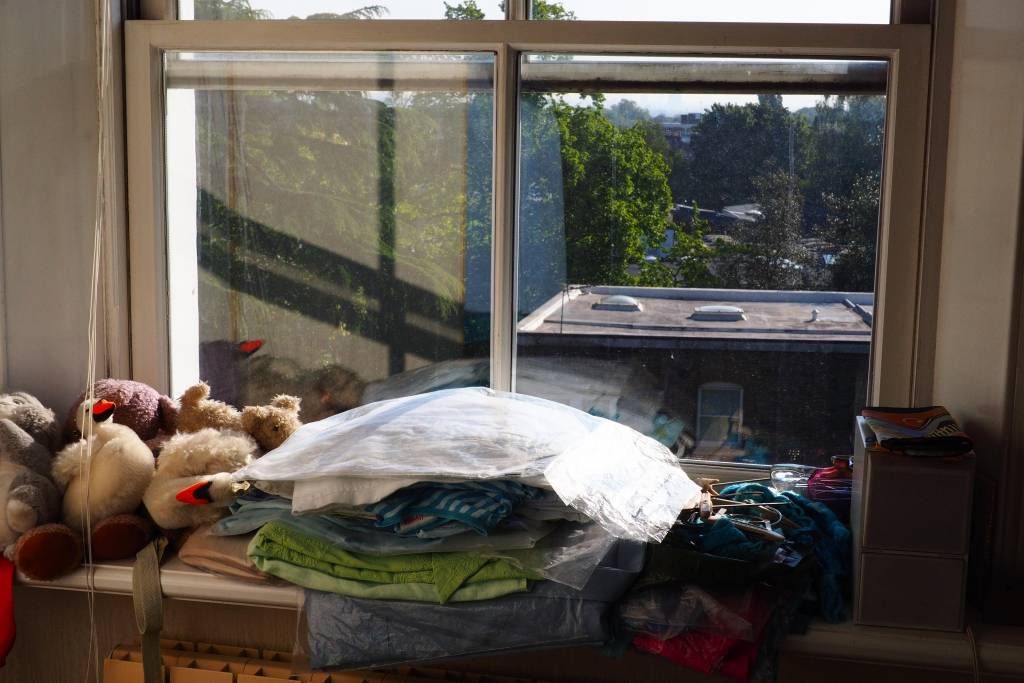
Pic 21 – Olympus PEN-F, Leica 25mm f/1.4 at f11, 1/1000th “micro four thirds” 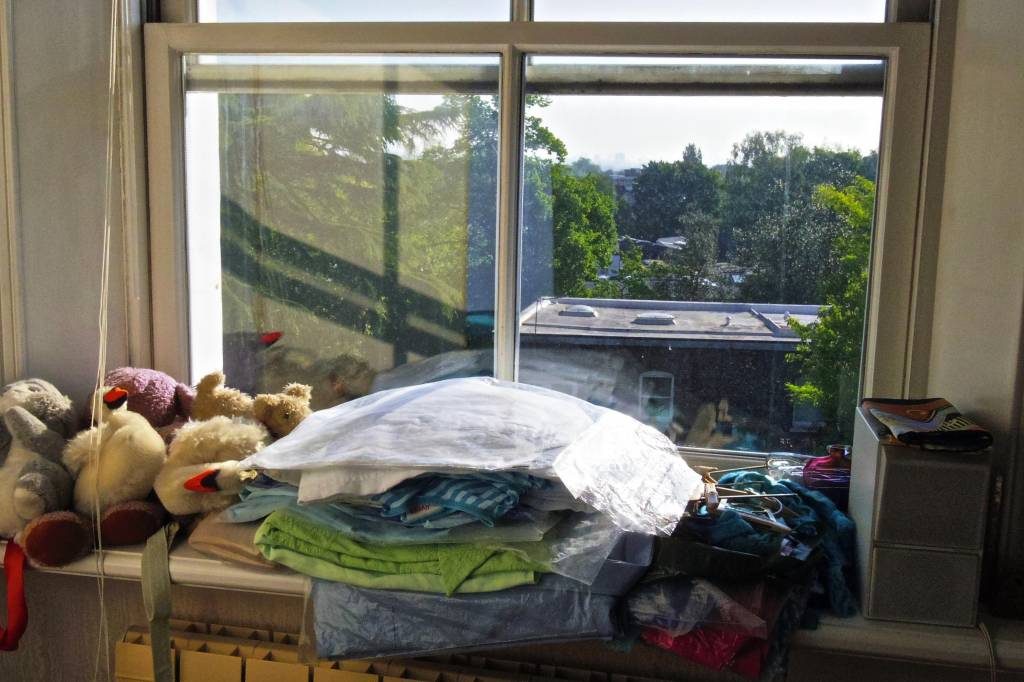
Pic 22 – Pentax Q-S1, Pentax 01 8.5mm f/1.9 at f8, 1/2000th “1/1.7-inch teeny sensor” (see diagram below) 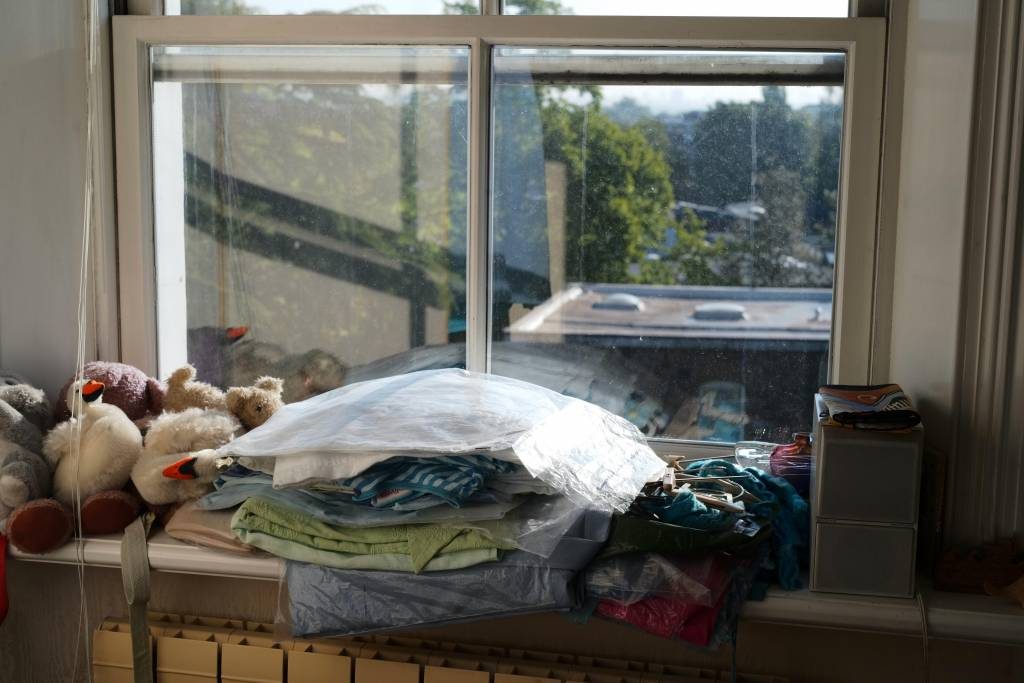
Pic 23 – Leica M10-P, Leica 50mm APO f/2 at f11, 1/1000th “full frame”
See much difference between them? The colour’s slightly “warmer” on the “Daylight” film, and the darker areas of the window-frame surround are darker than on the other photos because film is less responsive to dimmer light than is digital.
The digital photos, all on ‘Auto’ white balance, give a less “warm”, more neutral, result.
There’s a teeny bit more detail on the top of the plastic sheet in the film photo than in the digital photos. A very teeny bit, but nothing that you couldn’t get by under-exposing the digital shots by less than minus one third of a stop. The film photo is a little darker, with a little less detail, in the shadows. Er, that’s it.
Two of the cameras have a sensor that’s one quarter the size of most of the others – is that in any way visible? – and one of the cameras has a sensor that’s about a twentieth the size of the “full-frame” cameras. Is that noticeable in any way? Apart from the smaller the sensor, the sharper the skylights look on that distant roof.
HDR merging
Of course, Michael Reichmann’s 2003 suggestion to ETTR was made two years before Photoshop introduced HDR (High Dynamic Range) merging, which allows separate ‘bracketed’ photos – shots at different exposures – to be fused into one, thus providing extra detail in the shadows (from added over-exposed shots), and extra detail in the highlights (from under-exposed shots) all blended together. Traditional film photographers, though, have ‘dodged’ and ‘burned’ since the first age of negative/positive printing, to increase the dynamic range of their photos when transferred onto positive paper. So HDR is nothing new.
Things persist on the internet; articles written years ago can appear to be brand new. For instance, look at Thorsten’s 5-page paean to the Leica Digilux 2, begun in 2004.
Although old ideas can persist, that doesn’t mean that they’re still relevant. ETTR was a good idea in 2003. But that’s now sixteen years ago.
Here’s the crunch – and we’ve been a long time getting to it – how do over-exposed film and over-exposed digital shots compare in real life?
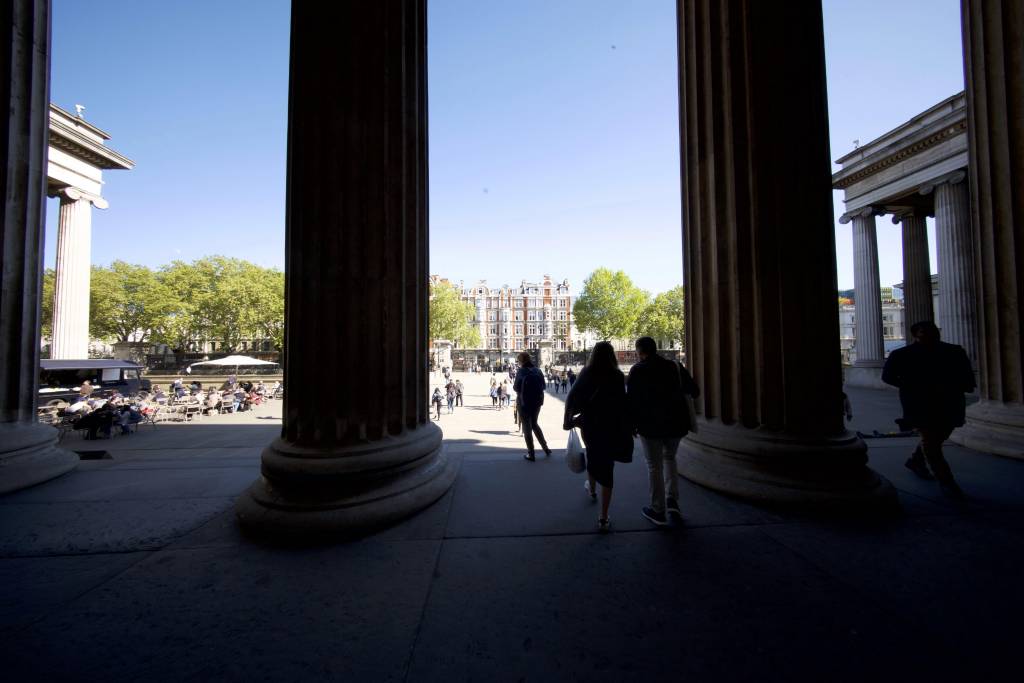
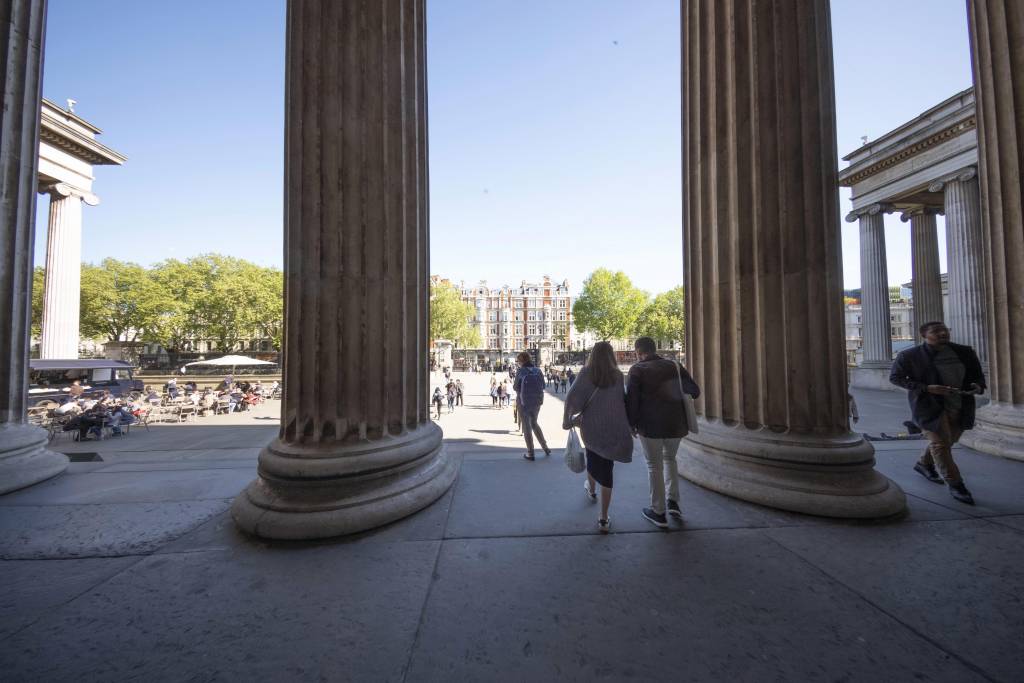
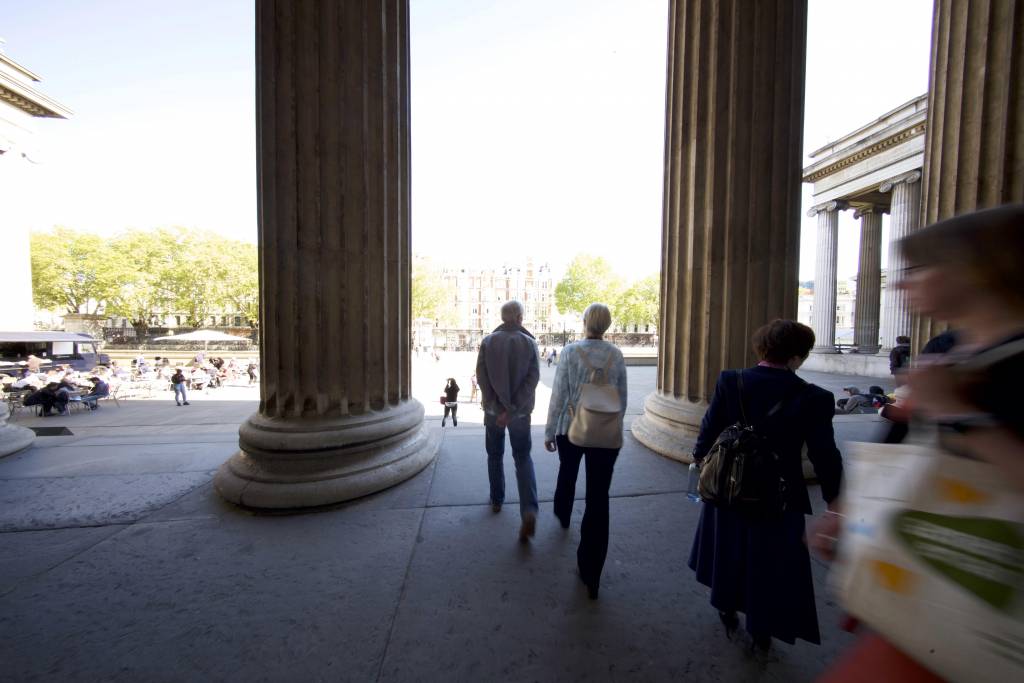
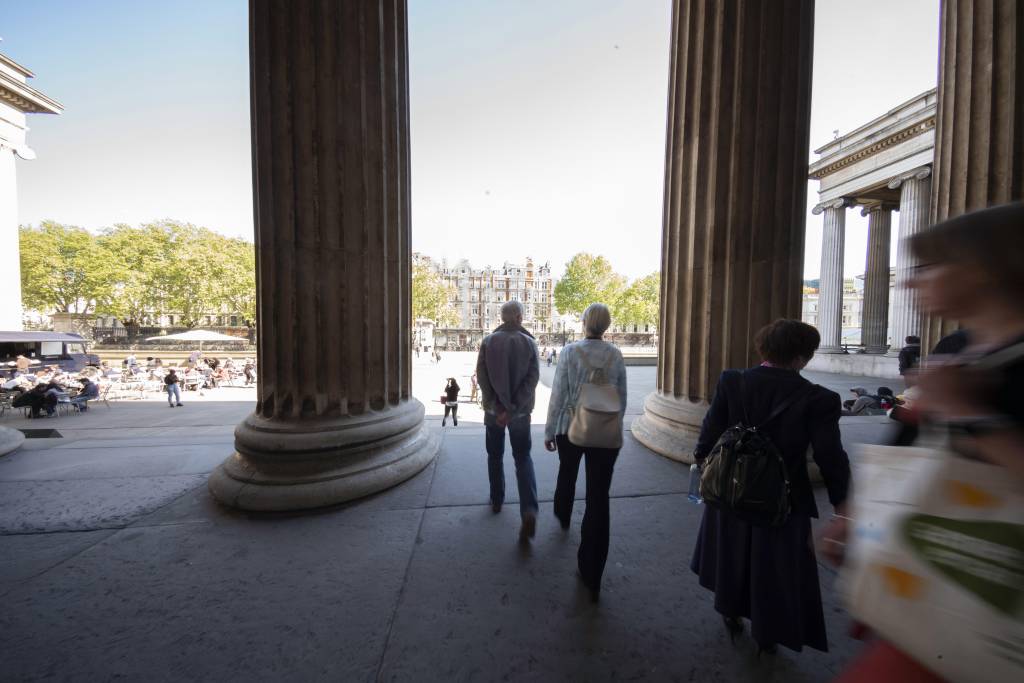
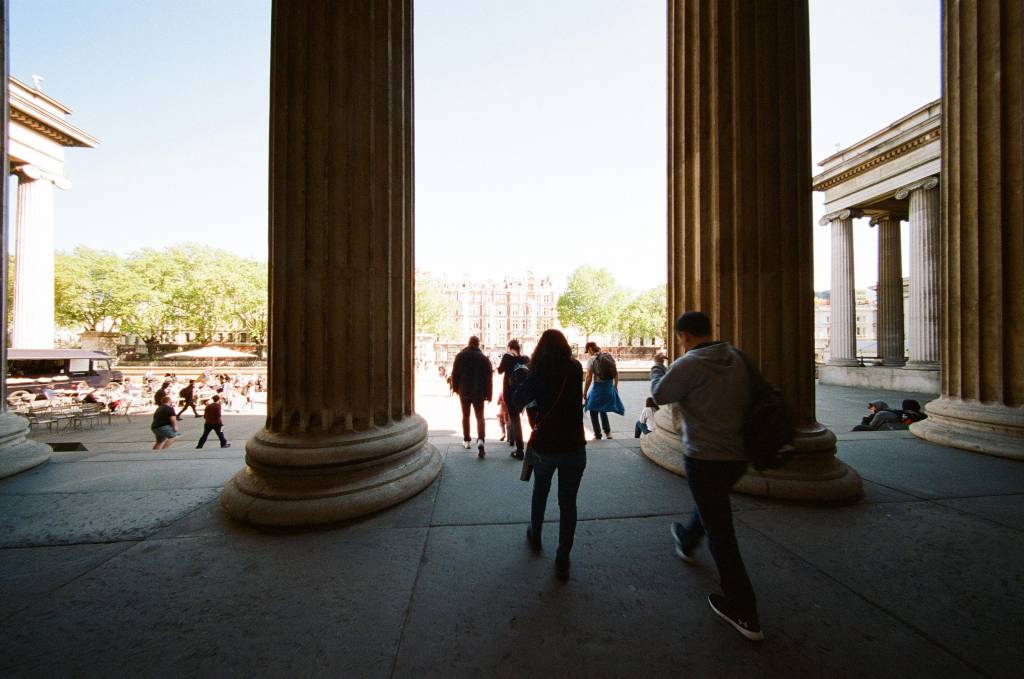
First stop was (the very first photos, above) the Great Court of London’s British Museum. Norman Foster, the architect, created a webbed roof over the courtyard so that it is now an enclosed space where you can buy a cup of tea and a bun. (I’d shot for the stonework and the roof lattice, to see what happens in that bright and over-exposed spot where the sun drills in.)
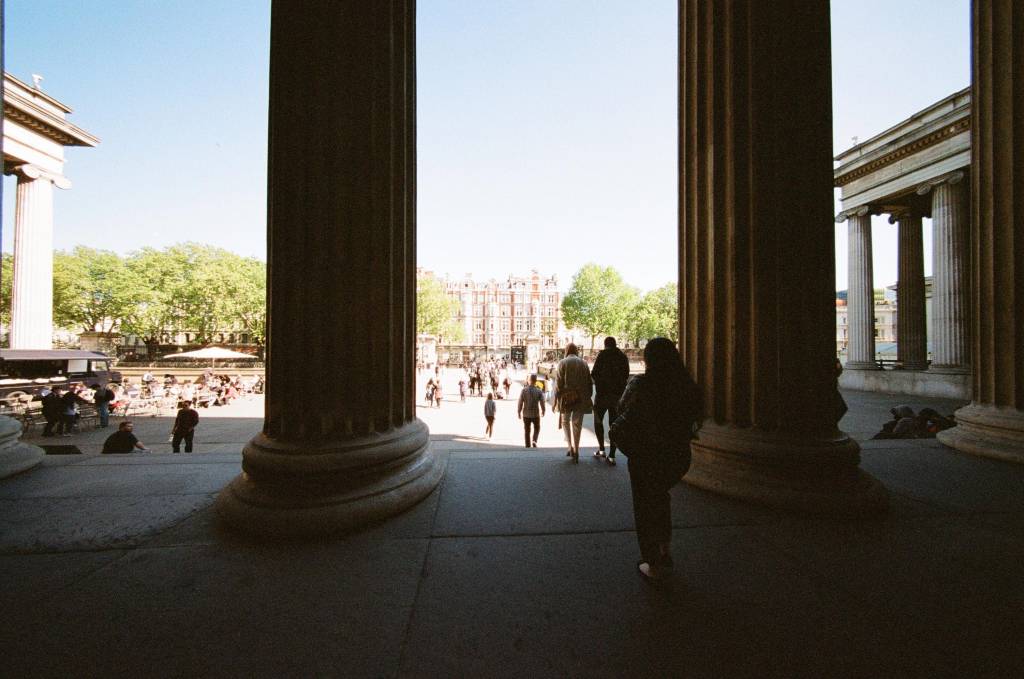
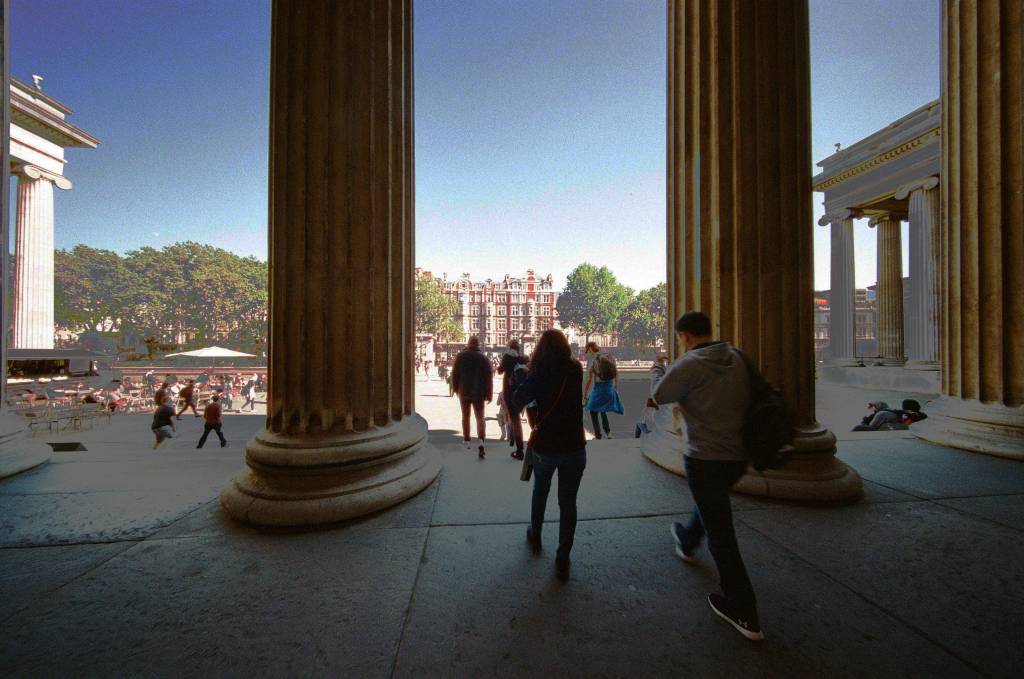
But now let’s go outside to the front portico:
In summary..
I used to write for ‘Practical Photography’ magazine — not ‘Theoretical Photography’ nor ‘Imaginary Photography’. And in all practical ways I really don’t think that Expose To The Right makes much difference, or much sense, in 2019.
In 1968, my advice to myself was always “keep the starting handle under the seat” because the battery of my 1947 Ford Popular (or was it a Prefect?) wasn’t reliable. So I always used to park on a hill, if poss. Does that advice make sense in 2019? No. No current cars, nor even twenty-one-year-old cars, have a hole in the front for a starting handle. So a handle would be useless. It’s no longer appropriate.
Similarly, taking the trouble to ‘ETTR’ doesn’t make sense, to me, in the face of the extraordinarily good and reliable auto-exposure modes of every current digital camera. I usually choose my shutter speed and aperture, and then just ‘ride’ the ISO, letting the camera, any camera, adjust its own sensitivity to match the brightness of whatever I’m pointing at. I do, though, manually adjust the +/- over- and under-exposure dial to give me roughly what I want of any particular photo (for example, minus 1.7 for sunsets).
Current cameras are good enough to reliably choose the right exposure for themselves, no matter that negative film may have a bit more tolerance of overexposure. But few digital cameras generally overexpose anyway.
Current digital cameras produce photos with hugely recoverable detail, both in shadows, as has generally been the case with digital, but also reasonably well in highlights. And the ‘spread’ of detail, in both highlights and shadows is generally better than that of current negative film.
It’s no longer 2003.
What can we take away from all this?
People right at the top of the company which they’ve founded, or taken over (Dr Kaufmann at Leica, the late Akio Morita of Sony, the late Steve Jobs of Apple) generally respond enthusiastically to requests for info and technical details – as Bob Shanebrook, who was in charge of Kodak film products, has done here. Incidentally, Stefan Daniel of Leica couldn’t be bothered replying to my queries and Rob Macneice of Nikon couldn’t get anyone at head office in Japan to explain how the company configures the light response of their products.
It makes little difference which camera you use – unless you want one which is especially good in low light, like a Sony A7S for instance – because just about any current camera will respond well to both light and shade and will give well-exposed photos, with plenty of retrievable detail in dark areas. (See the results above, for instance, from the tiny interchangeable-lens Pentax Q-S1 which has only a minuscule 1/1.7” sensor.)
I choose cameras in order to use a particular lens, not vice versa – because, as we’ve seen, it often makes very little difference to the results which camera you use.
Negative (black-&-white or colour) film has
Don’t obsess over very slight differences between film and digital. There are advantages to each. Digital is better with shadow (low-light) detail, and negative film is (only very slightly) better with highlights. But pretty much any difference between them is invisible on a limited-tonal-range computer screen anyway and may show up only on well-printed actual physical, tactile, stick-on-the-wall continuous-tone photographic paper prints. And that may depend anyway on who’s printed them, and on which paper, and whether they’re ink or photo-chemistry prints.
Finally, and essentially, instead of ETTR, I’d say DOBH — Don’t Obsess, Be Happy!
Hmm ..having spent so many years with film (..36, then swap rolls..) I s’pose I’m more frugal with shots, and so a few hundred at a wedding – 200 maybe at most – is more of my figure.
But I’d go overboard with video and might use four cameras running simultaneously (for long shots, close-ups, medium shots, one travelling camera) and then have a really big editing job afterwards to blend it all together! ..That’d certainly be the equivalent of shooting 1000 photos and then sorting through them all ..except that, for video, you also have to edit the sound (..I’ve usually run a separate ‘wild-track’ audio recorder to capture overall ambient sound to enhance that ‘blend’..) so the editing job gets even bigger!
1000 to 1300 shots per wedding! ..It must be a bigger job to edit than to shoot it!
Hi David
I don’t do video at all, and I don’t necessarily shoot that many – but this had quite a number of different scenes – 6 in all (getting ready / ceremony / lunch & speeches / bride & groom / group shots / evening party & speeches) each was at a different venue – 200 shots would be a roll at each. . . .
On the other hand I have a completely new workflow – like most of us I used to import the whole lot onto a computer and then sort laboriously through them. These days I use an iPad Pro first – doing each section completely before starting the next (even if they’re on the same card). But I don’t import them all – I go through them one by one in Photos and only tick the ones that look good – So, perhaps, out of 200 shots of the ceremony I would only import 30 – the rest will never see the light of day (and never clutter up my hard drive either). The fact that one might be deleting lots of good photos really doesn’t matter if those are duplicates of other good photos. I find it much harder to be brutal when it comes to marking things for rejection.
In this case only 400 images arrived on my hard drive after pushing up to Adobe Cloud. So, that’s only 400 shots to edit, but they’re all pretty good!
Best
Jono
Ah ..now we’re getting towards the same territory!
Cheers, D.
Another weekend, another wedding! (Really unusual, 2 a year is the average). This was another long one set in great surroundings. Shot with the SL and the M10, lots of catastrophe shots (and some good ones) . . But once again, nothing that was spoiled by bad exposure.
“..lots of catastrophe shots..” ..oh, no! (Father-in-law wearing the bride’s hat?)
“..(and some good ones)..” ..well, I’d hope so: that’s why they booked you!
But I couldn’t lug around an SL or S1 (and those huge lenses) all day. For weddings I use an autofocus full-frame Sony A7S (..superb quality in ANY light, small and lightweight, SILENT shutter – but, of course, I choose where the focus will be! ..single central focus point and then adjust framing) and / or an Olympus PEN-F (..small and light; lightweight, very small zoom lenses, SILENT shutter at any auto-ISO setting, which the similar E-M1 cameras can’t do.)
If needed, I put a Canon 85mm f1.2 gorgeous-background-blur lens on the A7S (with a Canon-to-Sony adaptor. The new Canon R, though, is very good, takes the 85mm f1.2 with a Canon EOS-to-R adaptor, giving more accurate autofocus with that lens that way than any of the ‘proper’ EOS cameras ever did.)
And “..nothing that was spoiled by bad exposure..” ..I’m sure of that!
P.S: Yes, I forgot to say; I’d normally shoot slightly under-exposed with the Df, too: look at that set of six “windowsill” photos, above ..the Df has definitely exposed brighter than some others ..at the same aperture, ISO, and shutter-speed settings.
(Oh, that comment, just above, was meant for Dave Seargeant, not you Jono!)
Hi David,
A very interesting look at exposure. I read widely when I was trying to learn how this all works, and found the Understanding Exposure book by Bryan Peterson as a brilliant guide to learning the basics and giving people the confidence to slip the camera (digital or film) in to full manual mode and go it alone. Helped me immensely.
I always set my Df to underexpose by about two thirds of stop, as this seems to give me best results by protecting the highlights, and the shadows have plenty of shadow recovery in the raw files. Whereas I find my Leica X doesn’t need any compensation to be in the sweet spot in most circumstances.
As for Jono’s wedding shot number, yep 1300 not a bad number for a twelve hour plus gig. I used to say as a rule of thumb on a full day, about 1000 shots minimum, with a publishable yield somewhere between 200 and 300. I also used to use two camera’s, and try to have a second photographer on hand – on these occasions having eye watering numbers of images can mean a little longer in the selection. I then would post process up to about 90% using a standard process for all images, and then the 10% where your money shots which I would do much more work on. My D300s use to almost smoke after a 12 hours gig, I loved it, but hated the risk and responsibility, and used to spend time backing up to my Mac during slack times in the day.
Dave
I used to ETTR a few years ago for awhile and when I processed the images and compared to auto exposure I found no practical difference especially when printed. All ETTR did was take the joy out of capturing moments while obsessing over exposure. I did skip your article yesterday as I thought it was just another ETTR article that would annoy me and waste my time reading. However, I was delighted to see someone post a PRACTICAL photography article. I do not shoot film any more but it was interesting to read a competent comparison. I see so much misinformation on the internet that people make buying decisions on. I have dramatically reduced the blogs I read as it is a waste of time. This is one of about 5 blogs I read and this is the first one I check.
Thanks for a great article that required a lot of work to do!
.
My pleasure, Brian ..and so glad that you found it a worthwhile read.
– D.
I’ve left you a reply, Per, but it may take a while to appear, as it has links in it ..so needs Mike’s approval! (Now sorted, I see….)
.
“..(Now sorted, I see….)” ..? ..?
Excellent! As an owner of the notoriously highlight-blowing-prone first Leica Monochrom, I´ve avoided the ETTR concept out of necessity, and have done so for years, even with colour cameras. And, some time ago, I found support on Adam Marelli´s excellent website: http://amworkshops.com/tips-techniques/expose-to-the-left/
Well worth reading, as is the rest of his contents.
Well Per – as my original reply to you seems to have got lost – here’s a brief re-cap (..as far as I can remember it..)
That shot at the top of Adam Marelli’s website (I won’t put a link to it, as that seems to have put my first reply into limbo) ..it looks like one of Gene Smith’s photos of the Country Doctor. But is that really what his photo looks (or looked) like?
Here’s exactly the same photo on Magnum’s website at tinyurl.com/y9kzc3cl (..if you copy and paste that, it should take you to Magnum’s site..) but look how much darker and denser that same photo is there.
So which is the ‘real’ or ‘proper’ version? Adam Marelli’s or Magnum’s?
Marelli’s “flat” version, with all the content in the centre of his histogram, is quite different from Magnum’s. And I think Marelli doesn’t mention the point that a working photographer, like Smith, has to think of the final presentation ..of how the photo is going to be used. Smith’s photos were shot for ‘Life’ magazine. If you’re shooting for photos to be printed with ink-on-paper half-tone dots, then that will boost the contrast; blacks will look blacker and whites will look whiter, so you want to shoot at lower contrast with no bright highlights – like the example on Morelli’s website. But photo-gravure printing gives a lower-contrast result, so you’d want to shoot, or make a print, with more contrast and brighter highlights.
So I think it’s a bit disingenuous of Marelli to show that “flat” version of the photo, without reference to how it was going to be eventually used in the ink-on-paper magazine.
That’s the trouble with using other people’s photos for one’s own article, I think, without giving any background info nor explaining the intention for the final use of the photo: chemical printing onto paper to hang in a frame on a wall? ..ink-on-paper half-tone magazine printing? ..use on TV? ..use on a website?
I took the photos – for this article on Mike’s website – with the clear intention to show how these pictures will appear on a computer (or phone, or iPad) screen.
Many photographers – think Ansel Adams – have printed their photographs differently over the years – with greater or lesser highlights and shadows – as their ideas for their own photos have gradually changed.
And, of course, some photographers have intentionally shot “high-key”, way over to the right, to completely white-out their highlights.
It’s just a photographer’s choice. I’m thinking of, say, Erwin Blumenfeld. (You can find an assortment of his at, for instance, Jane Gorley’s selection here: tinyurl.com/gorley ..you may have to copy and paste that address into your web browser, oh and I think she calls him Blumenthal by mistake!)
Horses for courses ..you choose the final result which you want, or final purpose ..and then shoot how you wish.
There is no right or wrong ..but really only knowledge – or lack of it – of how to get the result which you want!
David, thank you for your very comprehensive answer to my small remark…. As for your blog entry re Marelli´s text, there can be no doubt about that your treatise goes much more in-depth, and your illustrations are indeed created just to illuminate (no pun intended..) your conclusions. I do not think that AM aspired to the same level of thoroughness, nor was my reference meant to imply such a thing. I´d say, AM gives some pieces of advice for a budding photographer, while you prove that it is indeed good advice…
As for Eugene Smith´s image, there can be little doubt that the Magnum version is more true to Smith´s intentions. His images are quite dramatic, almost painterly (the wake image in Spanish Village, or the Guardia Civil from the same set are good examples; I do not dare to put links in, since you´ve having troubles with them, but the images are easily found on Magnum´s site). Also, he was notorious for his perfectionism in the darkroom, and for his insistence that his work should be presented the way he wanted. So it is unlikely he would be happy with the version on AM:s site.
But, I don´t think that was AM:s main consideration here. I think he just wants to show an audience of not very experienced photographers the same thing that you do: don´t worry about things like ETTR when the mood of the image and your expression is more important. In short, DOBH!
.
I’ll drink to that ..DOBH!
Hi David
When I started I dreaded reading another peon to ETTR, something which seems to me to have ruined more digital photos than any other concept. The only point at which I disagree with you is that I don’t think it was right in 2003 either!
I’ve never much minded a bit of noise, and even way back then you could drag details out of the shadows, but once it’s blown . . . it’s blown! So I’ve always used auto exposure (sometimes spot) and the simple rule was never to allow anything to blow out (like you I use exposure compensation to do that).
After all – even if cameras can do 10-12 or even 14 stops of DR these days, most people crush the life out of that in post processing (that much dr usually looks ‘flat’).
Even today reviewers obsess about noise and low light, it took over a year to establish that the M10 wasn’t that good with blown highlights at 50 ISO (and none of the reviewers mentioned it).
So, Hooray to you! and lets all DOBH – as a rider, I just shot 1300 shots at a wedding over the weekend, and not a single one of them was unusable because of incorrect exposure . . not one!
All the best
Hi Jonathan,
When I started I dreaded reading a slap-down from Jonathan Slack ..but I’m astonished to find that we both work along similar lines! (I don’t do so many ‘landscapey’ photos as you, though.)
“..I just shot 1300 shots at a wedding over the weekend, and not a single one of them was unusable because of incorrect exposure . . not one!..” ..I believe it! (..B-b-but 1300 shots?!)
“..I’ve never much minded a bit of noise..” ..nor I. And I can’t bear “perfect and complete dynamic range” photos, which don’t look like anything I’ve seen with my own pair of eyes (..thinking of Ming’s photos here).
I’m sorry that there’s not much detail visible in those three-of-a-kind and six-of-a-kind photo groups above ..I’d thought that clicking on each of them would take everyone to a full-size photo to examine – it did in the rough ‘proof’ version which Mike sent me – so I’m afraid that you’ve got to just imagine(!) [silly idea] what the full size pictures look like (..or just take my word for it..) as described in the captions. (Perhaps Mike will link them to full size versions later, when he’s back from Bièvres.)
One caption, though, is wrong: Pic 20 was taken with an Olympus E-M1, not the PEN-F ..but there’s no visible difference between the results anyway, so don’t worry. DOBH.
Many thanks for your delight, and ..as in ‘Casablanca’.. “I think this is [maybe] the beginning of a beautiful friendship”.
David, sorry if the photos aren’t expanding. I need to check this on the computer and i have only an iPhone with me. Back tomorrow and I will check.
Many thanks for fixing the first of those Mike ..any chance that the six ‘windowsill’ pics can also expand to full size?
Thanks again for fixing it!
All done, David, but please check. I’ve also moved some of the diagrams into floating images with text flowing. I think it looks better. But all images are now clickable for enlargement. My fault, I didn’t check before publishing.
Many thanks, Mike ..perfect! It all jumps right out at you!
(Er, could you ‘moderate’ my reply to Per, below ..the one with a couple of links in it ..just in case it’s been overlooked? Many thanks – again!)
Well . . . “(..B-b-but 1300 shots?!)”
If you start at 7am (getting ready) and you finish at midnight . . Then that’s 1.3 pictures per minute (hardly excessive). It was a great wedding (nice venues, pretty people, well organised) so there were lots of opportunities – I was the official photographer though – there seem to be about 400 shots in the first cut, and probably about 200 in the book in the end . . . . The groups were such fun – in the theatre in the Rosemary Branch pub in East London.
I have this idea to start a website called ‘Heresies’ with diatribes against tripods, Flash, HDR, ETTR, ‘slowing down to think about it’, Film, Bracketing, Focus stacking. . . Well, I could go on and on 🙂 but basically you nailed it DOBH!
All the best
Jono Slack
.
I’d subscribe to that!