
For many photographers the tripod is an after thought: you tend to buy what’s affordable and consider the implications later. However, if you shoot in inhospitable weather or shoot long exposures in fading light, this can lead to potential failure. This review is a journey in search of a confidence-inspiring tripod setup. The first part covers the Kingjoy C86 tripod itself, and the second part the Leofoto G4 Pro head. It’s then wrapped up by my experience and my level of confidence in using this combo.
The confidence to shoot in all conditions
I’ve been using my Velbon carbon fibre tripod and Uniqball head for so many years I can’t even remember buying them. This combination has served me very well, including doing seriously heavy duty for the night photography in my Skye At Night book. It’s fairly lightweight and decently sturdy.
I’ve always put up with the fact that it isn’t tall enough, and I resigned myself to crouching down to look through the viewfinder. And the inevitable flex you often get with a ball head, where it is difficult to easily carry out fine adjustments, especially one-handed. I’ve always coveted a “proper” tripod and head setup, so I decided it was time to upgrade, especially as I am working on a long exposure series at the moment.
The Kingjoy C86 Tripod
There are so many tripods out there these days, and that makes it really difficult to decide what to buy. This is especially the case if you are buying online. I always want to try before I buy when it comes to tripods, which can be tricky on the Isle of Skye.
Conveniently, I was on a photography outing with my friend Paddy and noticed he had a rather nice tripod. It was by a make I’d never come across, “Kingjoy”. The quality looked top-notch, which made it even stranger that I hadn’t heard of the maker before. He said that well-known Skye photographer Marcus McAdam offered them through his Skye Photo Academy business, so it could be possible for me to see some of the range before handing over my hard-earned cash.
After a few emails to Marcus, we arranged a dodgy-looking meeting in a supermarket car park. Marcus had done a proper job and brought five different tripods for me to look at, which was good of him.
The most important considerations for me were
- how tall the tripod would extend to
- the solidity when fully extended
- build quality and robustness
- as light as possible given the above requirements
Making a confident choice
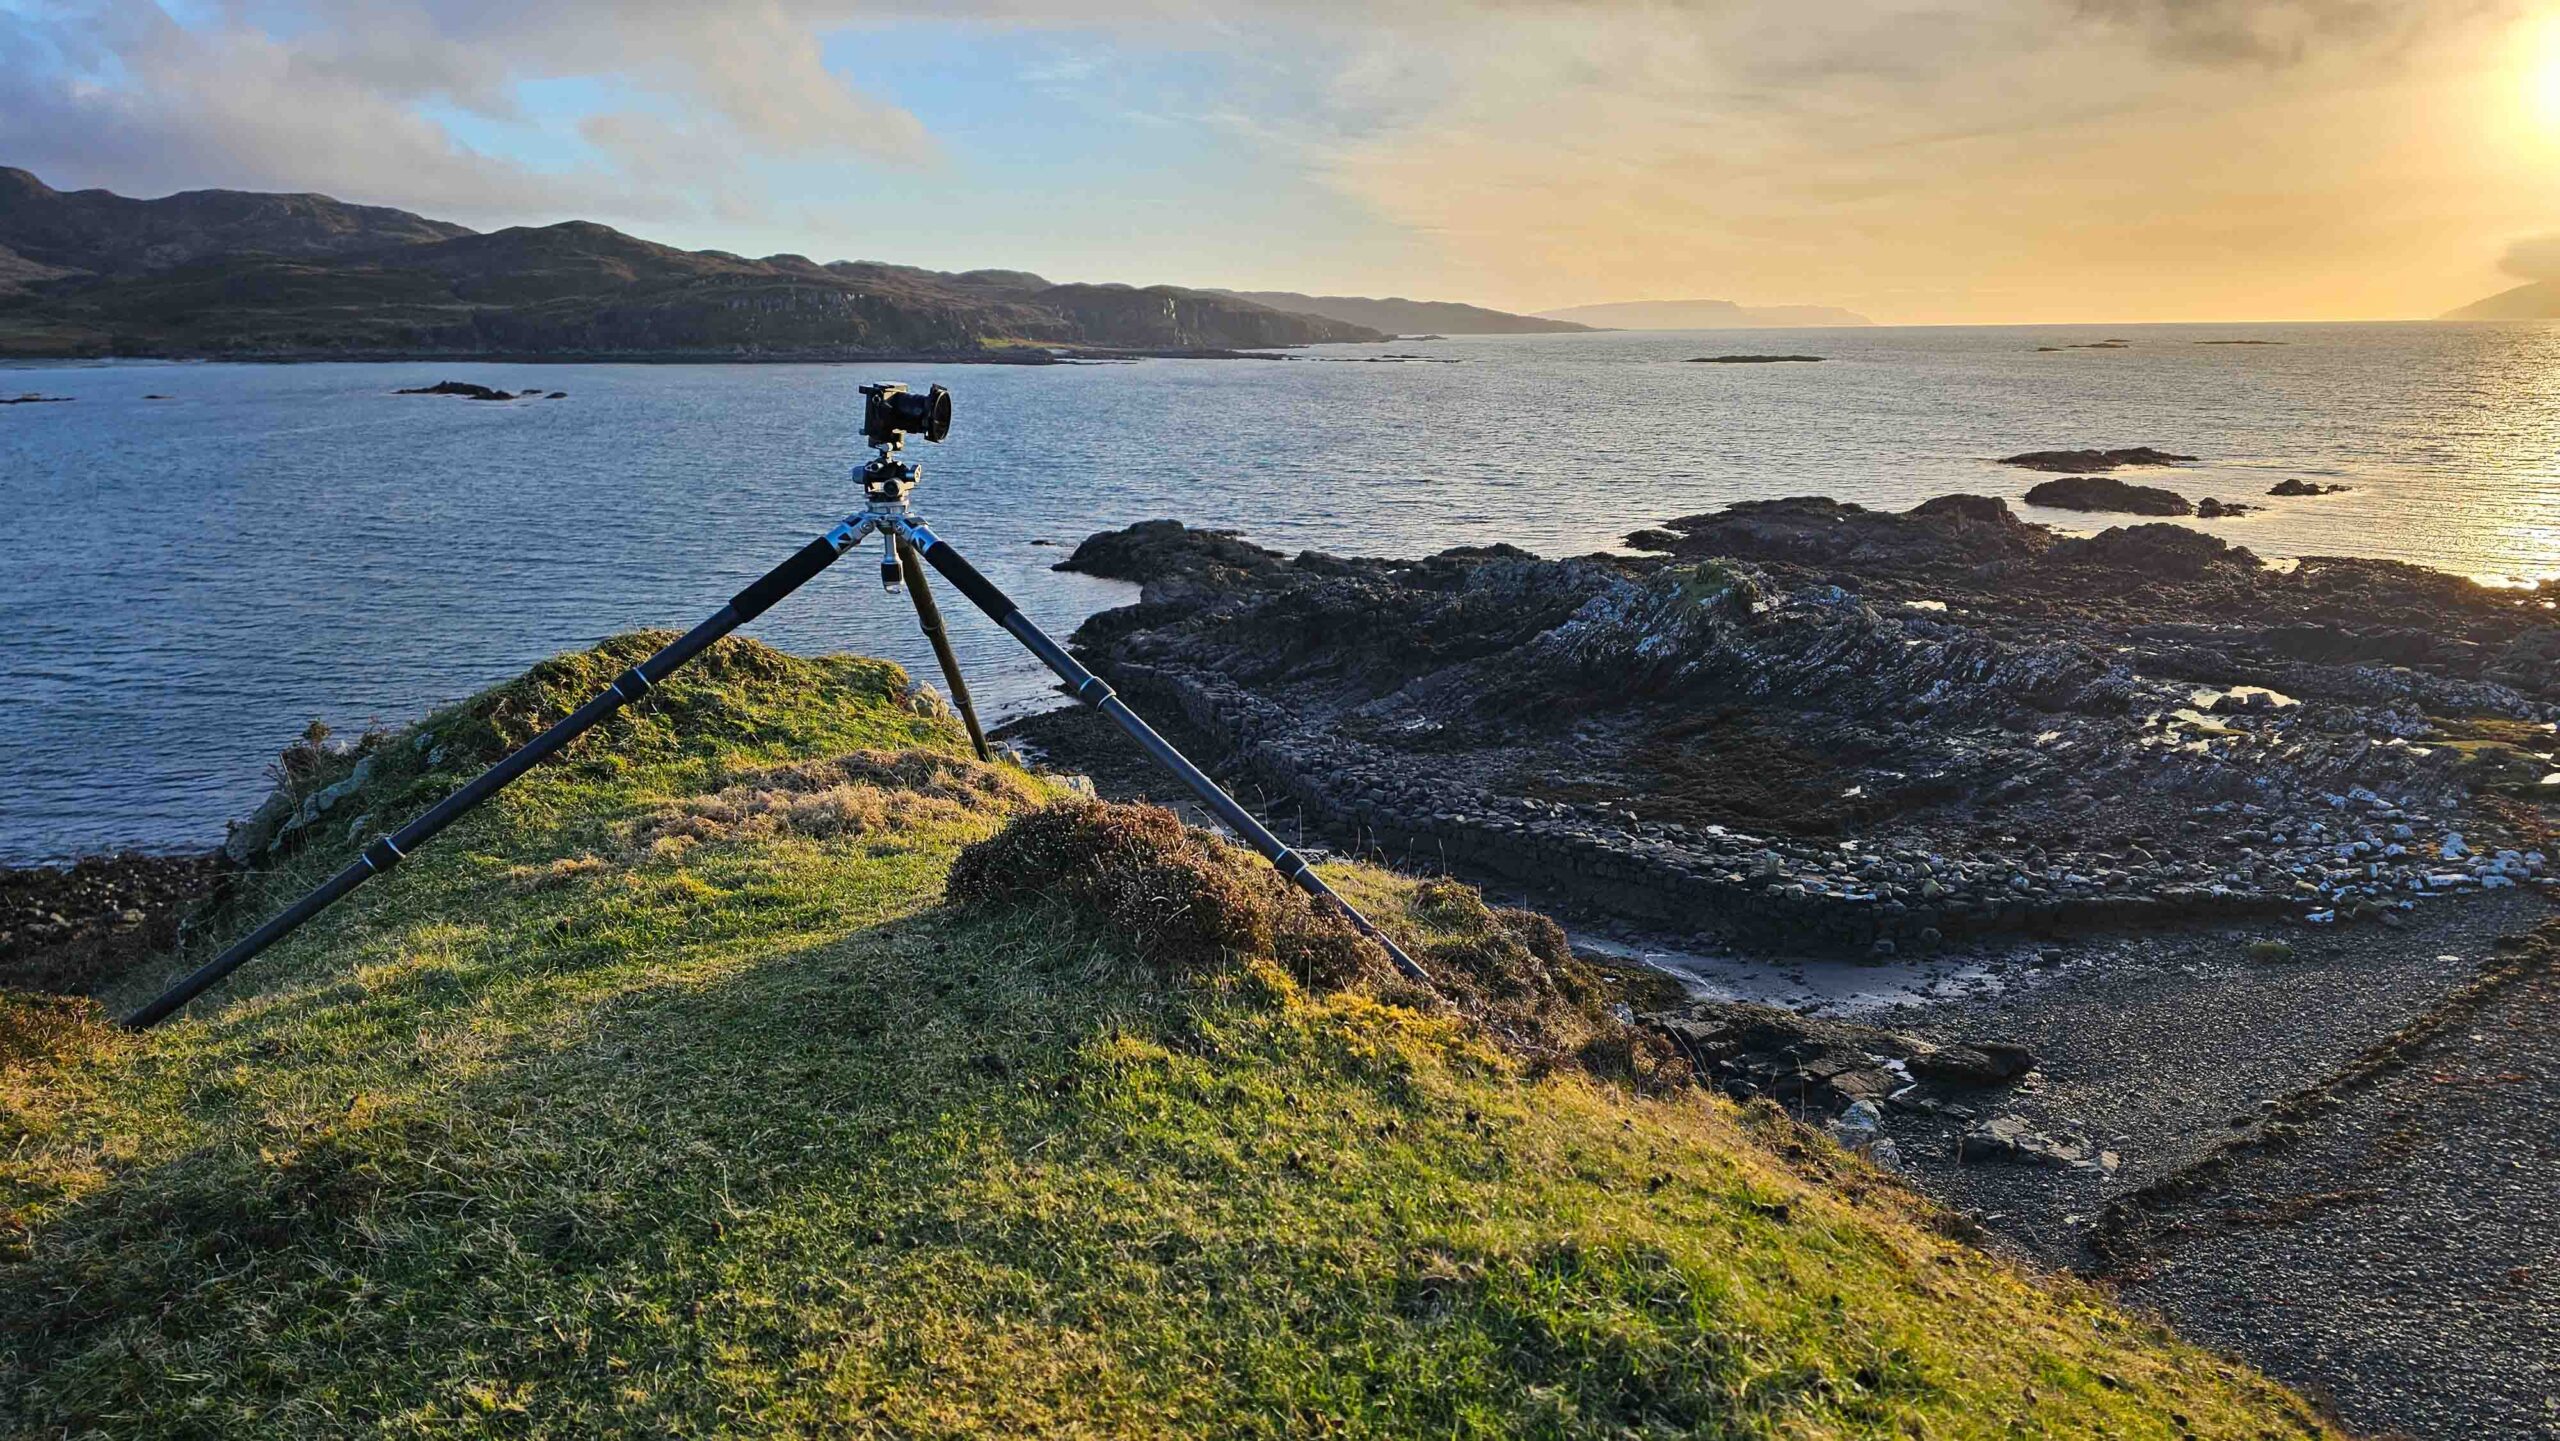
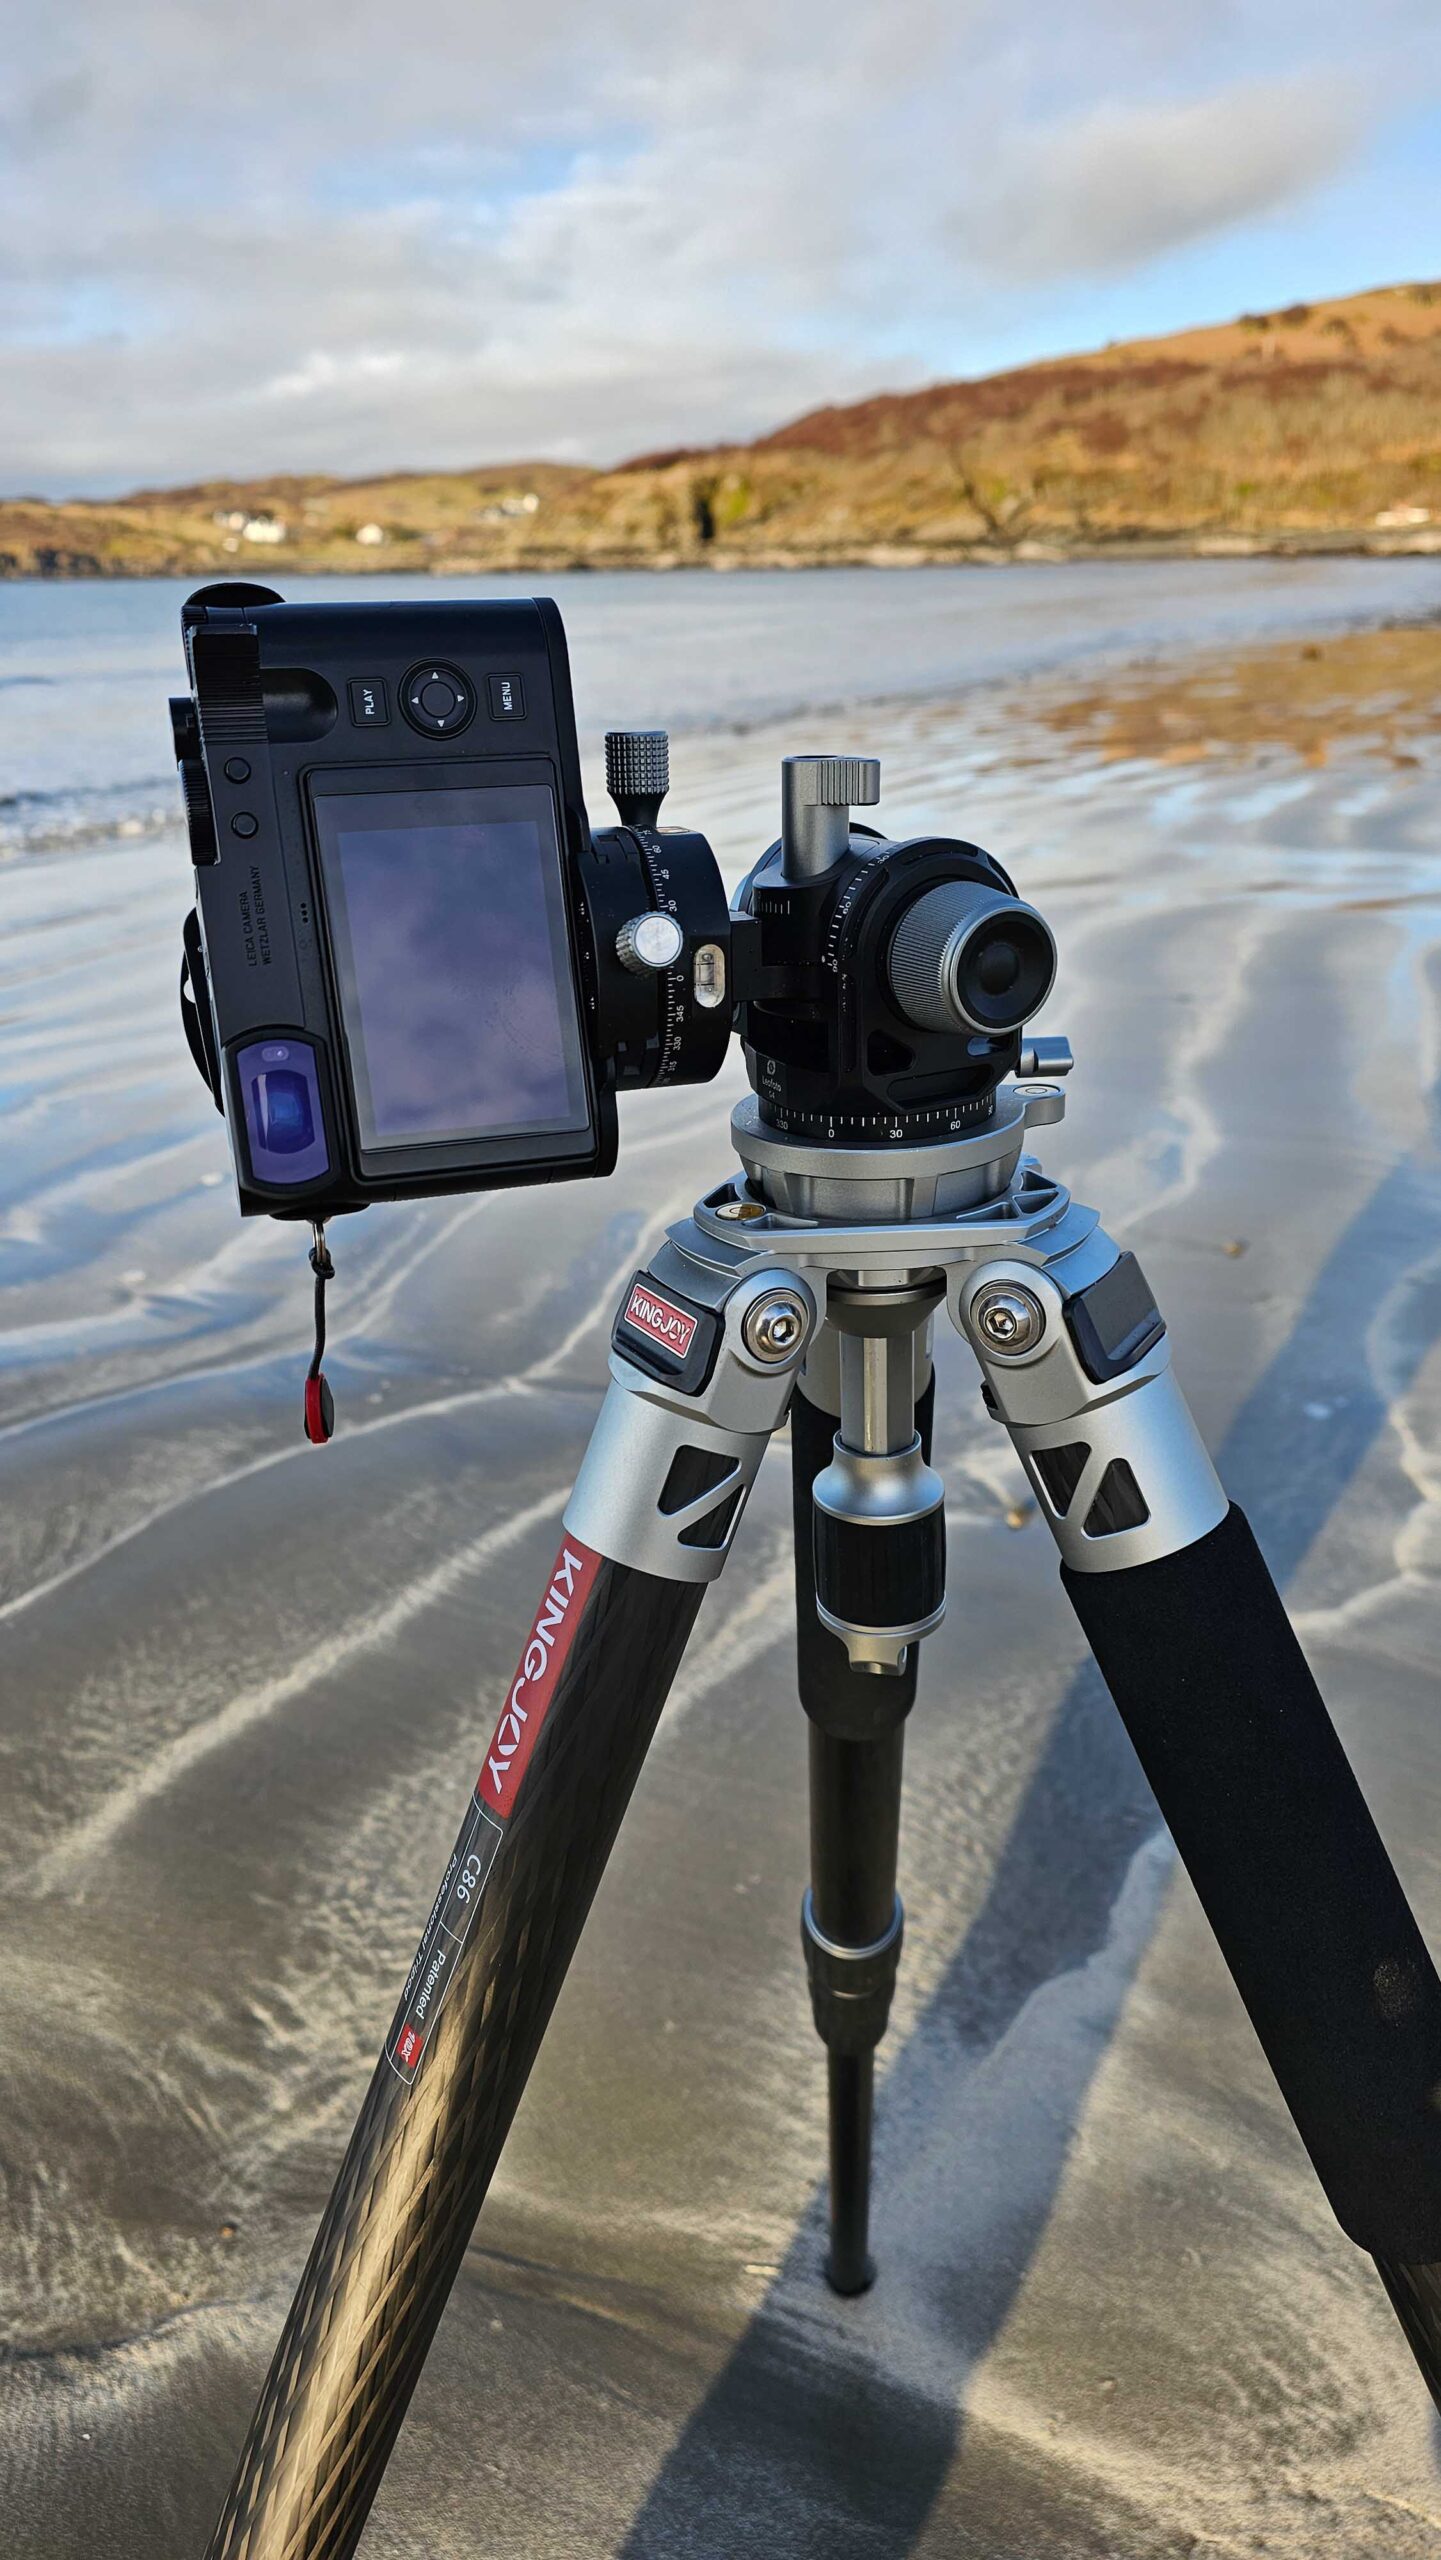
After much playing about with this very impressive gear, I settled on the Kingjoy C86. For some reason, this model isn’t even on the UK Kingjoy website, but you can see it on Marcus’s website and on the Kingjoy USA website. This is a 2.6kg carbon fibre tripod with an inbuilt levelling base and four-section legs. Happily, it extends to 199cm to the top of the levelling base without a head (including 4cm for spiked feet).
But the leg length isn’t the right measurement. What we all need is the height when the legs are splayed at the normal angle. This is 182cm to the top of the levelling base. With the head on and the spikes installed, the camera mounting plate is 194cm off the ground. Compacted it is 79cm long with the head, 68cm without.
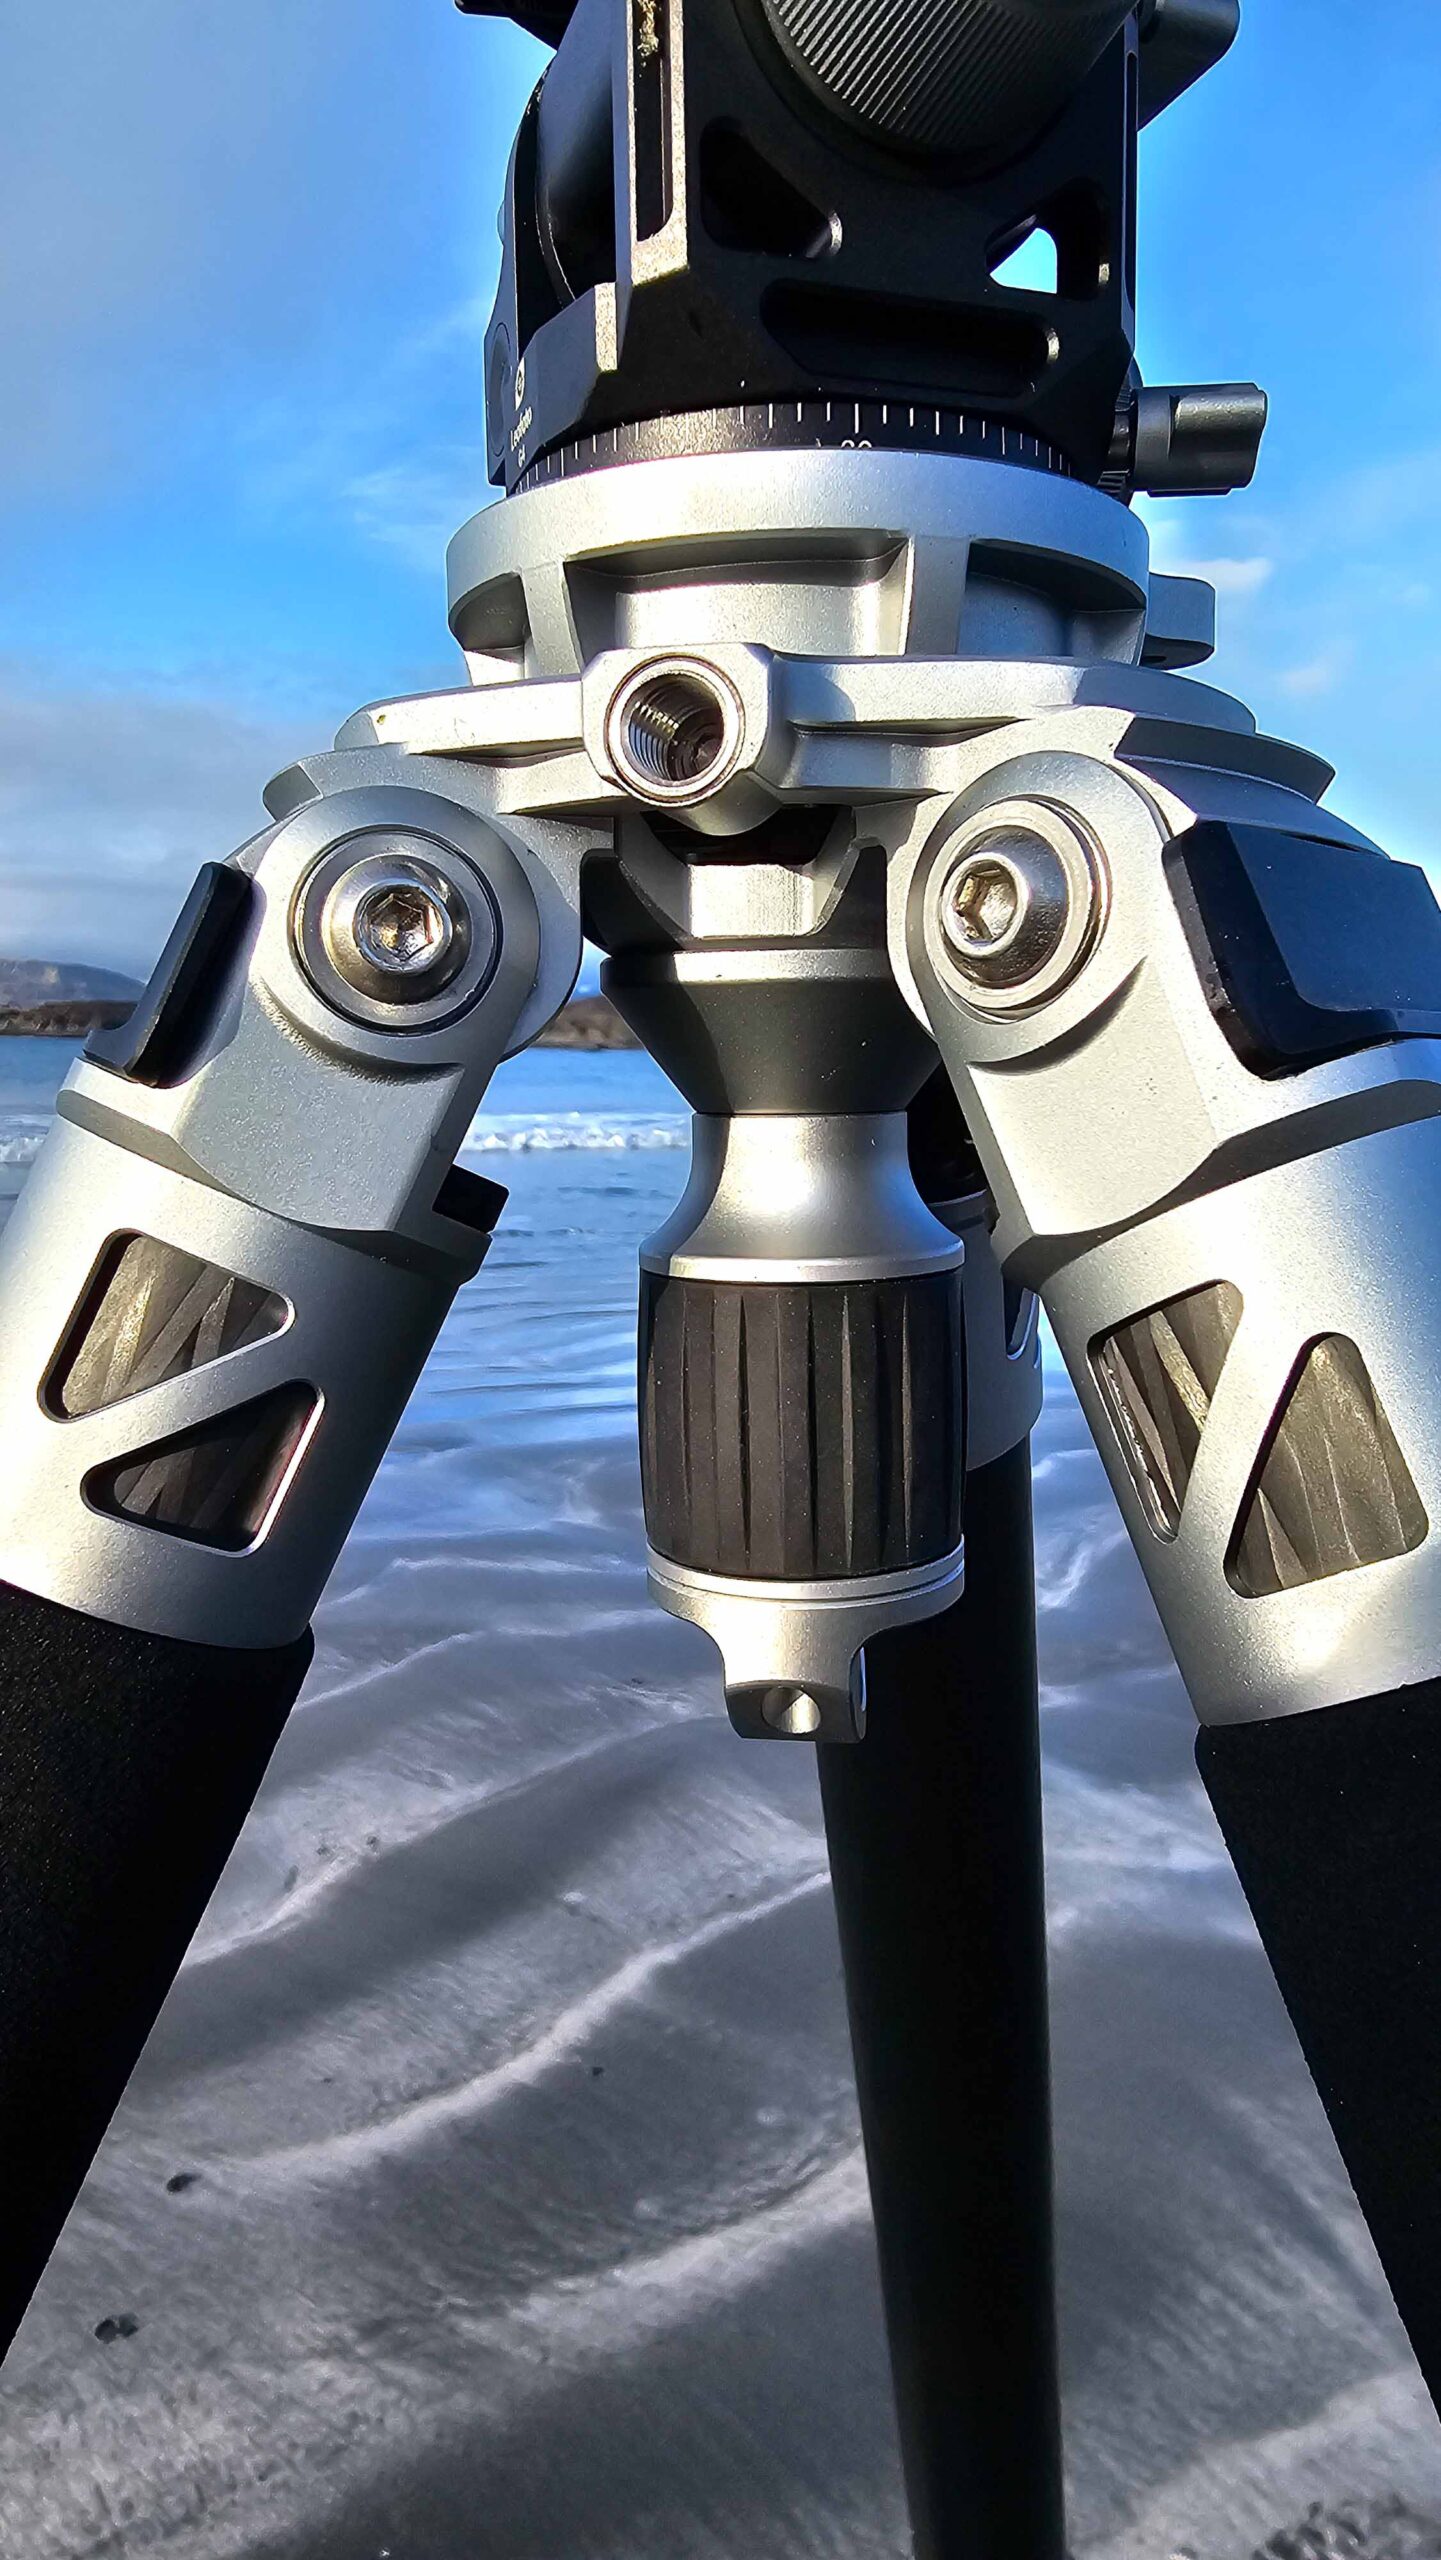
Inspired by mountain bike frame construction
The carbon fibre tubes are beautifully woven, and are embedded into very attractive cut-out aluminium joints. It’s like the latest top-of-the-line mountain bike frames which are made similarly. The leg joints are smooth and solid, and give you confidence with no side-to-side flex whatsoever.

I have used lever-style leg releases on my tripods for ages. My thinking has been that levers are easier to use with gloves on, and you can unlock and relock all the levers on one leg in a single movement. This was the first time I have had one with twist-lock legs.
Having to twist every joint on every leg is a drag by comparison. However, when the twist-locks are as nice as these, it is a lot easier than I expected. They are smooth and refined, like the rest of the tripod. I can untwist all three locks on one leg in one go, but usually, I just need the lower two extended.
Creating a solid base
Since the Kingjoy C86 is a tall tripod, the easiest approach is to release the lower leg sections first as, once the legs are out, it’s challenging to reach the lower twist-locks. With planning, it’s fairly easy to unlock all the leg sections you require while the legs are still gathered together, which is quicker than when the legs are spread out. The leg angle has three positions, allowing you to get a much more solid base for windy conditions, which is very useful on Skye.
Handily, two of the legs have foam grips on them which is nice and secure, as well as warmer to hold in the winter.
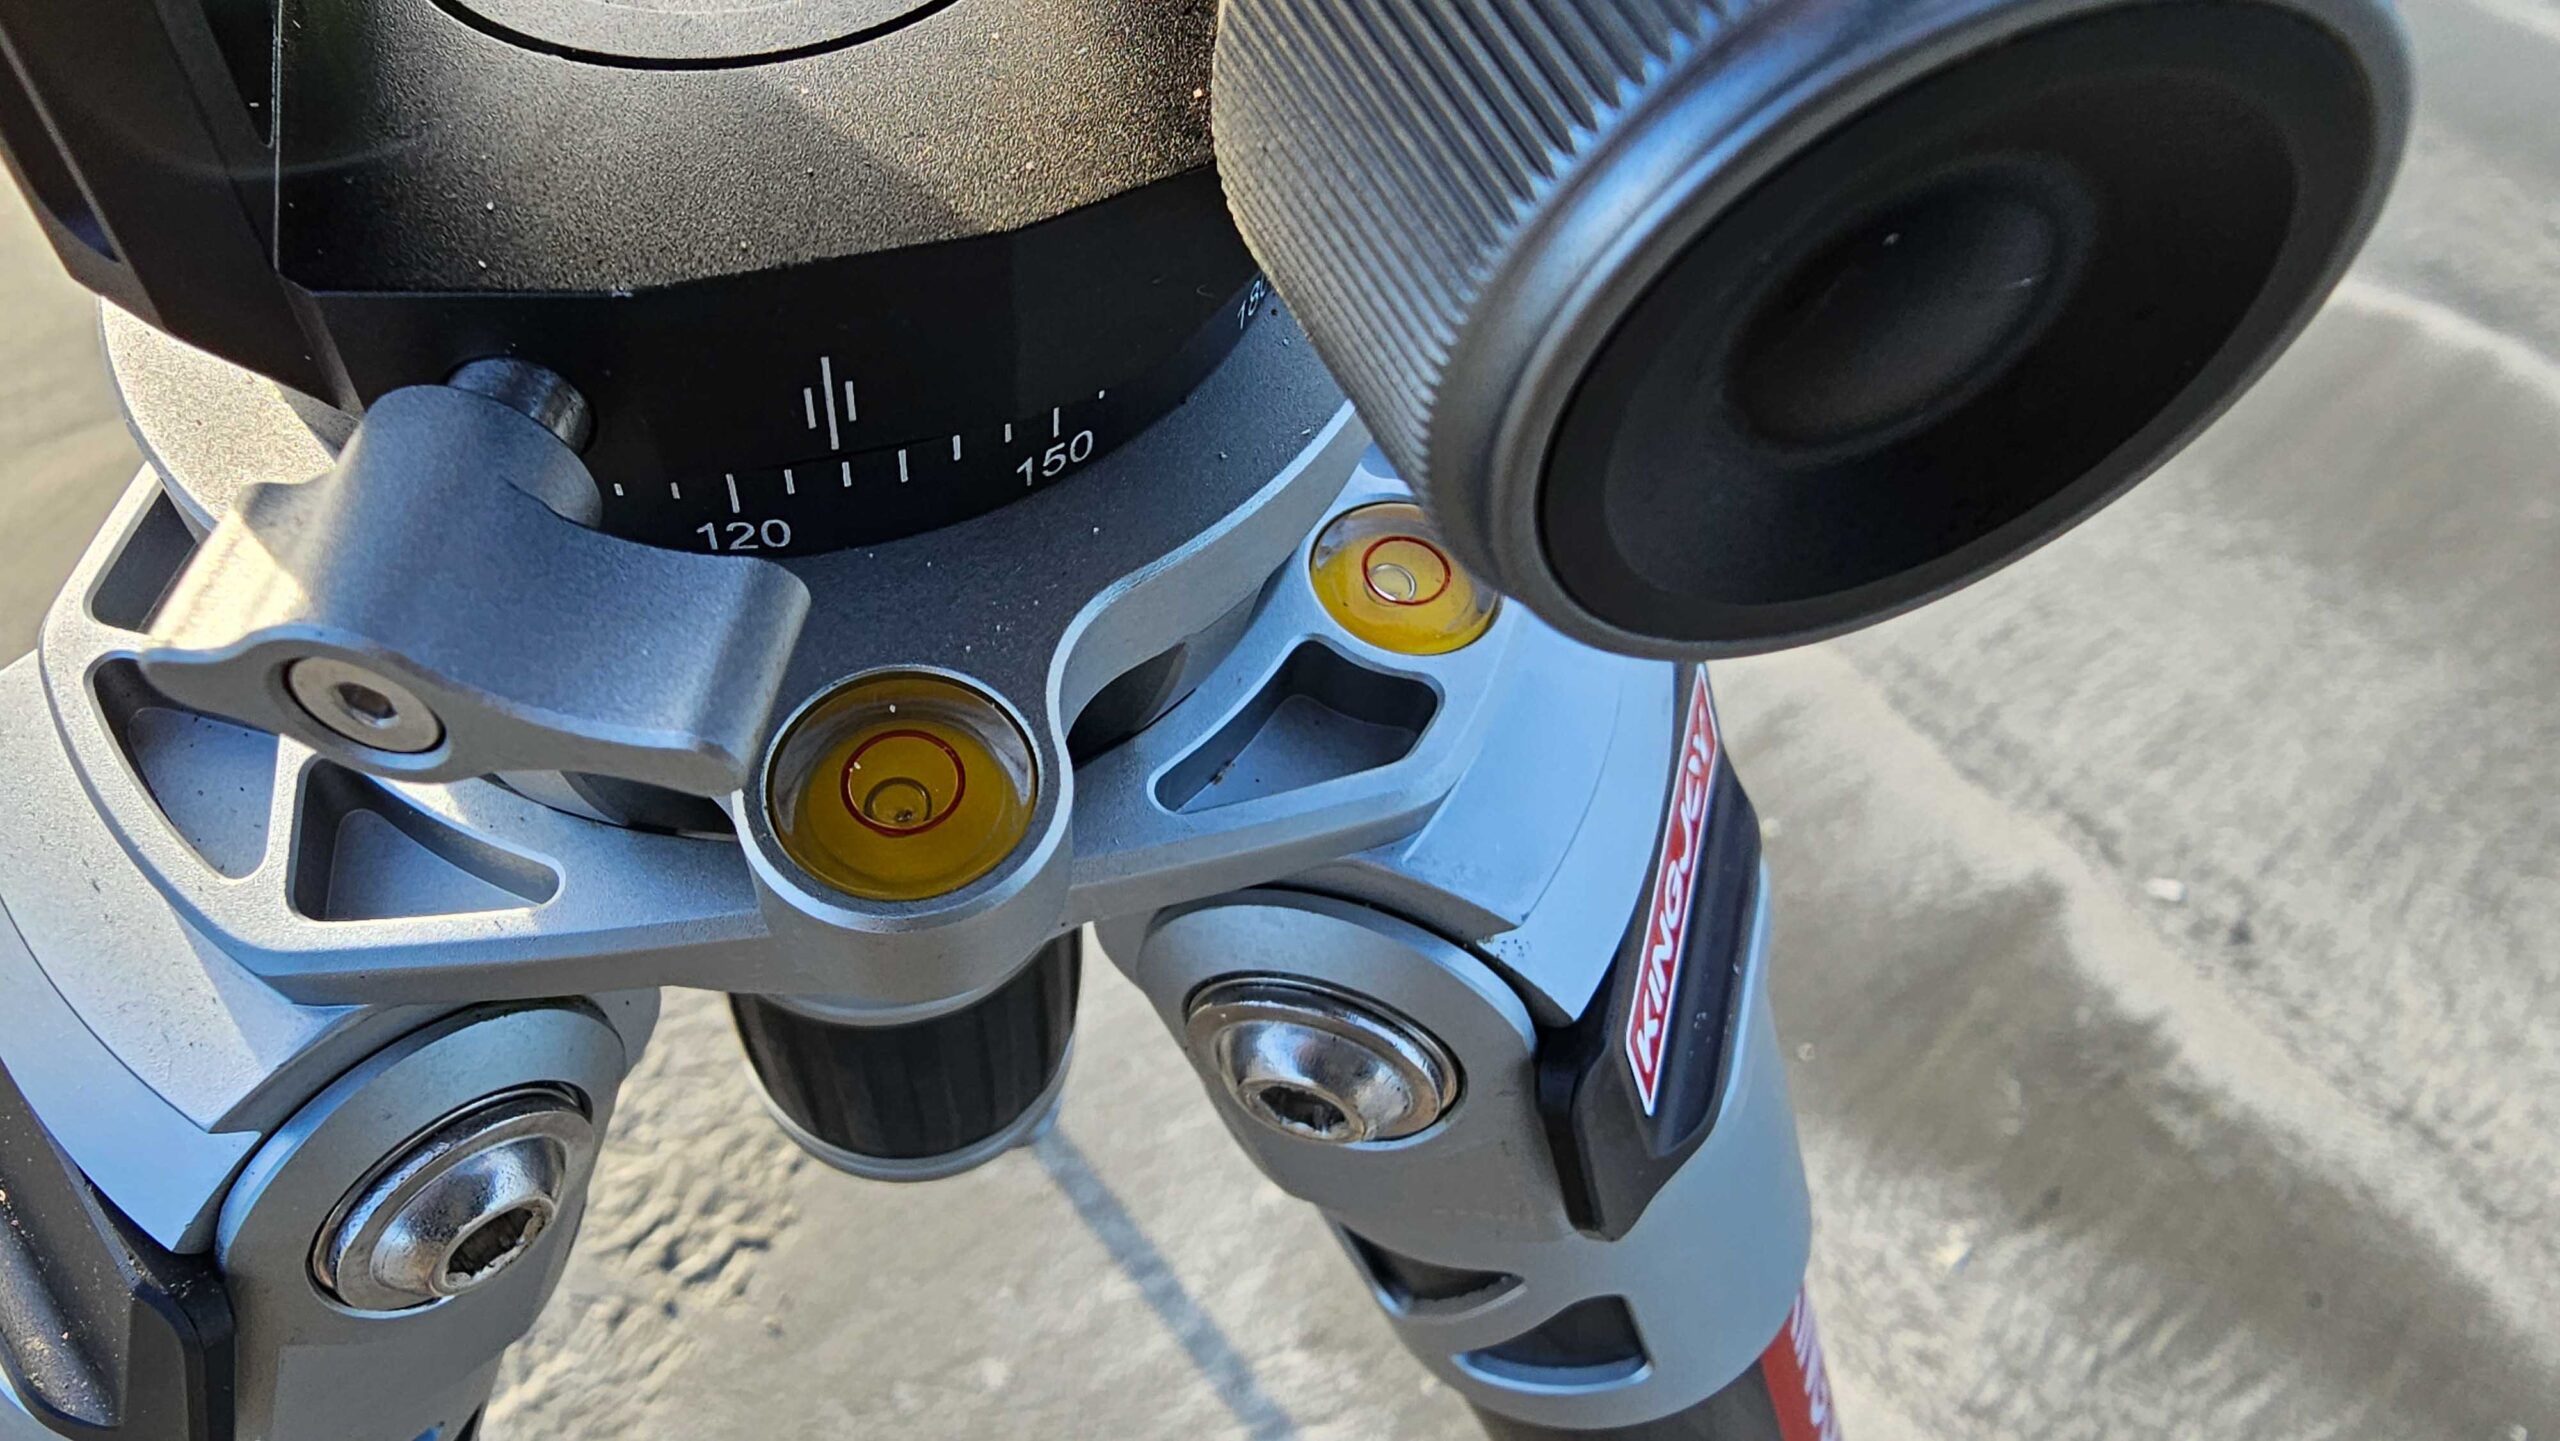
This is my first time with a levelling base as well. The idea of a levelling base is that it lets you get the top of the tripod level without having to micro-adjust each of the legs. This is important when combined with a geared head like the Leofoto D40 as, once the base is level, any further adjustments with the head will also be straight and level, and multi-shot panoramas will line up properly.
Let the spirit move you
There are two circular spirit levels on top of the tripod. One on the levelling base itself, and one on the top of the legs. I’ve been getting things roughly level with the legs, and then doing the final adjustments with the levelling base.
To use the levelling base, there’s a column between the legs which you can pull down to extend, and then twist to release the tension and allow it to be moved. Then it’s easy to move around and use the spirit level to get it levelled off. It takes just a few seconds and is simple and precise.
This column also has a robust hook on it to hang a camera bag to weigh the tripod down more. Included in the bag (tucked into a hidden inside pocket I’d never have found if Marcus hadn’t shown me) is a set of stainless steel spiked feet. I also bought some longer aluminium spikes as well.
The only thing I really have to complain about is that the levelling base tilting action can have quite a lot of stiction. It’s not as smooth as everything else on the tripod and is rather jarring by comparison. I expected a much more fluid action.
Aside from that, all good so far. Lovely tripod, and so it should be for £549!
The Leofoto G4 Pro Head
While ball heads are extremely convenient, I find it challenging to make small and precise adjustments using them. And then there always seems to be flex or sag that sneaks in just when you think everything is set correctly, especially if using a heavy camera and lens setup. Generally, you need to use two hands, one to support the camera and one to loosen/tighten the ball head.
360 degrees
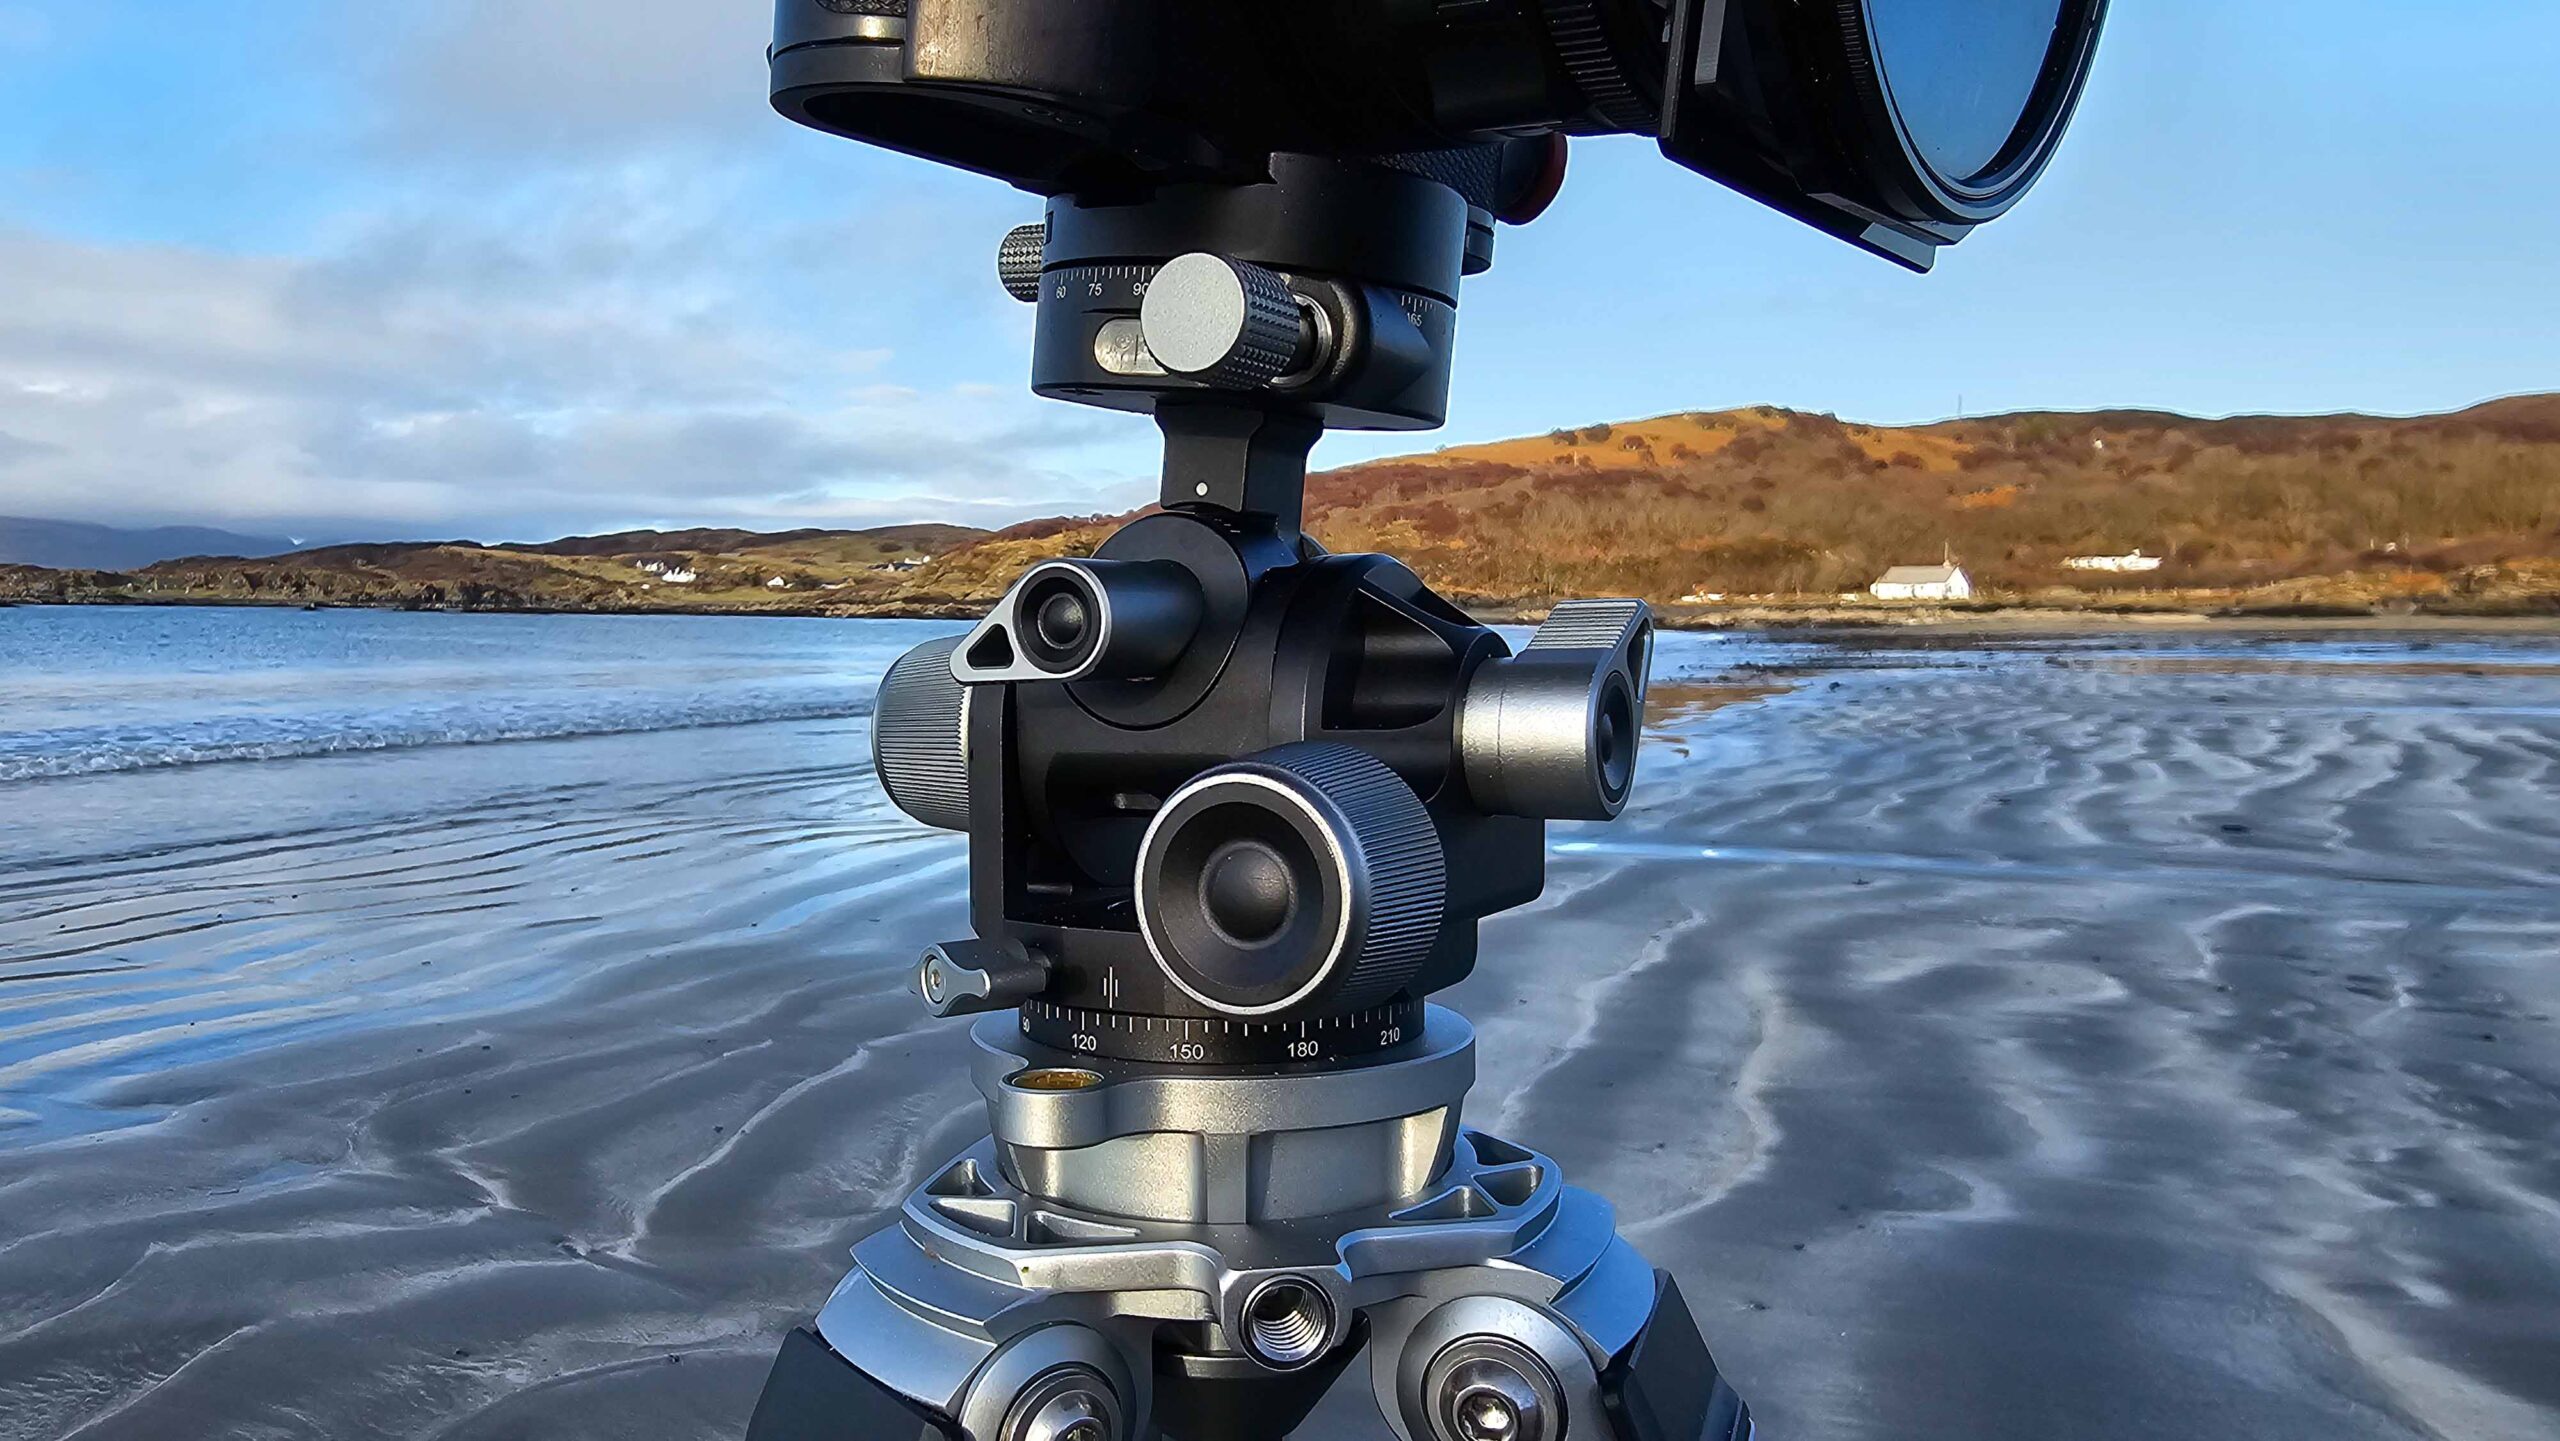
One answer to this need for precision is a “geared head”. This is a head that has adjustment knobs controlling gears that allow you to make very fine adjustments to the camera’s orientation. The idea is that you get the camera in roughly the correct position and make the final adjustments with the knobs.
My research led me down various rabbit holes, which culminated in a general opinion (nice review here) that the Arca Swiss D4 is the top of the tree. It has up/down (vertical) and left/right (horizontal) tilt controls, and two panning adjustments. It also has levers that allow you to “unlock” the gears to make fast adjustments to the camera’s position. You then “lock” them again, and use the gear knobs to refine the position.
But, it costs north of £1,200. Ouch.
Google did its googly thing, and alongside the Arca Swiss D4 ads it served up something called the Leofoto G4 Pro. Initially, I thought it was the same thing, as it looks so similar, even down to the D4/G4 name.
But it turns out that it is a less-than-half-price almost identical copy from the Chinese firm Leofoto. They are part of the much larger Guangdong Laitu Imaging Technology Company and specialise in making tripods and heads that mimic those from Arca Swiss. I’ve no idea how this is allowed.
Quick adjustment
I looked at the Leofoto G4 Pro in more detail. The excellent diagrams on their website show confidence-inspiring precision machined worm gears inside a solid-looking body. As with the Arca Swiss, it has quick-adjustment levers to unlock the horizontal/vertical gears to get the camera into a rough position with minimal hassle.
It also has a geared pan adjuster in the top plate, along with an un-geared pan adjustment where it mounts to the tripod base. So three-axis geared adjustment plus an additional panorama adjuster. Mmm… nice.
Proof from images
The images also confirmed that the head can be tilted ninety degrees to allow for shooting in portrait orientation without having to remove the camera from the plate and use an L-bracket. This is particularly important to me as I often do portrait- and landscape-orientation shots of the same subject, so just flipping the head over is a simple and easy approach and avoids the expense of an L-bracket on the camera.
And all for £434 from Amazon, about 1/3rd of the price of a “genuine” Arca Swiss model. The pictures and reviews looked very positive, so I put my money where my mouse-clicking finger was and ordered one.
What arrived a couple of days later exceeded my expectations. I thought it would be acceptable, but a little rough around the edges. But no, what I had in my hands was a beautifully made, solid and lovely thing. It really was the finished article.
And to make things even better, the matte-grey anodising exactly matched the shade and colour of the aluminium on the Kingjoy tripod, making it all look like it was meant to be. It’s 13cm high, and adds 820g to the tripod’s weight.
Every which way adjustment
The horizontal adjuster gives 50 degrees to the right and about 115 degrees to the left (for portrait orientation). The tilt adjuster gives 22.5 degrees up and down, a total of 45. The geared panorama adjuster gives a full 360 degrees.
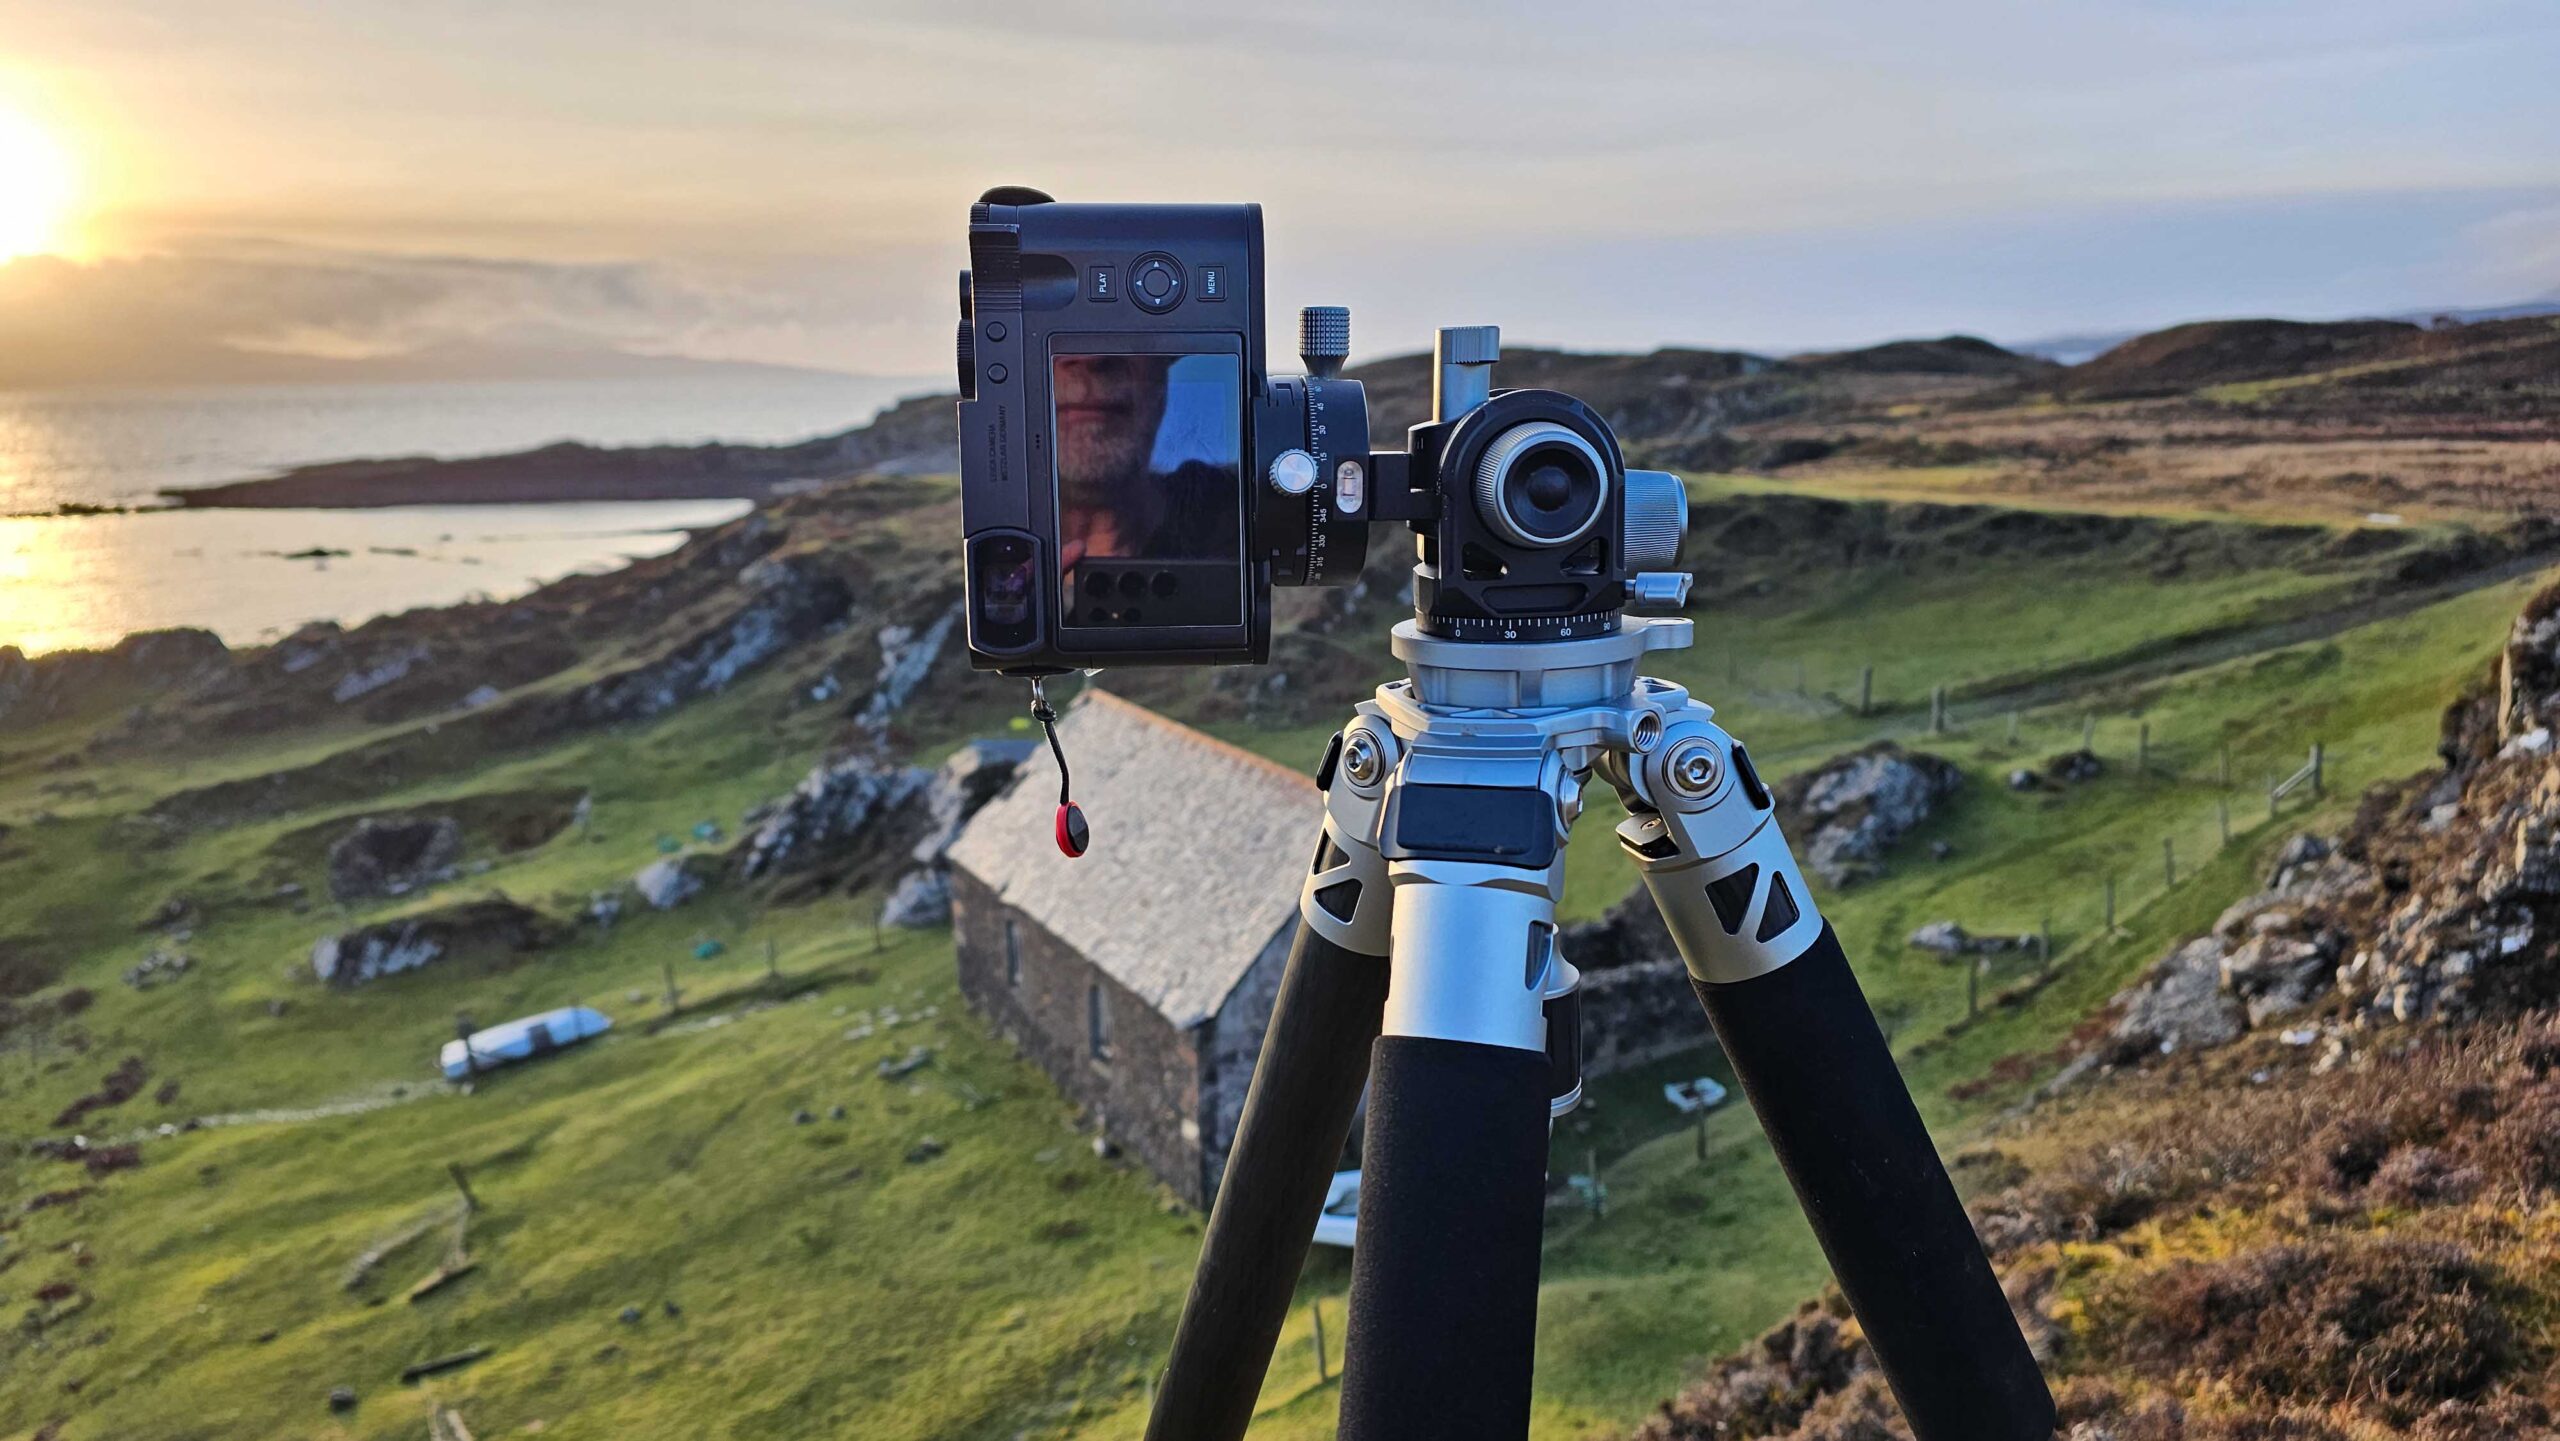
I quickly screwed it onto my new tripod, and checked that everything fitted OK, which it did. The head comes with a lovely camera mounting plate, but I already have an “Arca Swiss compatible” grip/plate on my Leica Q3, so I tested that that fitted OK, which it did.
A quick test of all the twiddly bits revealed a smoothness and fluidity that I hadn’t expected to be so good. Itching to get out and use it, I set off into the wilds of Skye.
Protection
The whole setup weighs 3.4kg. Not bad, but definitely not lightweight. I have a Peak Designs carbon travel tripod for very lightweight stuff. It’s very innovative, compact and light at a mere 1.3kg, but not the world’s most robust thing for 10 minute exposures at night in strong winds.
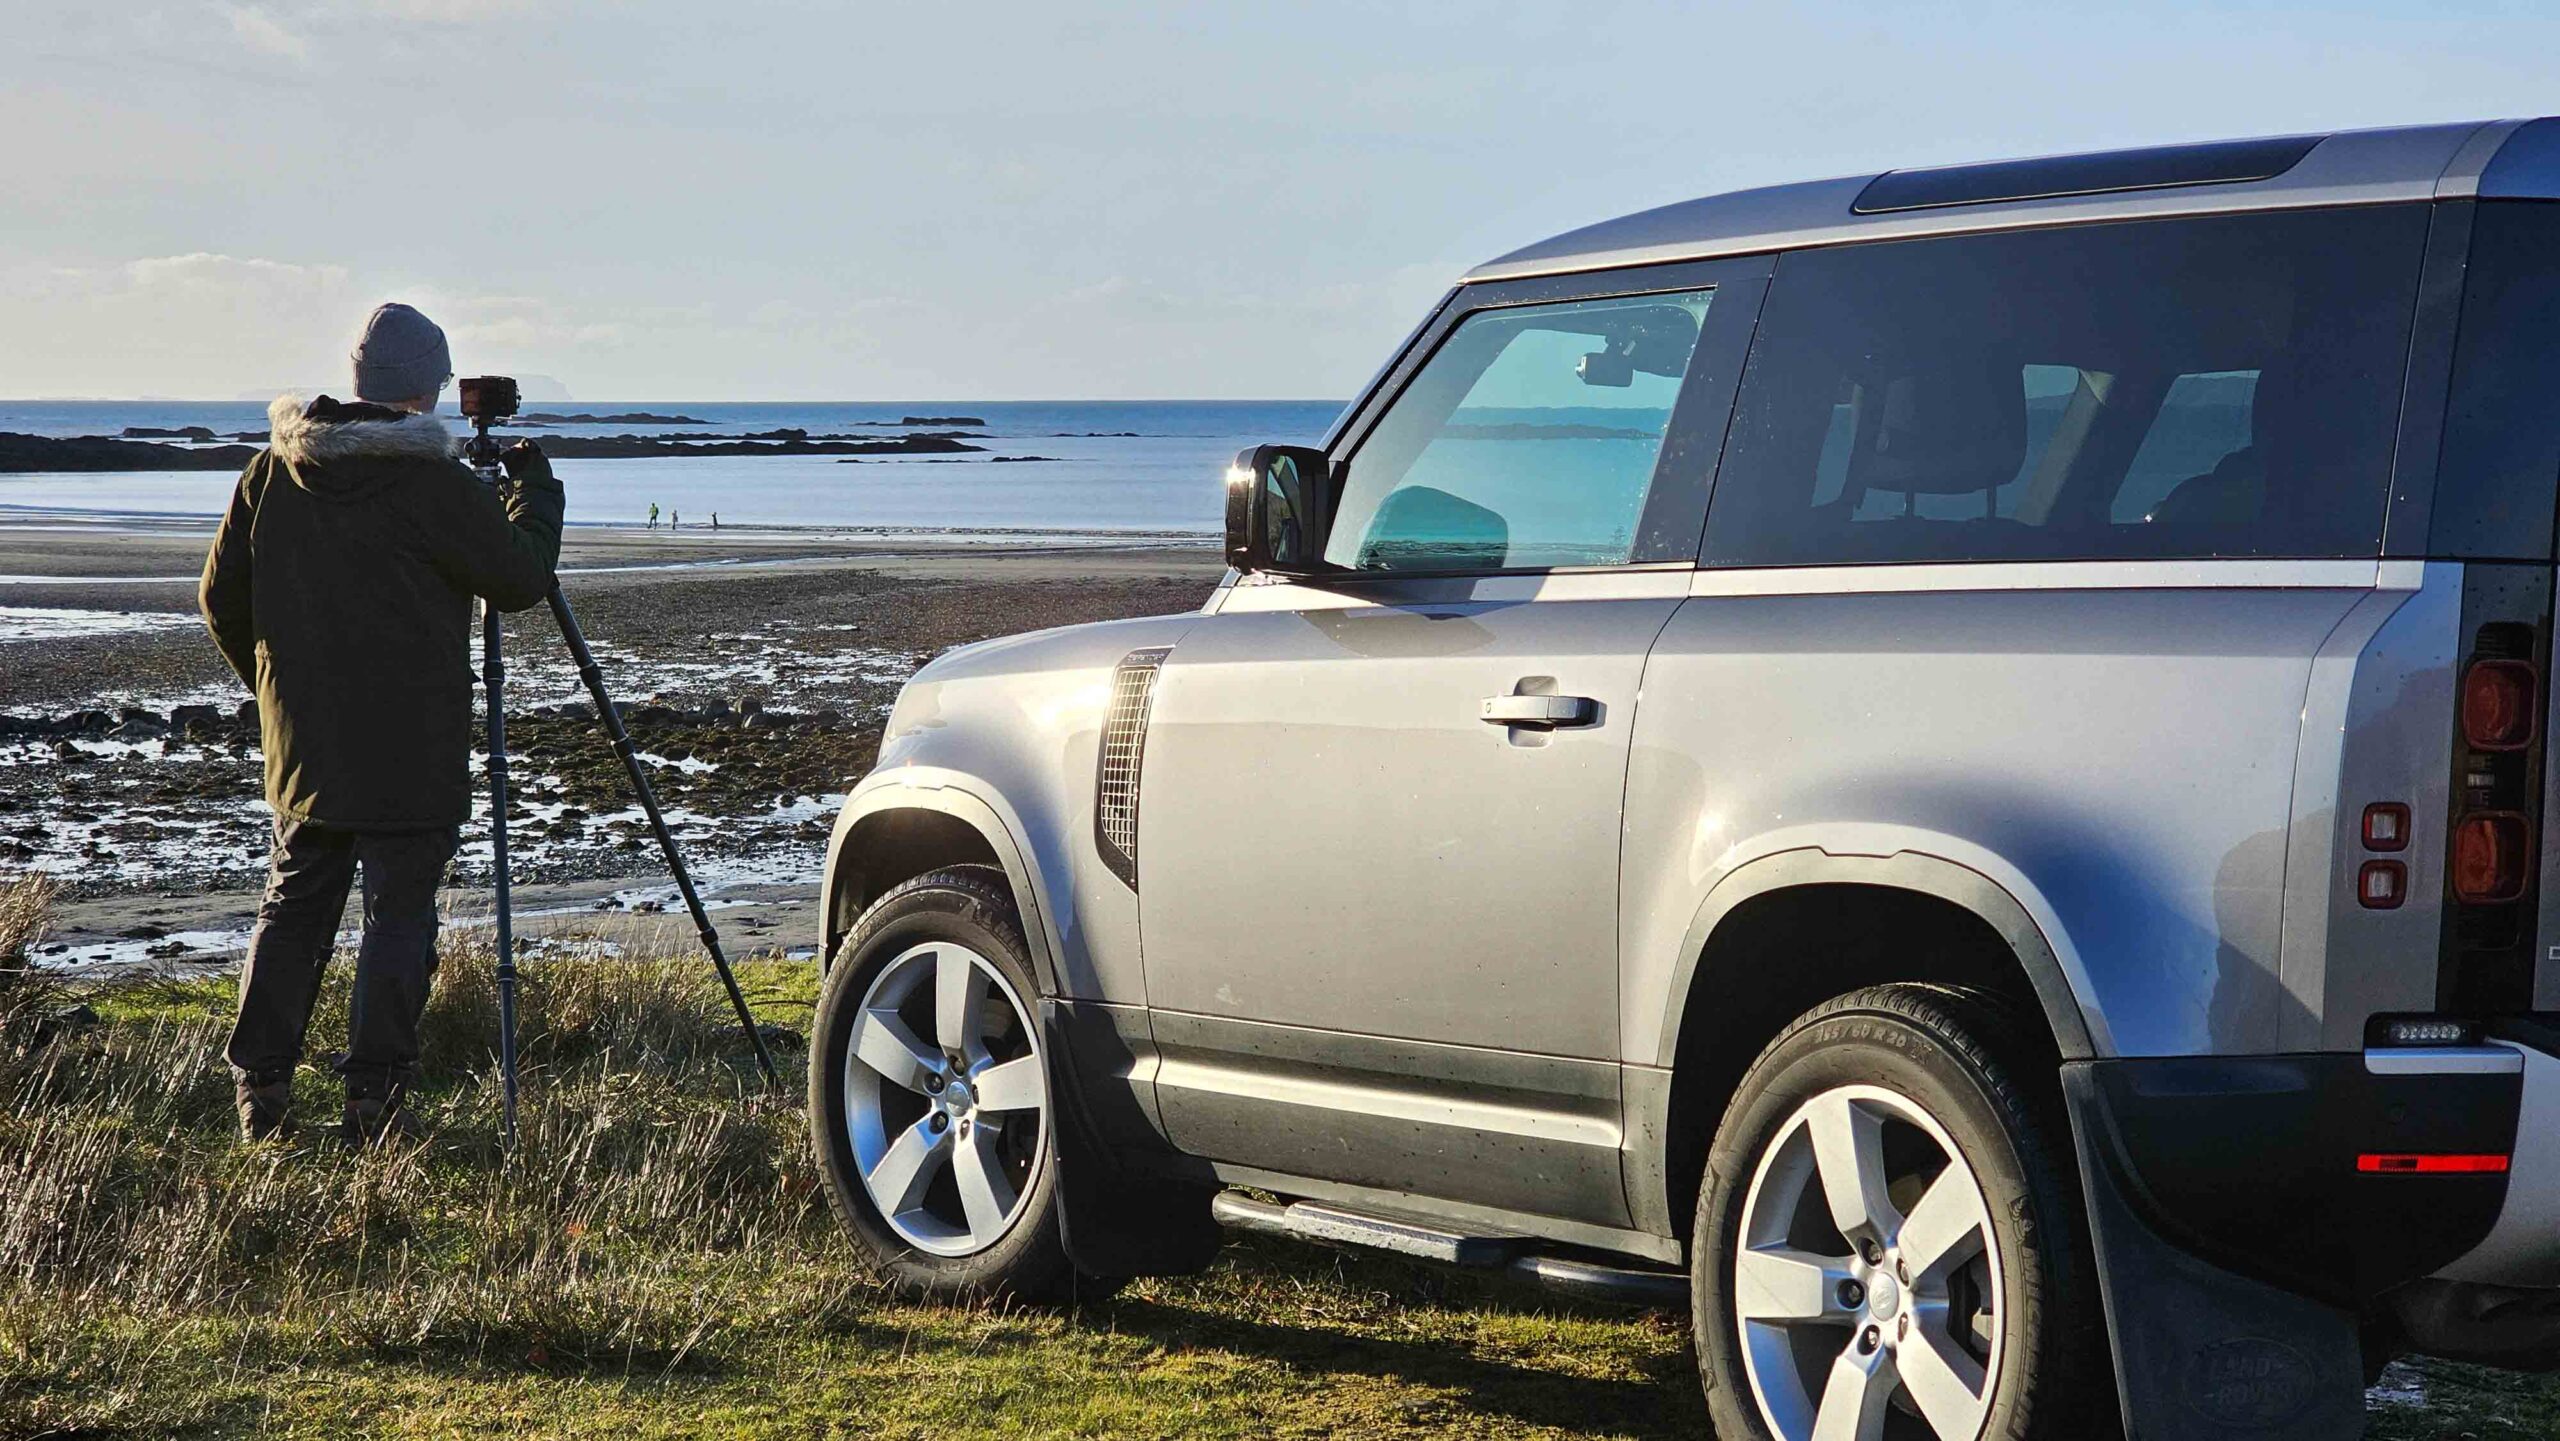
Being fairly long at 79cm with the head on with the legs retracted, it’s also not the smallest item of gear. However, it is easily carried in one hand. It would need a rather robust rucksack to hold it — it’ll overwhelm a day pack.
One thing missing is a strap attachment. I’d like to be able to put the tripod over my shoulder to keep my hands free when scrabbling about up mountains and along coastlines. There is a threaded hole in the baseplate which can accommodate a loop bolt for one end of a strap, but nowhere obvious to secure the other end down on the legs.
The spiked feet have horizontal holes in them, which is a possible means of clipping on a strap. I’ll need to experiment with this.
Headache
So many knobs and levers! With a ball head, you unlock it, move it about, and lock it again. This is going to take some getting used to. My current approach goes like this:
Unfurl the lower two leg sections of the tripod to get it to a normal working height, and pointing roughly towards my subject. Then adjust to roughly vertical using the upper leg sections.
Carry out fine levelling using the levelling base. This is quick and easy — pull down the adjuster under the centre of the base, loosen it, and make the base level using the inbuilt spirit level. You need to make sure the spirit level isn’t on the far side when setting up.
Clamp the camera on the plate if it isn’t already on there. This is a screw-in clamp on the top of the mount, and it’s quite secure.
Fine adjustments
I’m normally well enough oriented that I can make any final adjustments with the gear knobs, so I tend not to use the quick adjustment levers (unless I flip to portrait orientation).
The headache comes from remembering which knob and lever does what. I’m sure it’ll become natural in time. It isn’t helped by the rather counterintuitive knob orientation. The knob that you think should do horizontal adjustment because of it’s orientation actually does tilt adjustment.
And the knob that faces the direction of tilt adjustment actually does horizontal adjustment. Then add in the quick release levers, which are oriented 90 degrees to their accompanying gear knob. Confusion reigns!
Happily the geared pan adjuster does just that.
Until you put the camera in portrait orientation, when the horizontal adjuster now gives you pan, the tilt adjuster now gives you horizontal, and the as-yet-unused geared pan adjuster now gives you tilt.
I’m sure it will sink in eventually and become embedded in my muscle memory. Currently, it feels like playing 3D chess.
Precision
Once set up, the use of the head is a real luxury event. It is incredibly precise. I can make one-handed adjustments with extremely fine control. A bit to the right, a bit up, horizon not quite level so tweak a few degrees. While I may grab the wrong knob initially, it’s quickly obvious, and a tad of trial-end-error sorts things out.
During my first outings, I’ve found it a joy to use. It’s difficult to describe (obviously!) but coming from a ball head it is a pleasure to be able to have such smooth adjustability. With everything levelled off, vertical stays vertical when you pan or adjust the tilt, making adjusting composition simple.
There is a smidgen of difference in the friction of the two main gear adjuster knobs on the head. One of them also has a very slightly stiffer part of its travel. It’s minor, but worth mentioning. I imagine this is where the genuine Arca Swiss unit would be superior.
Solidity
I used to think my previous Velbon tripod was excellent. The Kingjoy is several levels better. Once it is rammed into the ground, it isn’t going anywhere. There’s no flex and it’s very confidence inspiring. The build quality, leg joints and twist grips are all superb quality. It is an exceptional platform for the fancy Leofoto head.
It is also very nice to have a tripod that is high enough to let me shoot without stooping, especially on sloping ground.
Conclusion
Thanks for sharing in my purchase justification exercise! Seriously, though, I’m well impressed if you hadn’t guessed. I feel like I’ve graduated to a “grown up” tripod and head after years of scrabbling about with lesser equipment.
Is the setup worth £1,000? Subjective. It is to me. It may not be to you. I get so much enjoyment from my photography, and use all my gear such a lot, that the price-per-use ends up being negligible. I also have a point to make all my gear pay for itself, and this setup is no exception.
Quick Pros
- Tall
- Solid
- Precise
Quick Cons
- Expensive
- Fiddly
- Unprotected
Here’s a selection of recent photographs that I’ve relied on the Kingjoy + Leofoto setup to create:


More work from Andrew Tobin
The Skye at night (You can donate to this project at the end of the article.)
Leica Q3: A one-year review, photographing the people of Skye by night
Leica CL: 18-56 Vario-Elmarit-TL versus 24mm Summilux-M and 50mm Summilux-M
Leica CL: 55-135mm-TL versus 90mm Summicron-M and 50mm Summilux-M
Make a donation to help with our running costs
Did you know that Macfilos is run by five photography enthusiasts based in the UK, USA and Europe? We cover all the substantial costs of running the site, and we do not carry advertising because it spoils readers’ enjoyment. Any amount, however small, will be appreciated, and we will write to acknowledge your generosity.
When we left the EU, I thought that we might return to the human centric way of measuring things.
Like Andrew Tobin, I am 6’ 2”, which may well be 1880 mm, but if someone asks me how tall I am, I say the former and without consulting a ready reckoner of some sort have no idea of the latter.
My foot is more or less, that long, an inch is the length from the last joint of my fingers.
My arm from the tip of my nose to the tip of my fingers is a yard.
In the UK we call it imperial, which makes sense since the king measured the things that he wanted to nick and then found a handy name… he measured his horse in widths of his hand too. The Septics managed to mess up liquid measurement, but even so, it kind of works.
Similar applies to chains, furlongs and miles… £sd… and just about anything else. Only the French would come up with something that can only be divisible in such a limited way.
I wonder if the king had a handy way of measuring gases like methane? 🙂
It might be true that if you keep a lump of metal in a vacuum, it will remain a reliable unit of measurement, but it is completely impractical.
This raises some interesting points, Stephen. As you know, we have an irritating hybrid system here in the UK. Despite efforts to introduce the decimal system, there are so many loopholes and anomalies that it becomes confusing.
Many visitors, for instance, assume Britain uses meters and kilograms, kilometers and millimeters exclusively. But this is far from the truth. We use miles, our speed limits are in miles, we measure “300 yards to the next turning” (not 900 feet, as Americans do). We buy our petrol in liters and calculate our consumption in miles per gallon. Not only that, but we can’t even decide on “er” or “re” at the end of the newfangled measurements. I prefer “er”, as in this comment, but many people swear that it should be “re” to complement “centre” and “theatre”.
The whole thing is what is locally known as a bugger’s muddle. While I sympathise with your imperial tendencies, I sincerely wish we had done the changeover to the decimal system as effectively as we did with the currency change from pounds, shillings, and pence to pounds and 100 pence in 1971.
Like you, though, I find myself in mid-change. I am still instinctively wedded to inches, feet, and yards. But I now prefer kilograms and grams because they make more sense in talking about photography. However, the situation is not going to change soon…
Indeed Mike decimalisation, is something that has been with us for a very long time, the florin (two shilling piece) was introduced as a replacement for the half crown in 1849, this later became the 10 pence piece when decimalisation finally began on 15th February 1971.
It is all a bit confusing really, since the base currency of the USA is actually the Silver Eagle, which is two dollars, even though detractors said that we Brits merely wanted to have the biggest unit as the basic coin, which of course it is not.
Somewhere, amongst all of this mess, is the real truth, which probably involves the state thieving from the citizen. 🙂
Oh and don’t mention the Fractional-Reserve Banking system!
Oh and….
https://www.flickr.com/photos/buzzer999/51787132808/in/pool-camerawiki/
We had Taylor Hobson, Reid and Sigrist… 2” lenses… Just for a laugh.
Hi Andrew, while I was searching the internet for a Leofoto G 4 Pro, I found your review, which is very helpful. Thank you very much. My problem about the Leofoto G4 Pro is, that you can´t get this head in Germany. On one at the great fotofestivals in Germany last year, I went to Leofoto to asked, but they can´t give me the answer I wanted to hear. So I have to wait…..
All the best, good luck with your new equipment and allways good light.
Greetings from Germany
Regards
Claus
Hi Andrew, thanks for a fantastic review. I am not currently in the market for a tripod, but if I were, your detailed evaluation of options and prioritization of features would be a terrific guide. I have experienced the challenges and frustrations of using a primitive ball-head system, especially when trying to switch between landscape and portrait mode, and so was pleased to read that there are more sophisticated options out there. Lovely example images too. I live in a place where there is plentiful sunshine and lots of light, permitting easy hand-held shooting, even with long telephoto lenses. But, if I was surrounded by those brooding skies you enjoy, I probably would be in the market for a new tripod. All the best, Keith.
Thanks for the lovely feedback Keith. Have a great time with all that sunshine!
I had no idea that geared heads were a thing. It would’ve been helpful back when I did landscape photography. So much fiddling because of sag. I haven’t had that problem lately because my typical M-mount setup is much lighter but I imagine that L-mount users would still have this problem. Thanks for the review!
As for why Leofoto can do that, patents are very specific, and if it were an actual copy, Arca Swiss could get an injunction. Cost-engineering is not always effective. In my opinion there aren’t any cost-engineered designs that stack up to the Peak Design Travel tripod.
Thanks Arthur. I use a Leica Q3 for most of my landscape photography and even with that I was still getting a “saggy ball” on my previous tripod. Not pleasant to have a saggy ball. Noted re patents, and the Peak Design Travel Tripod is a thing of beauty for sure.
I went a similar but less expensive route and converted my Really Right Stuff ball head from a pano clamp to a flat base. I then purchased a Leofoto G2 geared head (copy of the Arca Swiss C1) which is about half the price of the Leofoto G4 Pro. The set up allows quick levelling up using the RRS ball head and then fine adjustment using the geared head. It’s very well engineered and made, and only about 25mm higher than the RRS pano head. If I want something smaller I unscrew the G2 geared head and replace it with the pano clamp. So it’s also versatile. Had it about 18 months now and very happy with the set up. The only concern is that the G2 design is more open than the G4, so I suspect if you knocked it over on a beach and got sand on it, it would be more vulnerable to getting inside.
Thanks Tom. I did look at the G2 and noted the more open design and plumped for the G4. I have also spent a massive £8.49 on a climber’s chalk drawstring bag which fits over the head so at least it’s protected when I’m wandering around. It has a little strap to keep it attached so I don’t loose it, and it also becomes a handy place to hold filters and lens caps while shooting.