

London. Too many people, too much traffic, too noisy, too expensive. Generally, I am not a fan. I spent years in the place for work reasons and cannot abide the stress. Call me jaded. Tired of London, but not too tired of life to try something completely different.
The shops are good, though. You can buy anything and everything, and the pubs are exceptional. If you can afford the mad price for a pint, that is. These days, I’m OK with a bite-sized daily dose every now and then, and that’s enough for me.
However, from a photography perspective, London offers so much. A myriad of landscapes, scenes, and shapes provides the photographer a massive selection of opportunities. Almost too much — how do you choose? Where do you go? What do you point your camera at? What do you “say” about London with your images? How do you create something completely different?
Going beyond street photography
I am not much of a “street” photographer. I don’t want some random person coming up to me and sticking a camera in my face. So equally, I won’t do that to anyone else. I admire those with the gumption and thick skin that do so, but it’s simply not my bag.
I have scratched the “high-contrast-sunlight-and-shadow-passerby-in-just-the-right-place” graphic composition itch already. I’ve done London at night in a wide aperture bokeh-fest. I know the hidden spots at the Barbican. The little stairwells at Somerset House. And the cool concrete of the South Bank.
Setting a new challenge
So, what should I do when I find myself in London with a day to kill, armed with my Ricoh GRIIIx HDF?
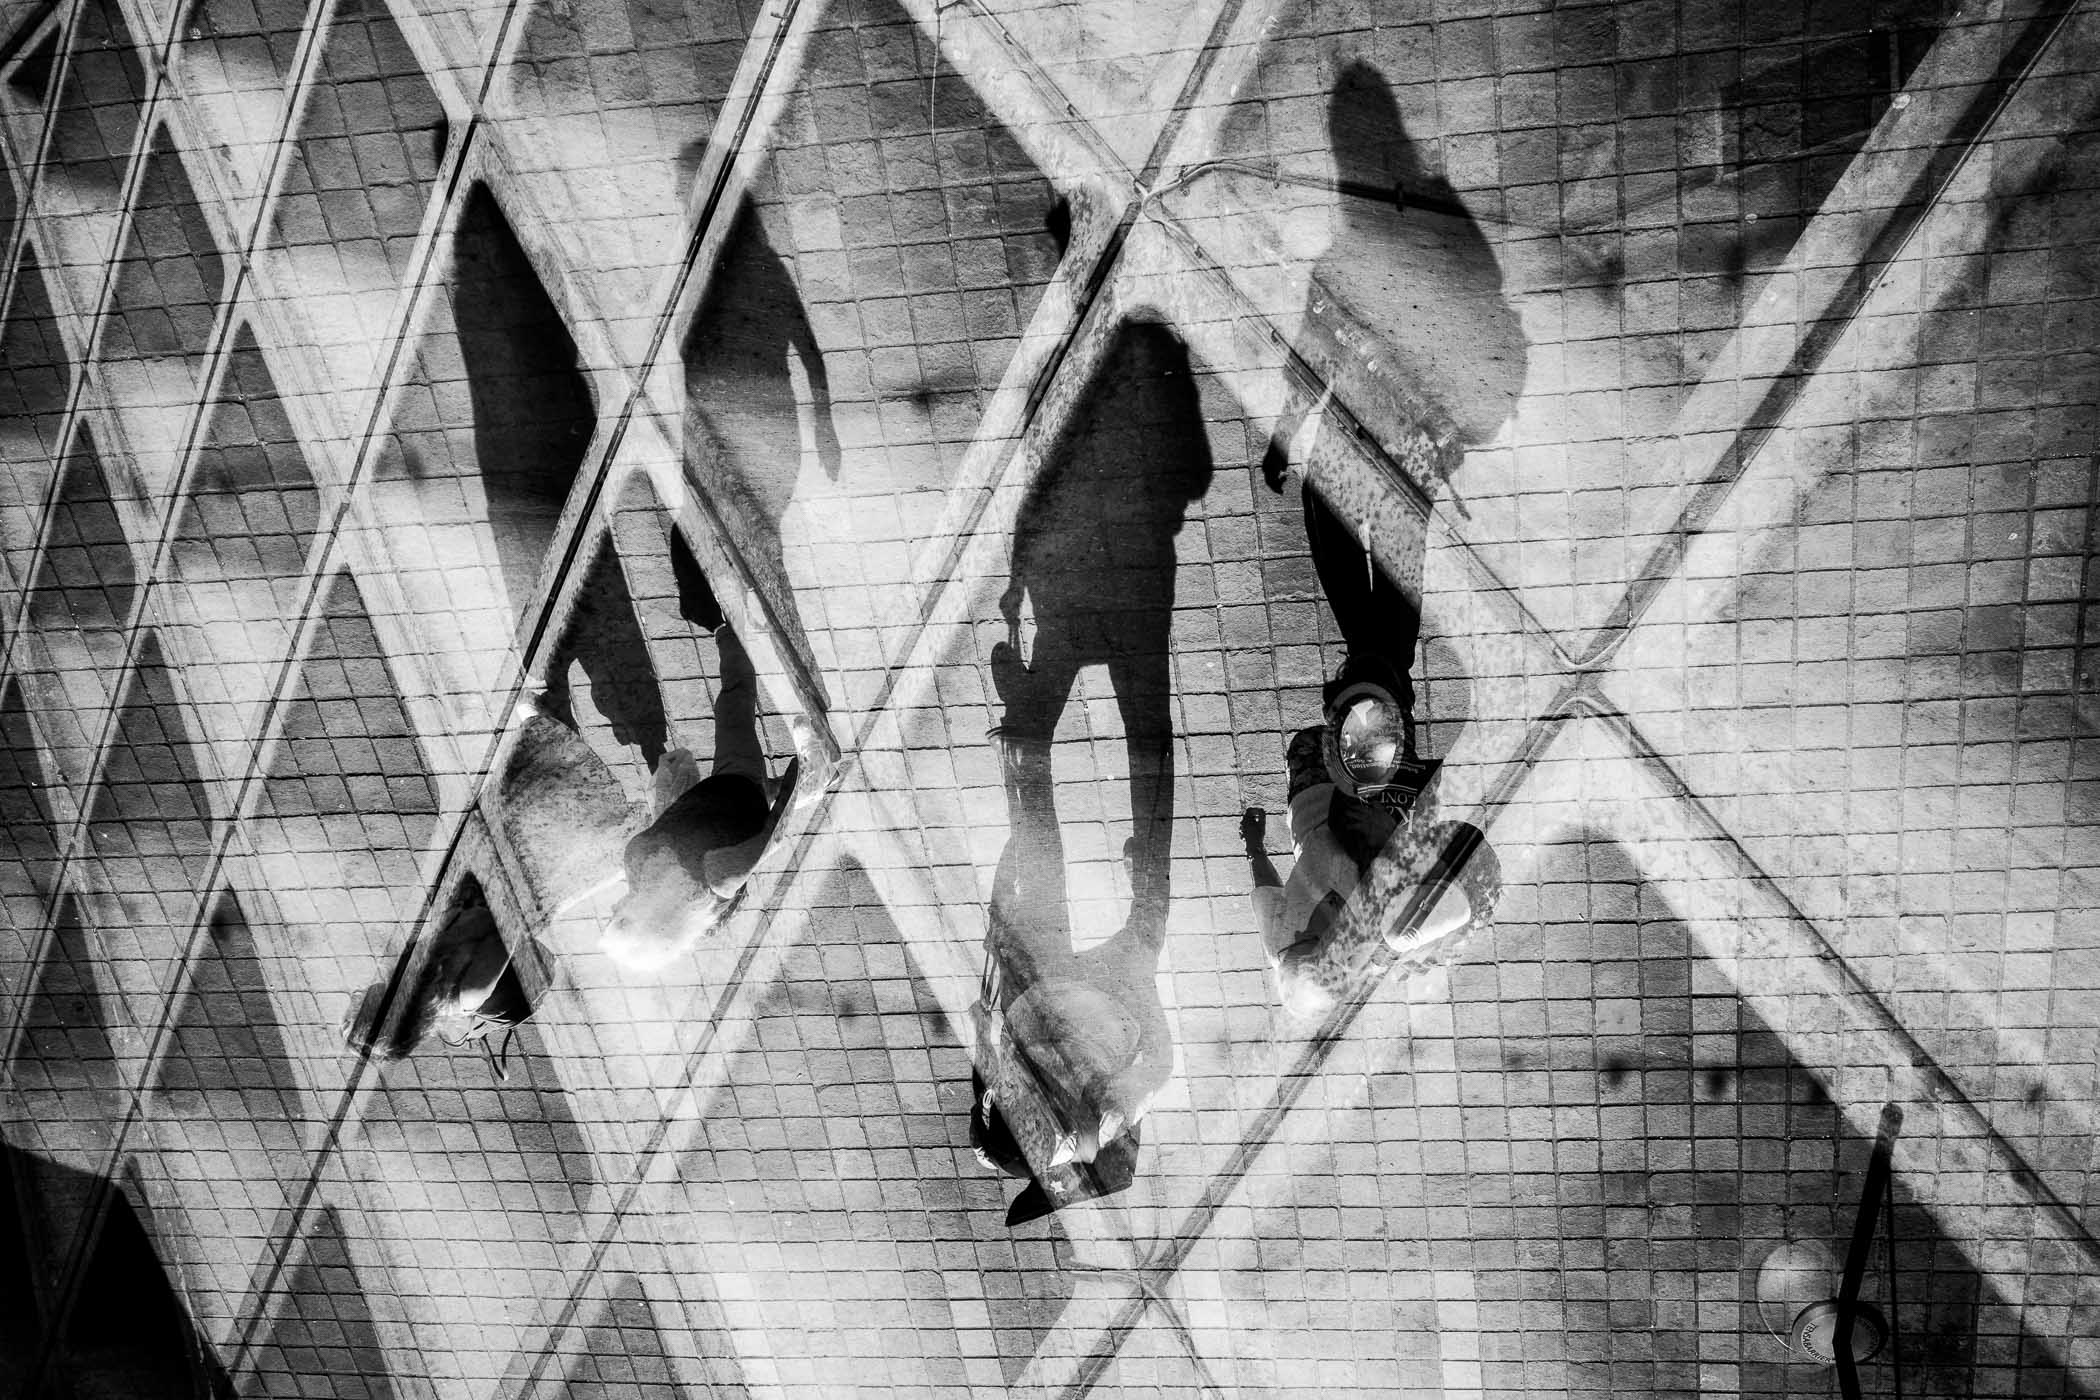
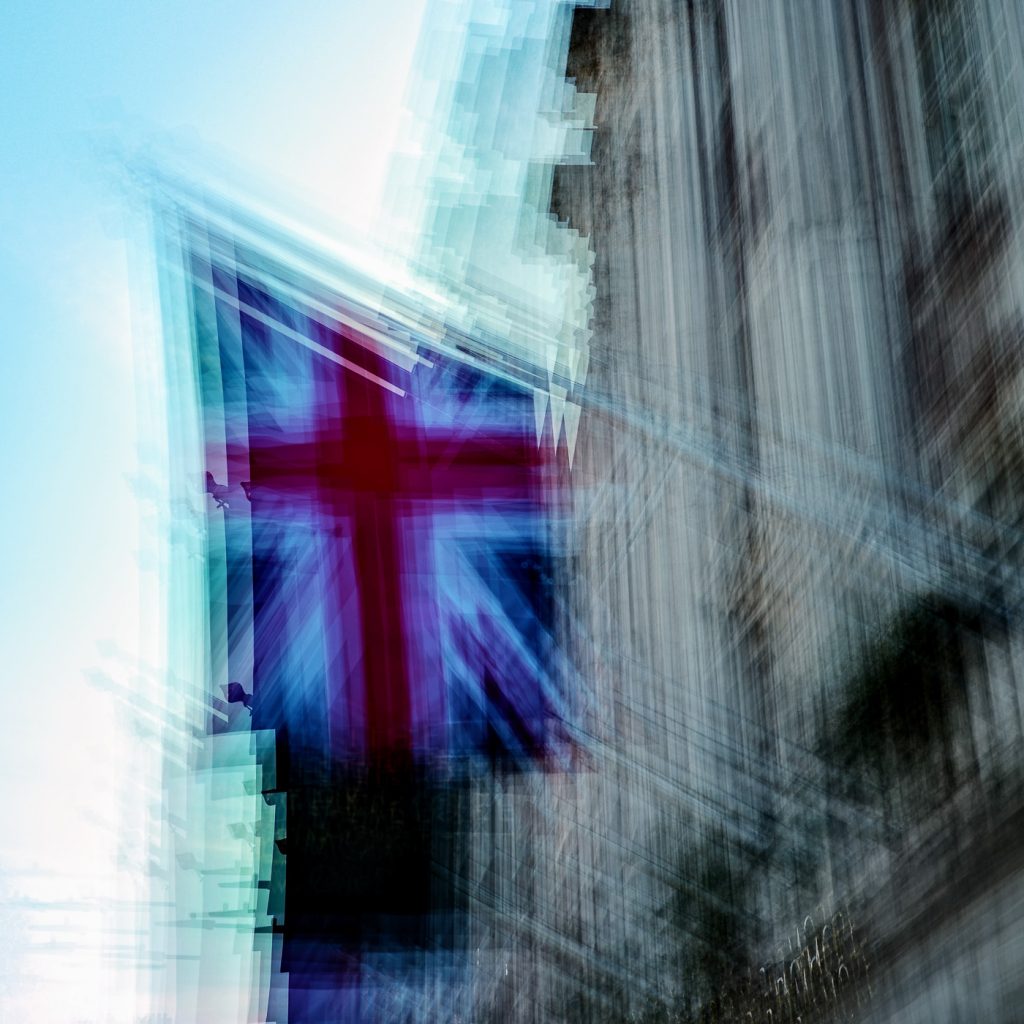
On my last London visit in May, I used the multiple-exposure (“Composite Mode > Average”) in my GRIIIx. I was able to combine two images on top of each other in the same exposure. That allowed me to create some very cool (in my opinion) street shots. And that felt like something completely different.
I thoroughly enjoyed that session. It got my brain working, particularly when trying to piece together how to layer the two compositions to create something interesting and compelling.
Experimenting
There’s a selection below — click for larger:
The push to go further
This time I thought about taking that technique a lot further. How far could I push it? What could I create that “spoke” of London in some way yet looked interesting and intriguing and different?
I decided to see what happened if I layered many, many images on top of each other. Rather than having two completely separate subjects that “fitted” over each other in some way like the shots above, I decided to pick one subject and see what would happen if I overlayed lots of pictures of it onto each other.
A new stage
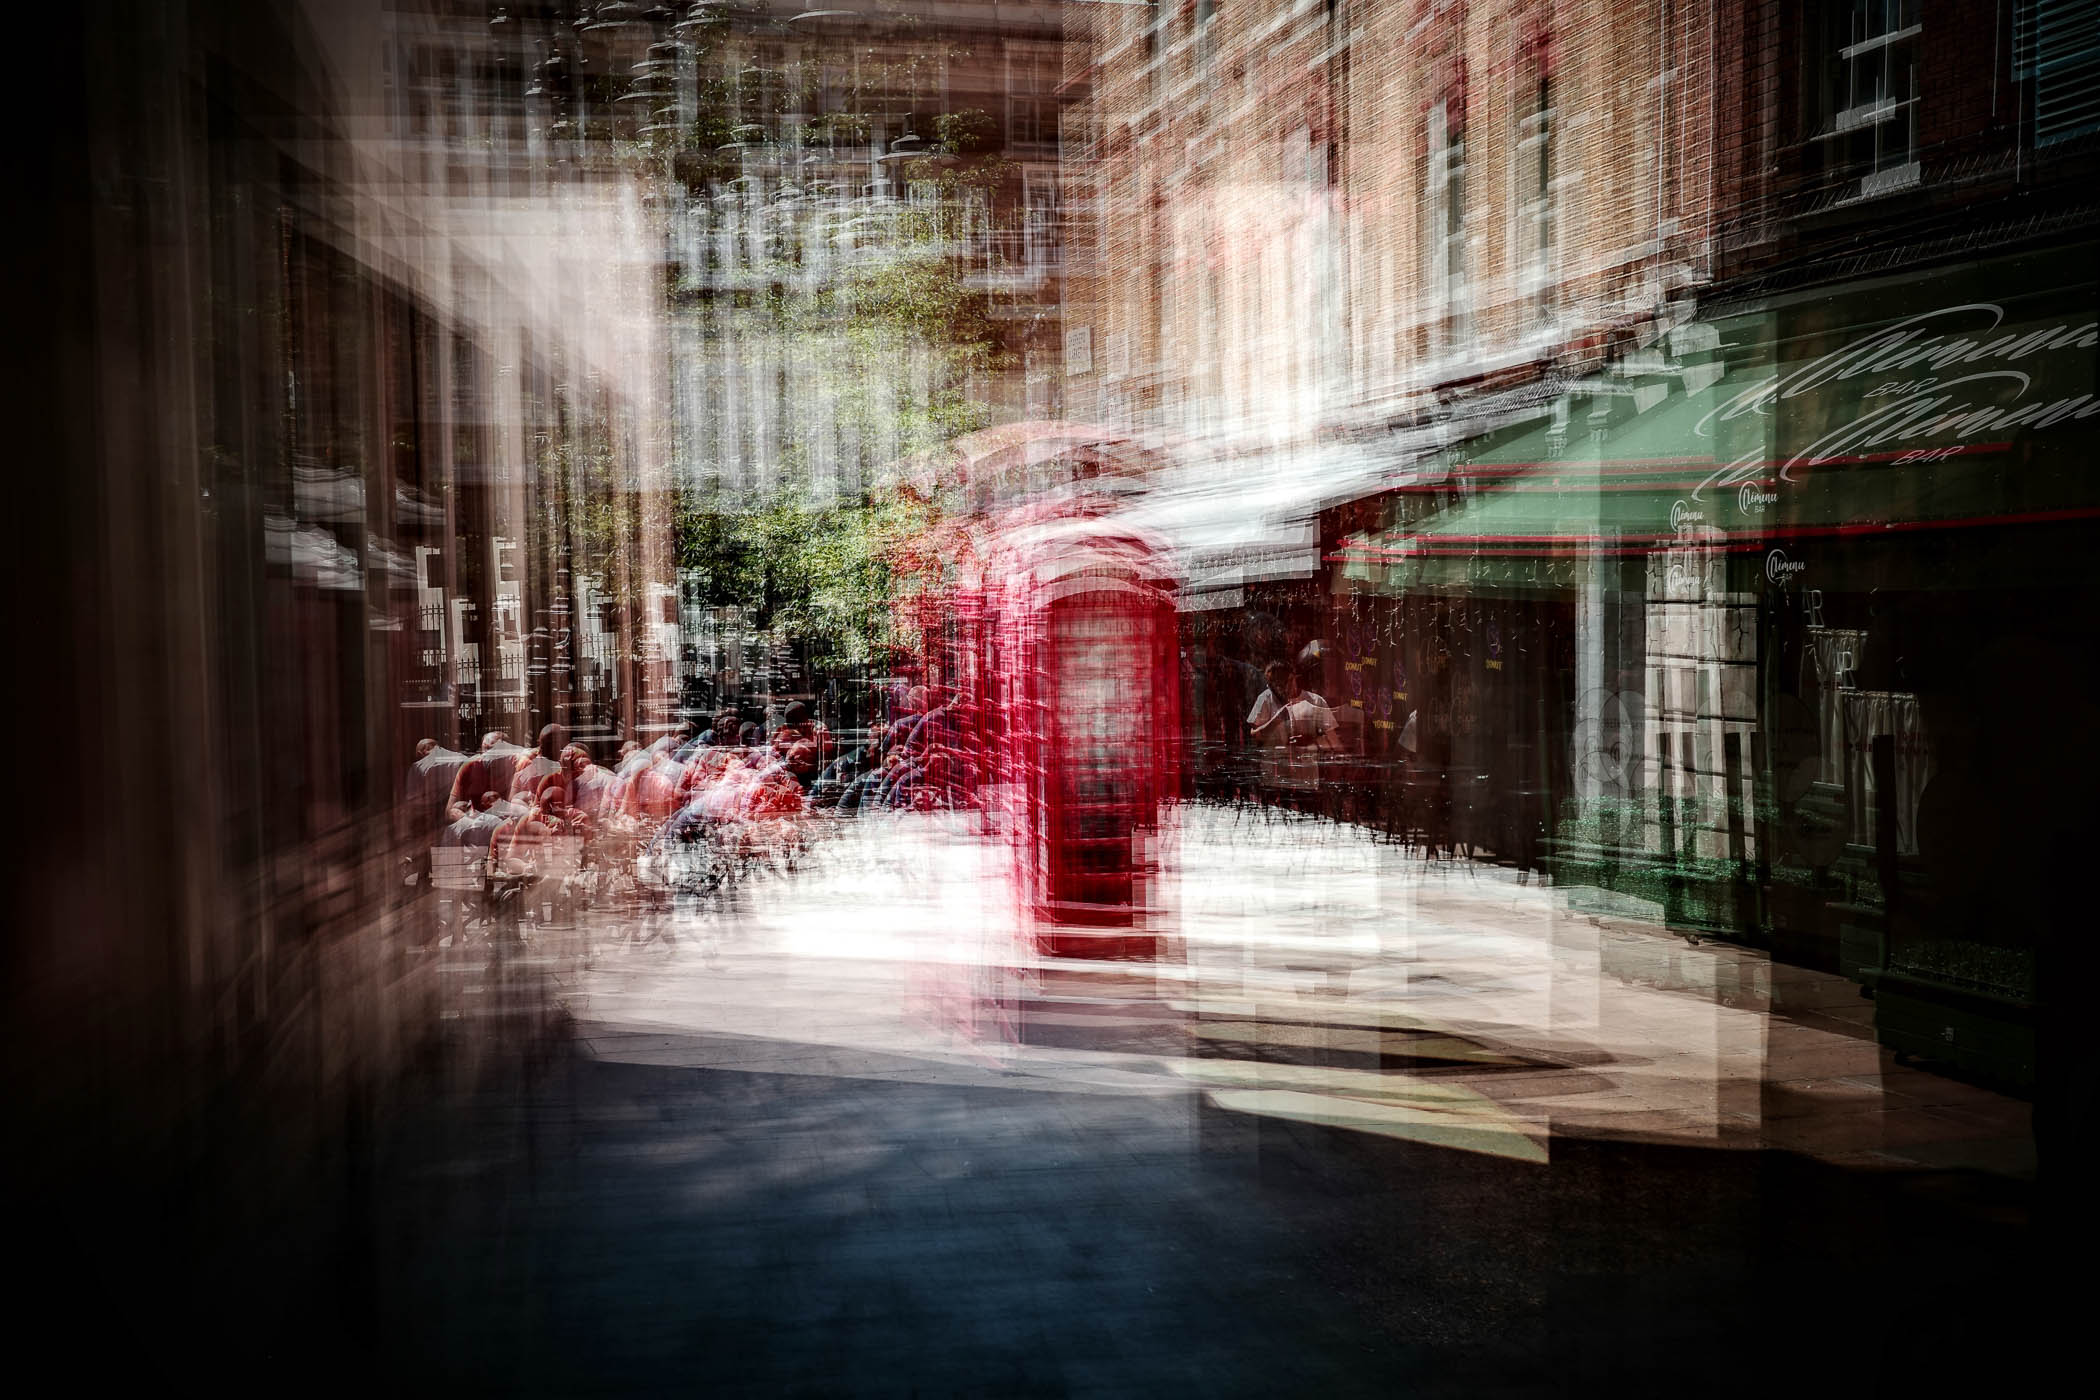
My first port of call was Shepherd Market in Mayfair. It is a very nice little warren of tiny streets with tailors, pubs, coffee shops, galleries, and restaurants that you would easily miss if you weren’t looking for it.
A red telephone box became my first focal point. Surrounded by red brick buildings with those lovely recessed white sash windows, some folks sitting outside enjoying the weather, and a well-placed tree, it felt to me a lot like the “desired” characterful spot that London is famous for.
Strong sunlight really helped to cast deep shadows to frame the chosen phone box. I had deliberately positioned myself in a covered alleyway to get darkness around the edges of the frame(s).
I had quite a few attempts before getting something I was happy with, and I ended up creating a method that worked quite nicely that I then used for the rest of the day. It began to define what I was looking for in creating something completely different.
Describing the technique
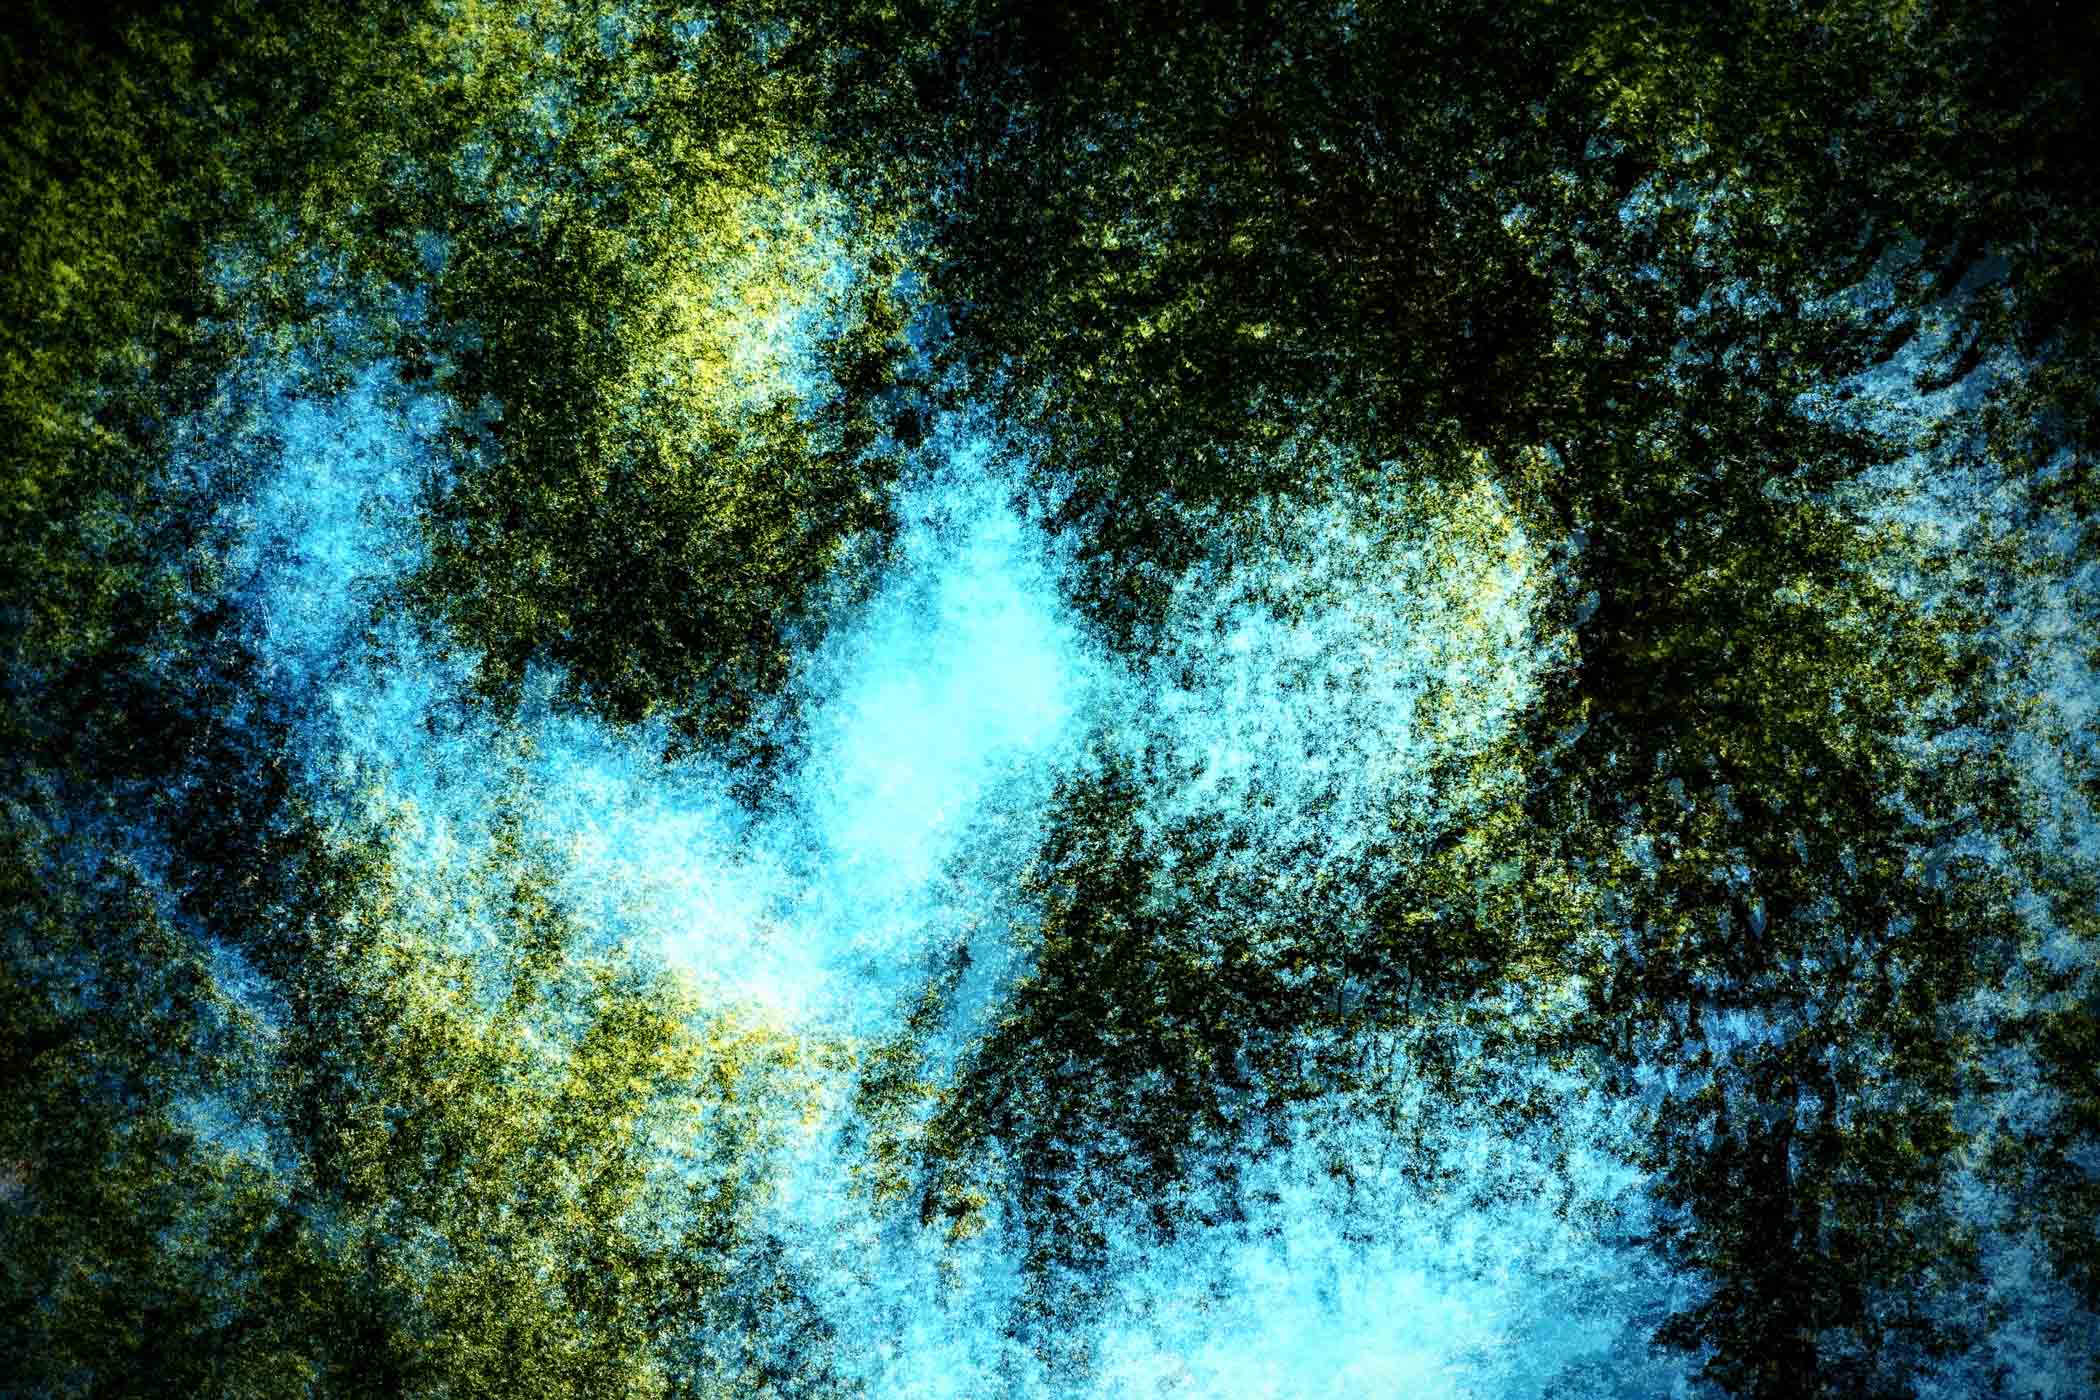
My technique is similar to the one I used for this shot of a lone tree in Skye. Take the shot, move slightly (like half a pace sideways), take another shot, repeat. I also moved closer and further away.
As the images layered on top of each other, it starts to look more and more like a slightly abstract painting. Later in the day I would use much smaller movements — I found it depends a lot on the subject and obviously, how much space is available.
Keeping things where they are
The key thing is to keep the main subject in roughly the same position every shot. This concentrates the subject in the final output and makes it clear what it is, while lending a weirdness to everything that surrounds it.
I really like the final result. Suitably enthused, I wandered deeper into the bowels of Mayfair, where the houses cost tens of millions and the sound of construction work deafens you everywhere you go.
Picking a focus point
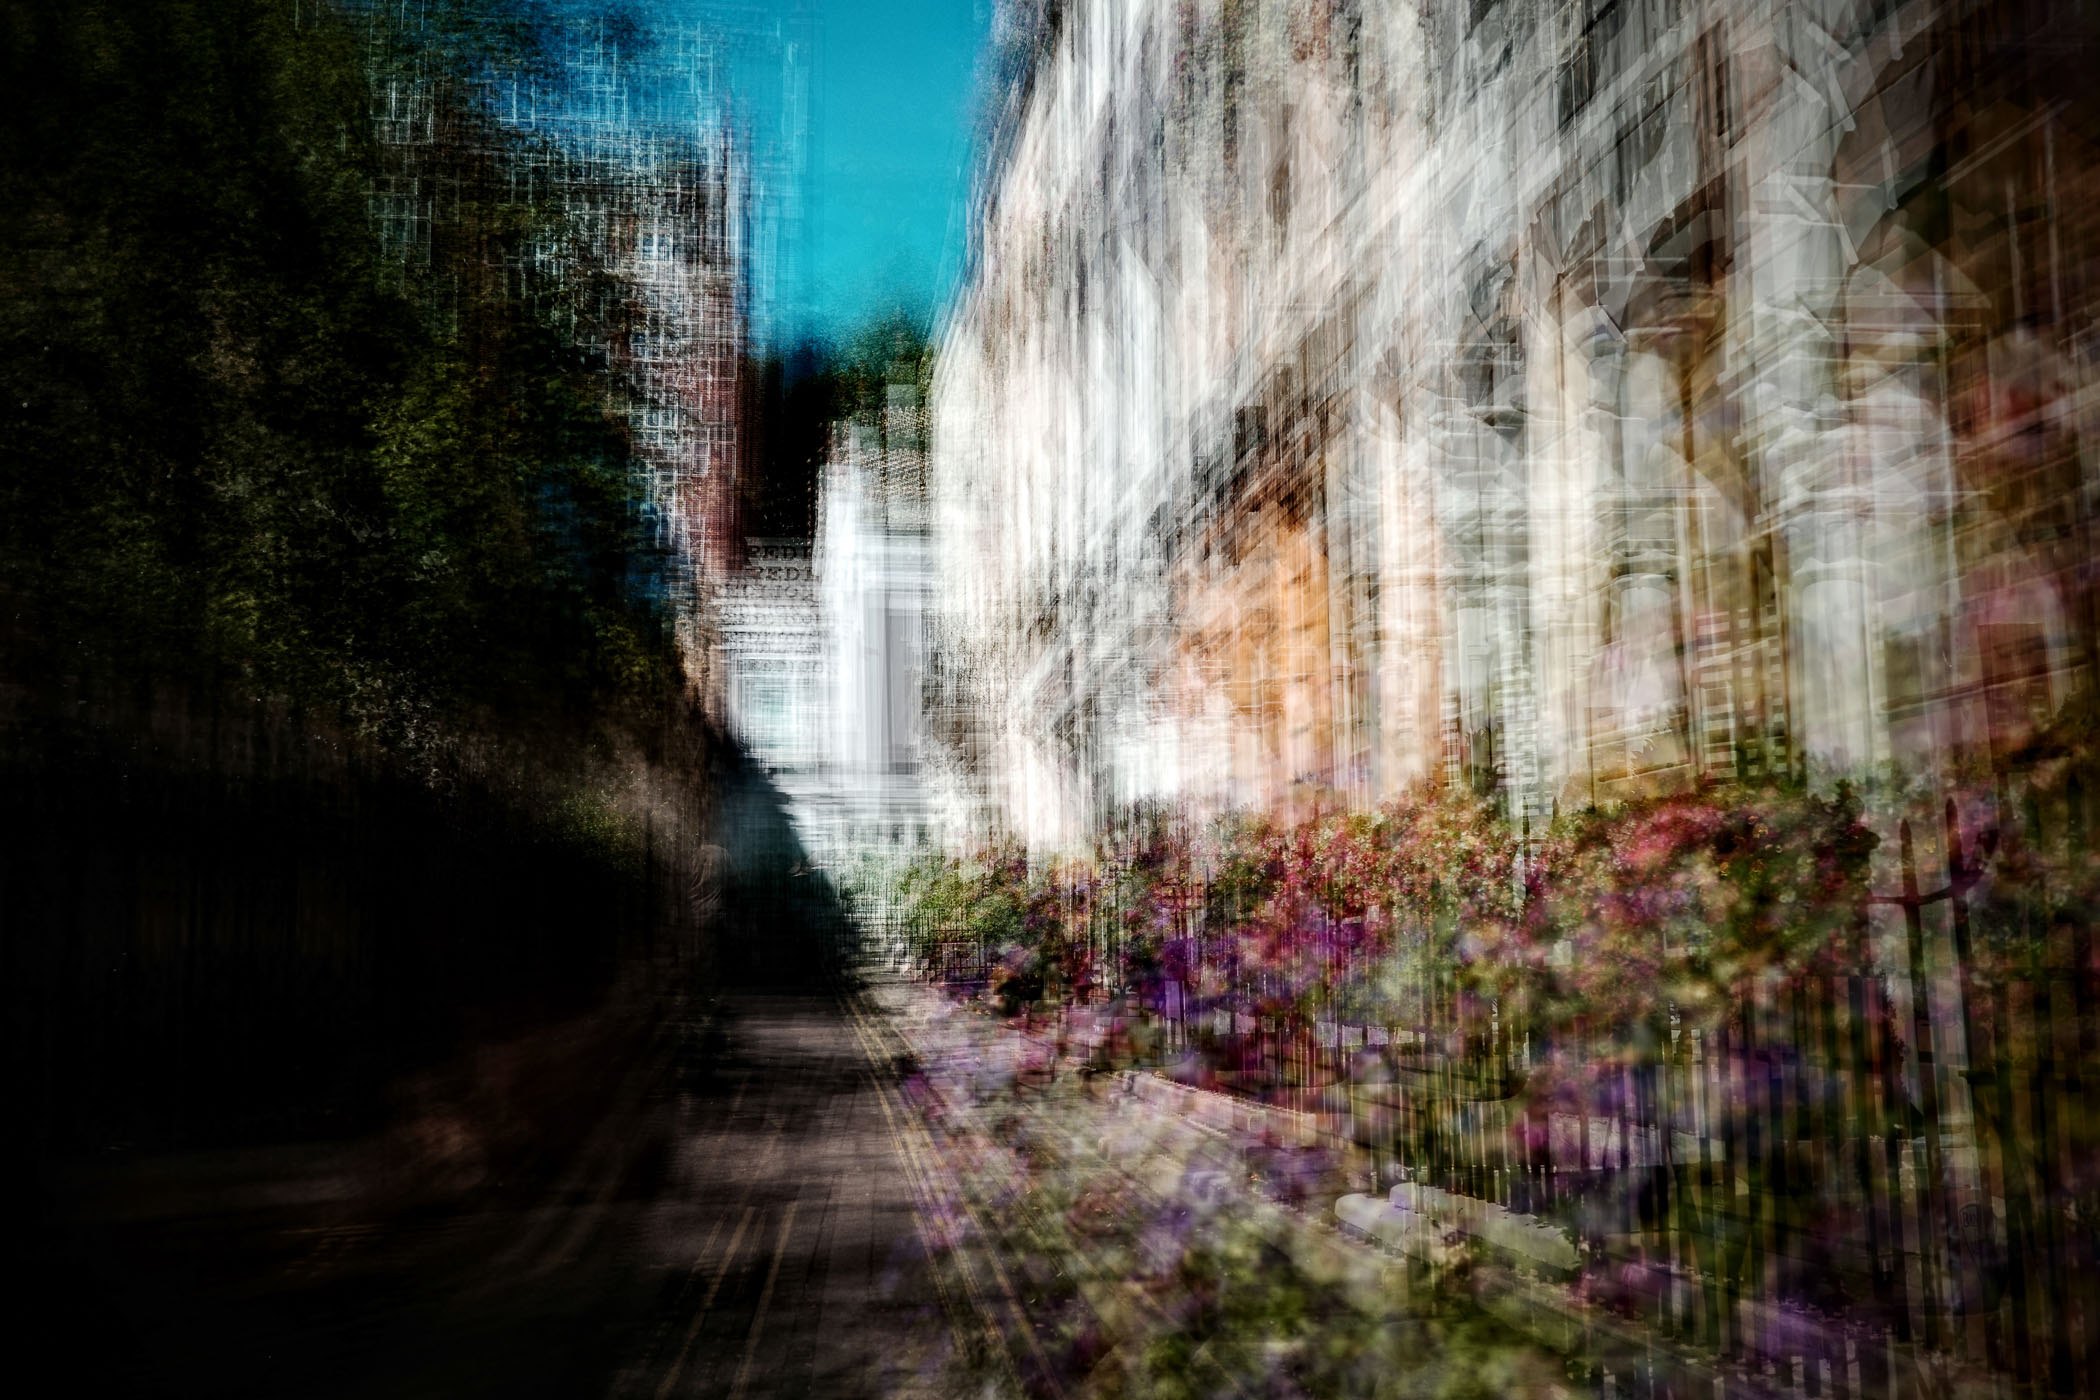
Next up, a small, narrow backstreet that is tucked away deep in Mayfair. I’m not sure that I could find it again. Baskets of flowers lined the well painted iron fencing, and not a drop of litter polluted the scene.
I picked a window of the house at the end of the street as my focus point. As more and more images get layered onto each other, and in the brightness of the sunlight on the camera’s display, it becomes quite hard to get roughly the same composition every time.
To make things easier, I used the focus point as a “marker”. At the start of a layering sequence, I would set up my initial composition and then move the focus point on top of the subject I had chosen, the house window in this case.
I’d then leave the focus point in that position for every subsequent shot in the sequence. For every following shot I would move a bit, compose, so the focus point was over the house window, take the shot, and repeat. This ensured that I’d get the effect I wanted of a mostly recognisable scene, and I wouldn’t lose my “place” and have too much separation from one frame to another.
Capturing the many photographic possibilities
Finding a pocket-sized green paradise
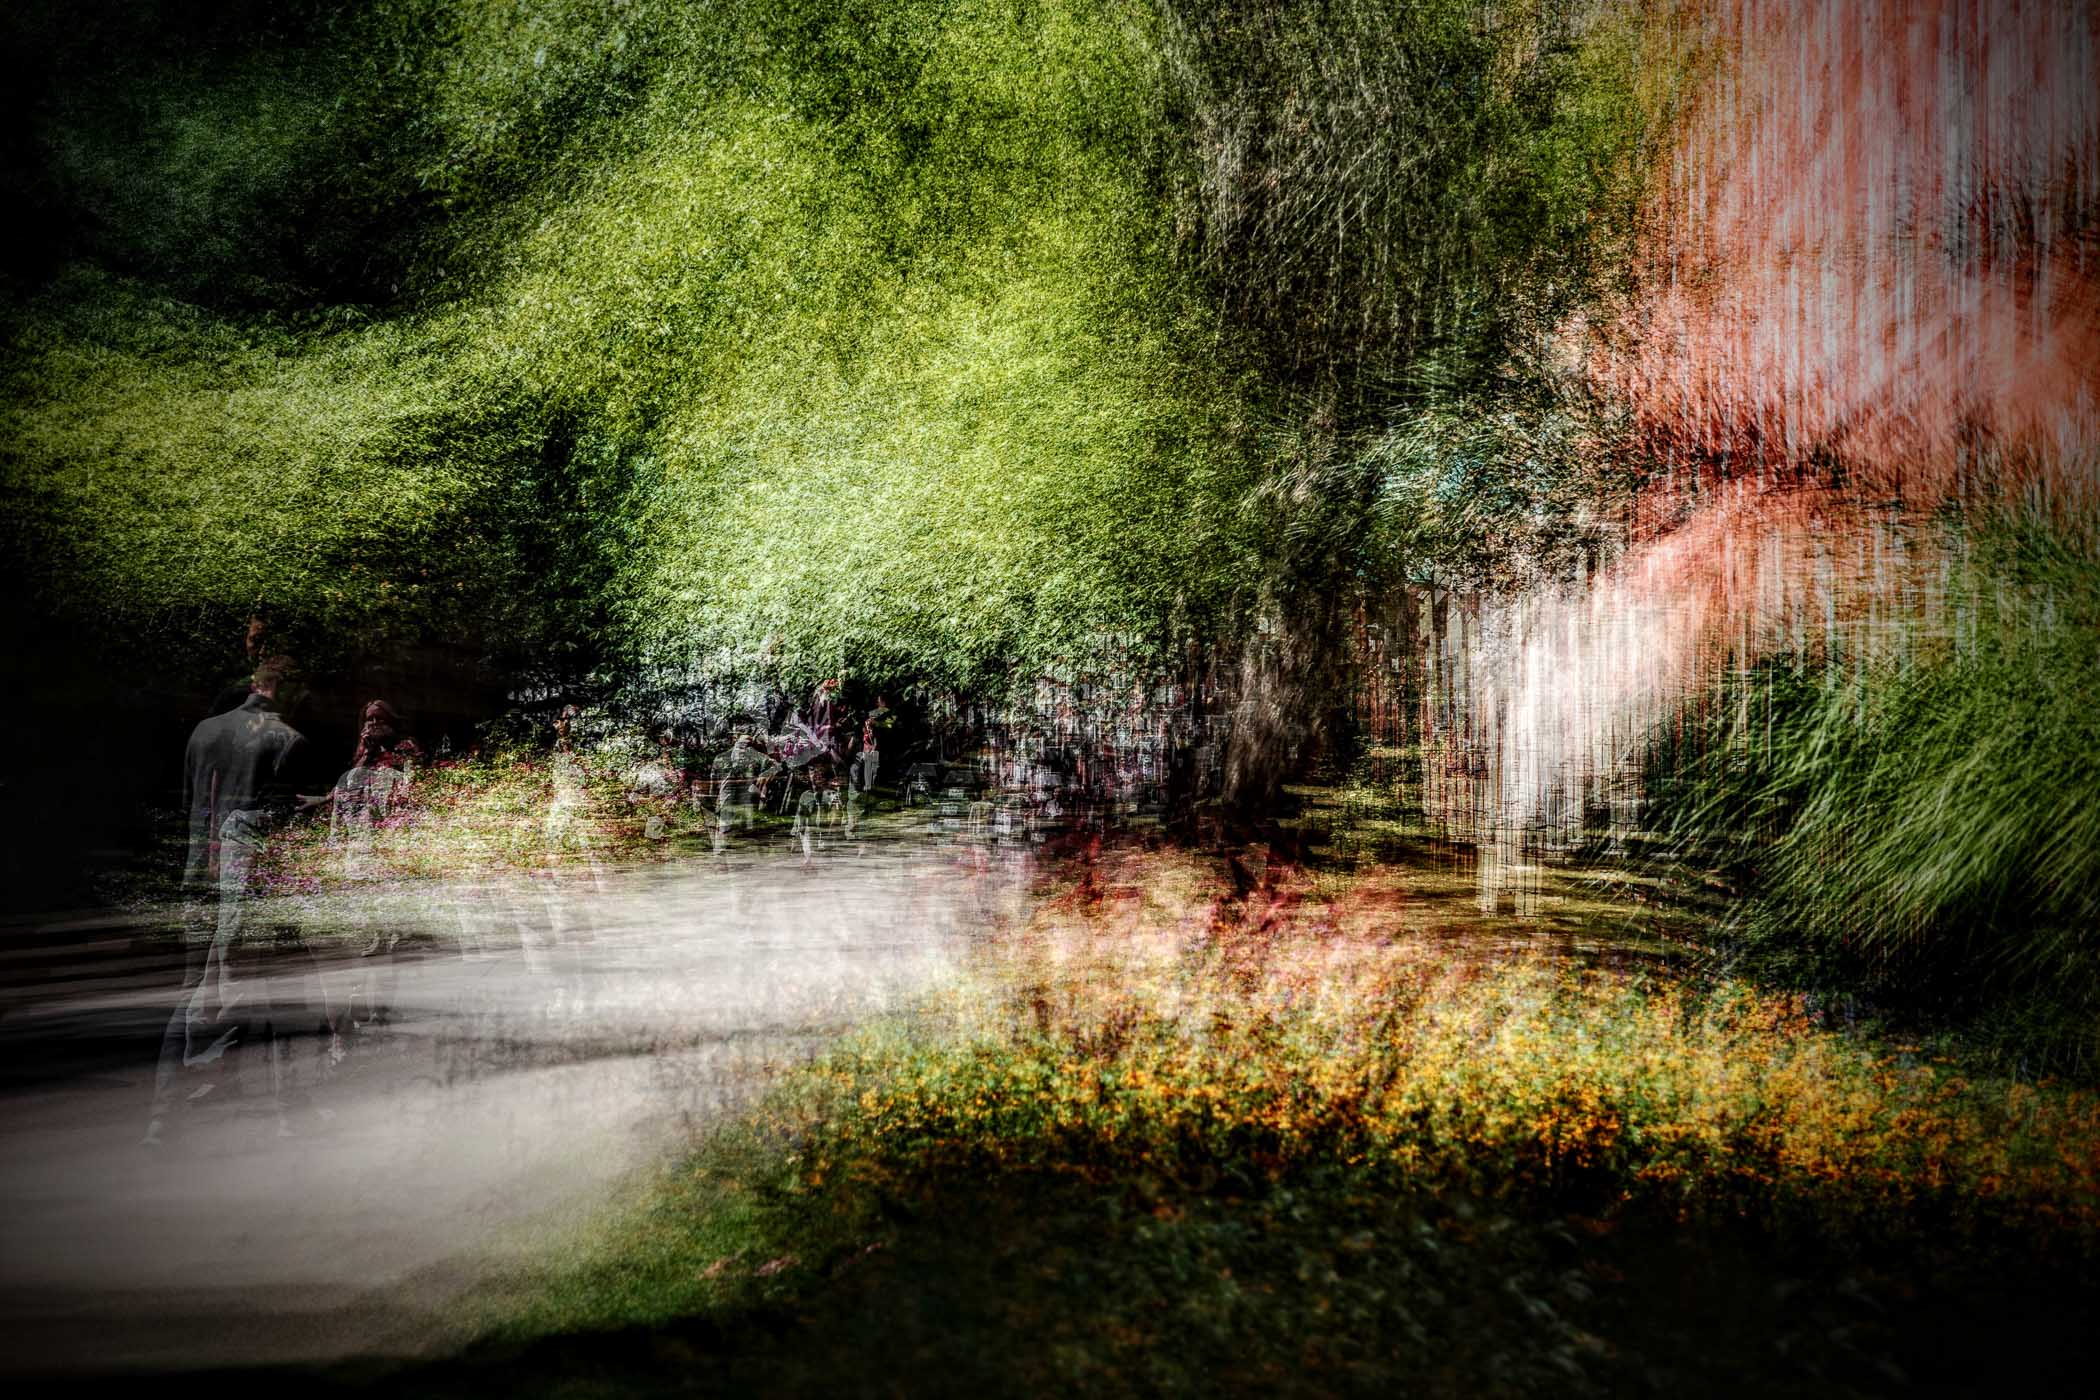
One of the joys of London is the myriad of little gardens and squares that you’ll find all over the city. Some are big and obvious, like Berkeley Square. Others are sneakier, tucked away for only the locals or the very curious to find.
One such is Mount Street Gardens in Mayfair. Flanked by more red brick buildings with sash windows, this is a beautiful green paradise away from all the racket. Lined with benches for a quiet lunch or meditative contemplation of the hedge fund markets, it is a favourite spot.
What compositing allows you to do
Using a tiny camera such as the GRIIIx is great for this type of photography. It is unobtrusive and clearly not a “serious” camera (that is, a DSLR type thing). The fact that is does the compositing in-camera is brilliant in creating something completely different. There are other cameras that do this as well, but it so happens I have the Ricoh. You can also use your phone — there are compositing apps, but I enjoy the complete control I get with a “proper” camera a lot more.
The thing is that you can appear rather odd when doing these composites. Typically, I would have 30-plus images in any of the shots that you see here. Standing there, moving a little, holding the camera up, moving a bit, repeat: it does look rather strange.
A small cloak of invisibility
But in general, I was ignored (or at least, people noticed me but didn’t feel moved to comment or ask what I was up to). I would prefer it if the Ricoh was faster at processing each shot.
There’s a delay of some four or five seconds before you can take the next one. That definitely adds to the awkwardness as you stand there looking like a muppet for five seconds and then repeat umpteen times. However, we are photographers, so we aren’t concerned about feeling awkward.
One of my favourite places
Onwards. The step count was rocketing up. I headed northwards for a snoop around my favourite shop, Selfridges. It has an excellent tech section downstairs that is conveniently close to the equally superb Harry’s Bar. If you ask nicely, they will knock up something completely different in the form of a Mezcal Margarita, for any discerning photographer that requests one.
Walking from there through the smaller roads that run parallel to Oxford Street to the north is a worthwhile experience. Everyone knows Oxford Street itself sucks, and the cognoscenti avoid it like the plague.
Missing the mark
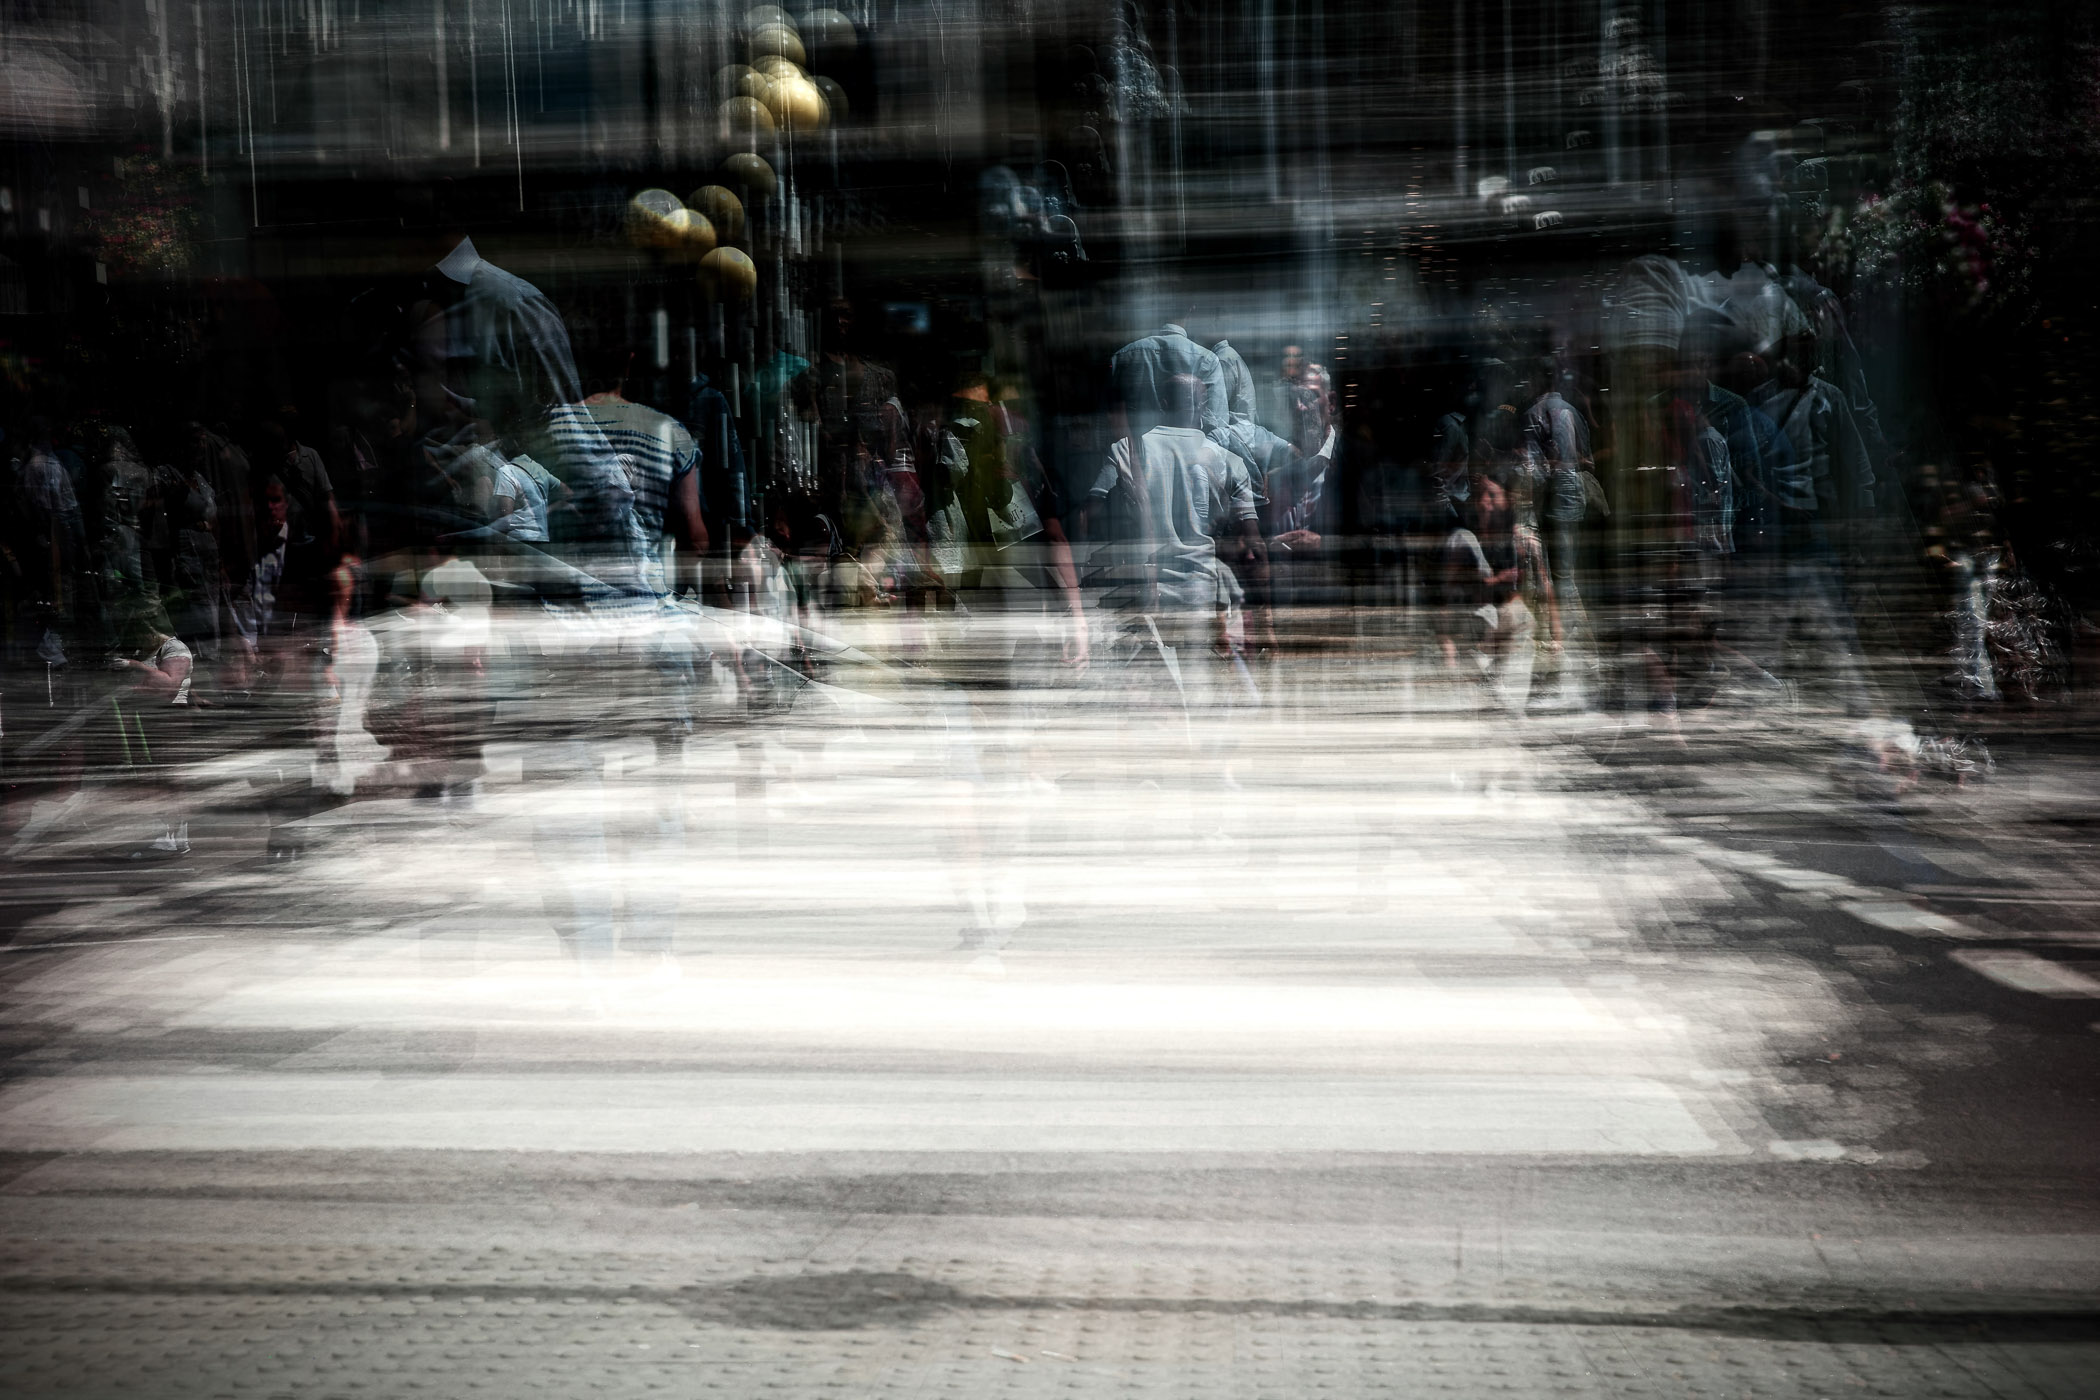
I found a few interesting locations and made some more composites, but they weren’t hitting the mark. Having analysed the results while enjoying a salmon roll from Pret, I concluded that if there is too much movement between shots, the subject gets lost in the noise.
A good example is the zebra-crossing image above. I thought it would work really well, being bold black and white lines and interest from the ghostly people crossing the road. But it turned into a bit of a mush really, so pretend you haven’t seen it.
However, the one below definitely works…
Trial and error was working really well for me. The clearer the subject the better. Many images stacked are better than just a few. Keeping the subject in the same place for each shot using the focus point as a guide.
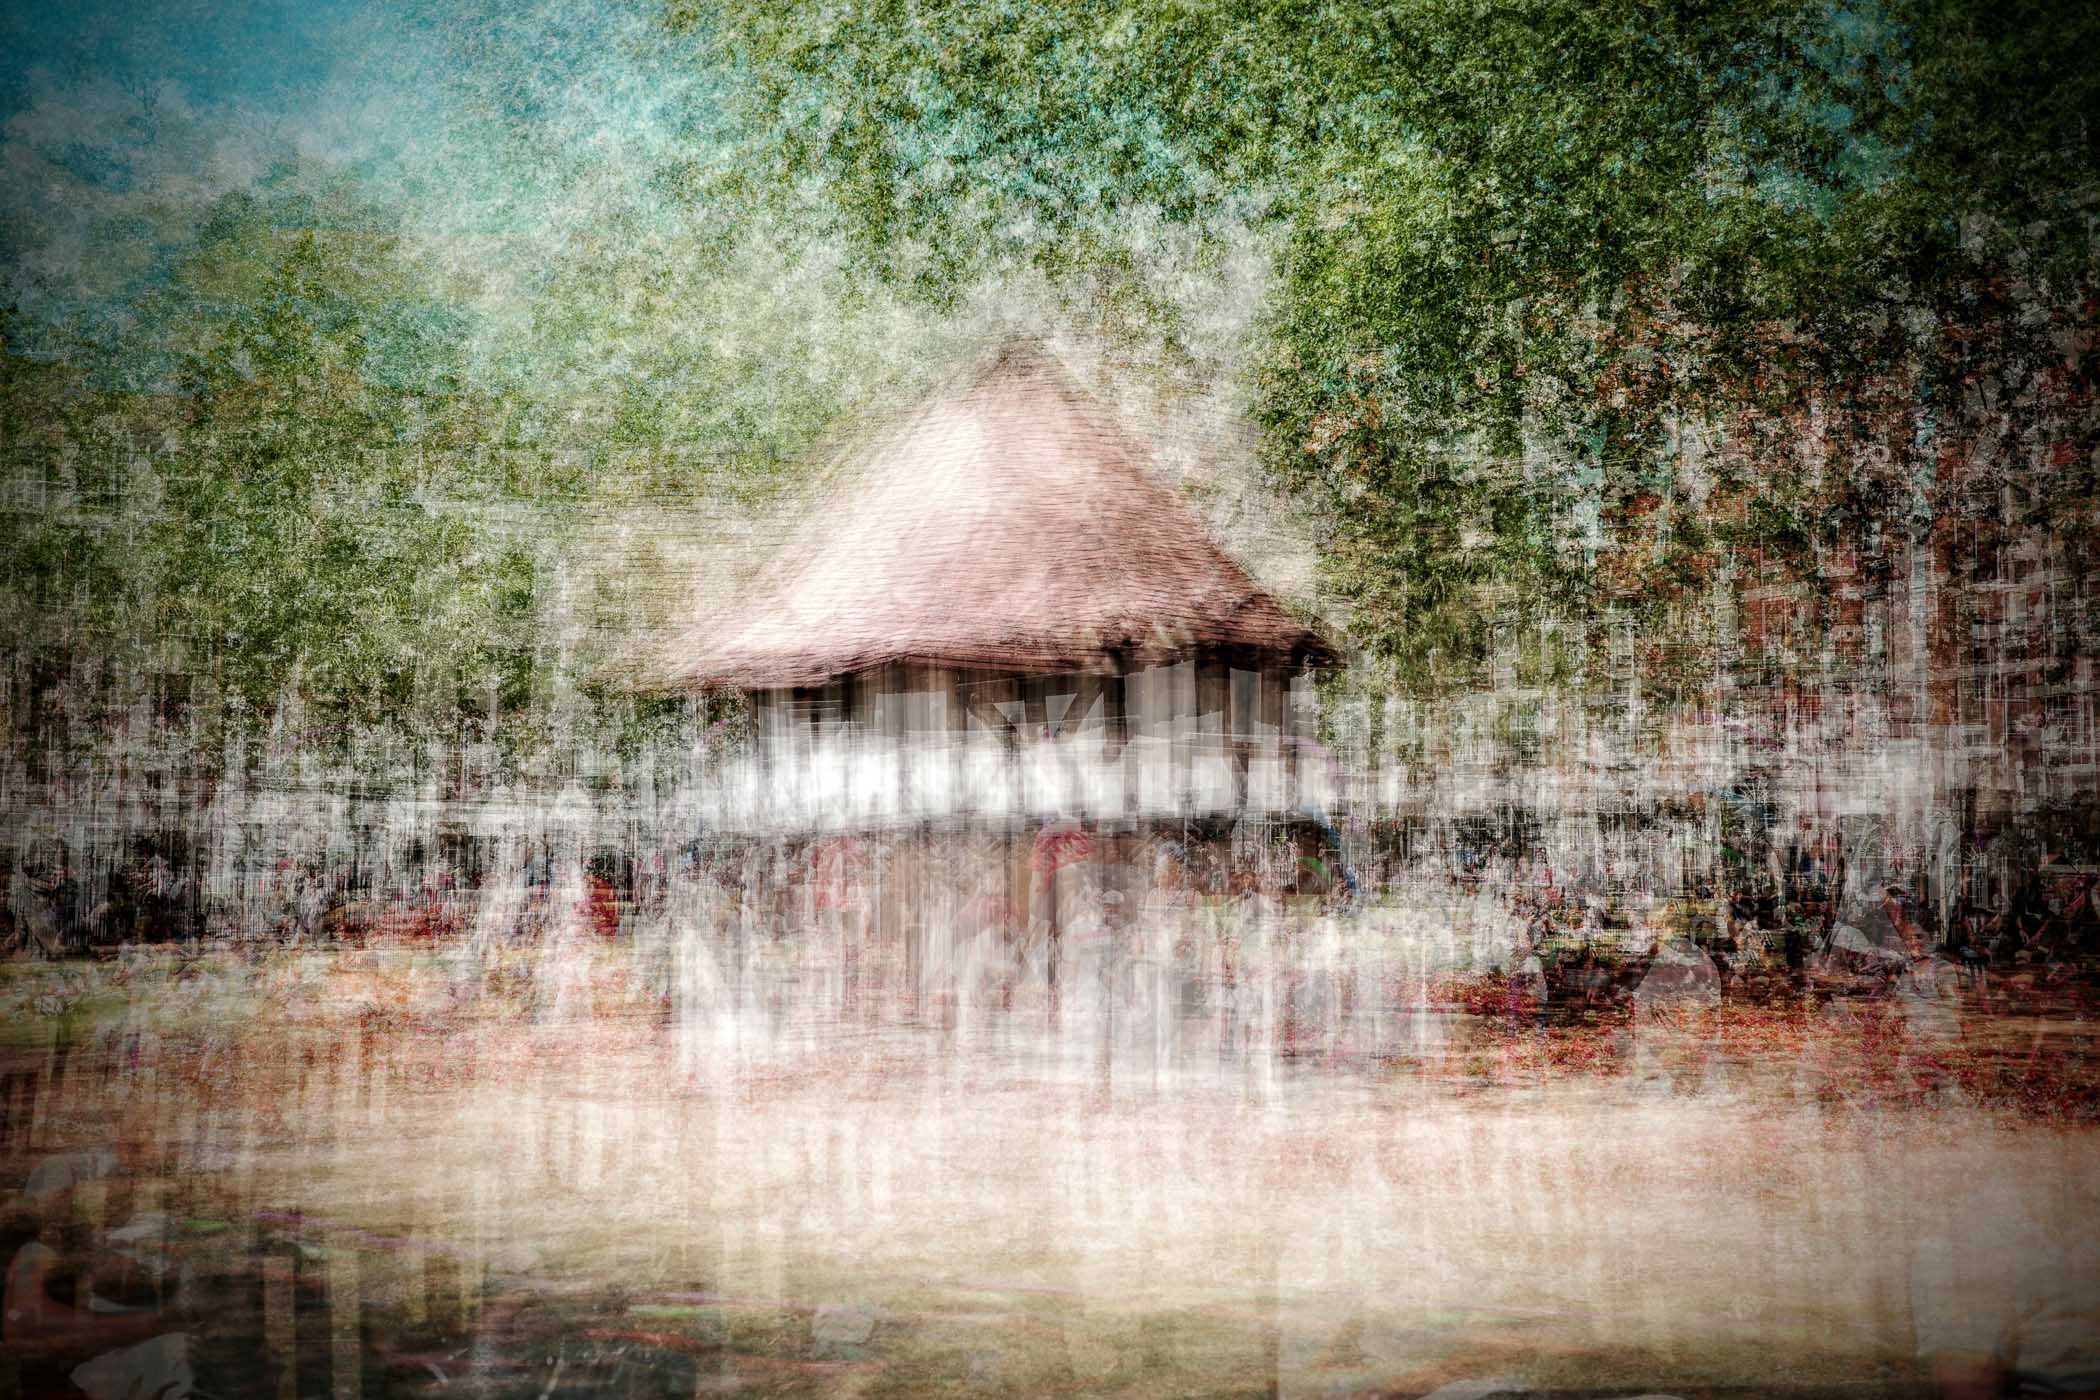
Next up was Soho Square. In the middle of the leafy oasis just off Oxford Street is a weird little octagonal building reminiscent of an old Tudor-era “market cross”. Timber framed with a low roof, it actually hides an electricity substation. Who knew? That became my target for the next composite.
An exaggerated movement
I decided that I would move a lot for this one. I put myself a decent distance from the building and then paced a semicircle around it, taking a shot every time, I took a pace.
The obligatory drunk, mentally unstable bloke shouting obscenities at everyone and complaining about women stopped me from doing a full circuit. My route would have taken me rather too close for comfort into the chap’s exclusion zone that had formed as sunbathers and lunch eaters moved away.
What works really well in this shot is that the background becomes even more randomised due to the constantly changing viewpoint of the camera. Compared to the phone box shot at the start of this article, (where I was in pretty much the same place and just moving side to side and forward and back a bit), walking all the way around the subject creates an excellent effect. It is reminiscent of a Monet watercolour.
Another address on the Monopoly board

Onwards to Tottenham Court Road. This much-redeveloped area now has a massive tube station entrance and is a lot less tatty than it used to be. Some of these tall signs point the way to the Underground. The design is iconic, so had to be part of this little project.
I decided to use the same walking-around-in-an-arc approach that I used in Soho Gardens. It was tricker though due to the road, fast-moving illegal electric bicycles and buses thundering past. I just took my time and gradually worked my way around in a 45-degree arc, keeping the focus point on the red circle of the sign.
The background works nicely here. It is the Centre Point office block, now converted into flats, I believe. The strong lines and light blue colour from the reflected sky work rather nicely.
There is just enough of the sign to be legible, and plenty of ghostly images of people, so get across the feeling for how busy the place (and London itself) is.
Perchance to sleep
One problem I did have was that if the camera turns itself off to save power (I have a three-minute power-off set), your beautifully constructed composite is lost forever. You have to select “Complete” to finalise the image, and if the camera turns itself off it just forgets all about it and you have to start again.
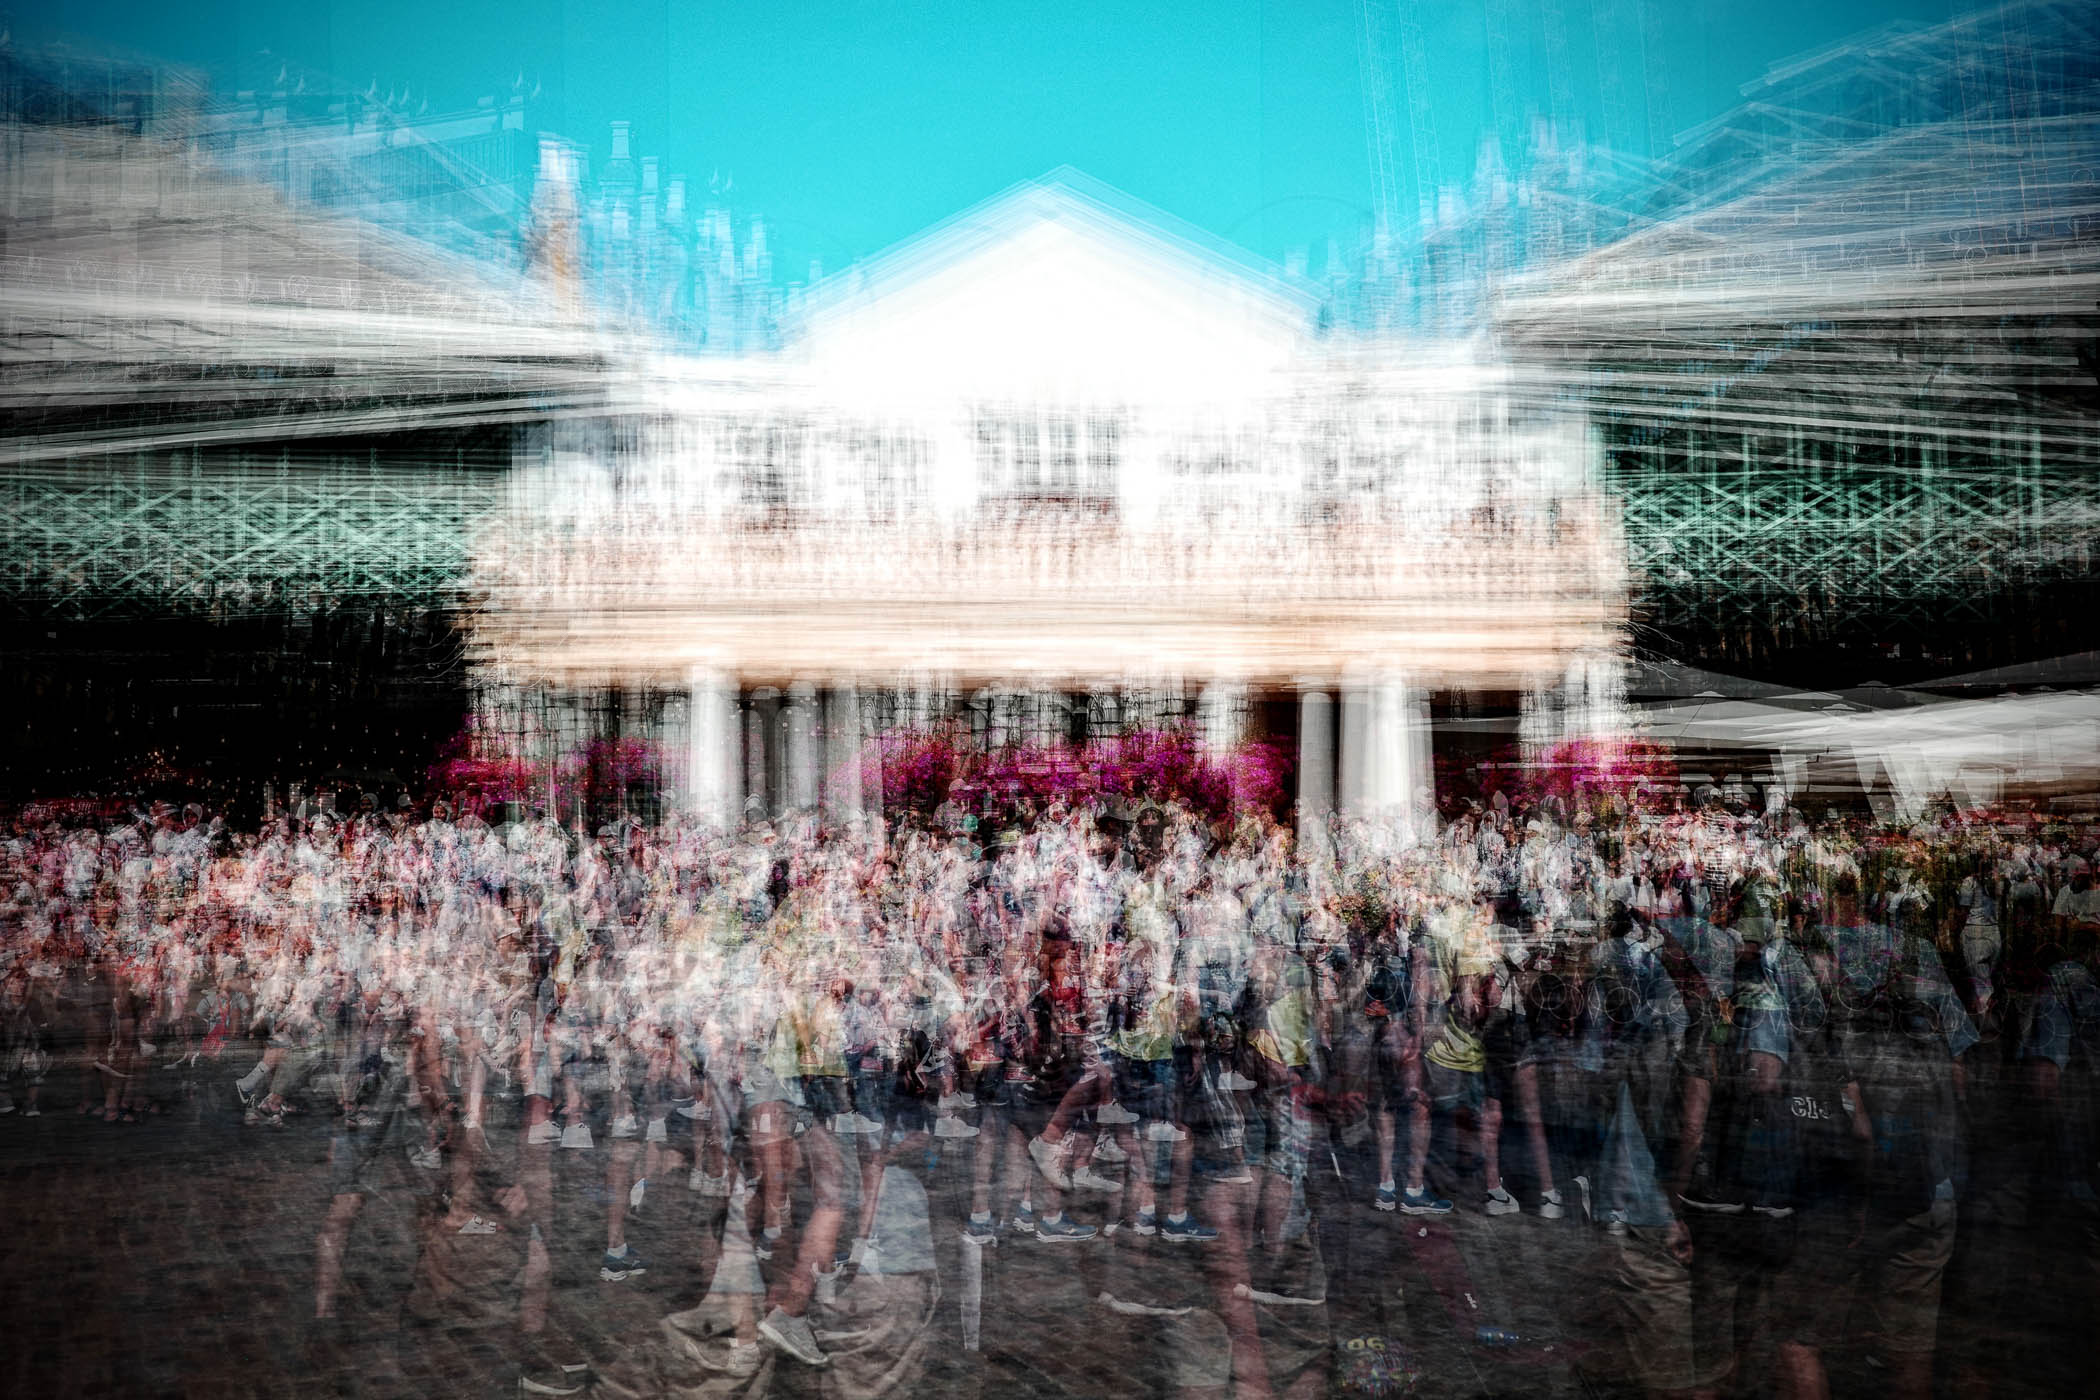
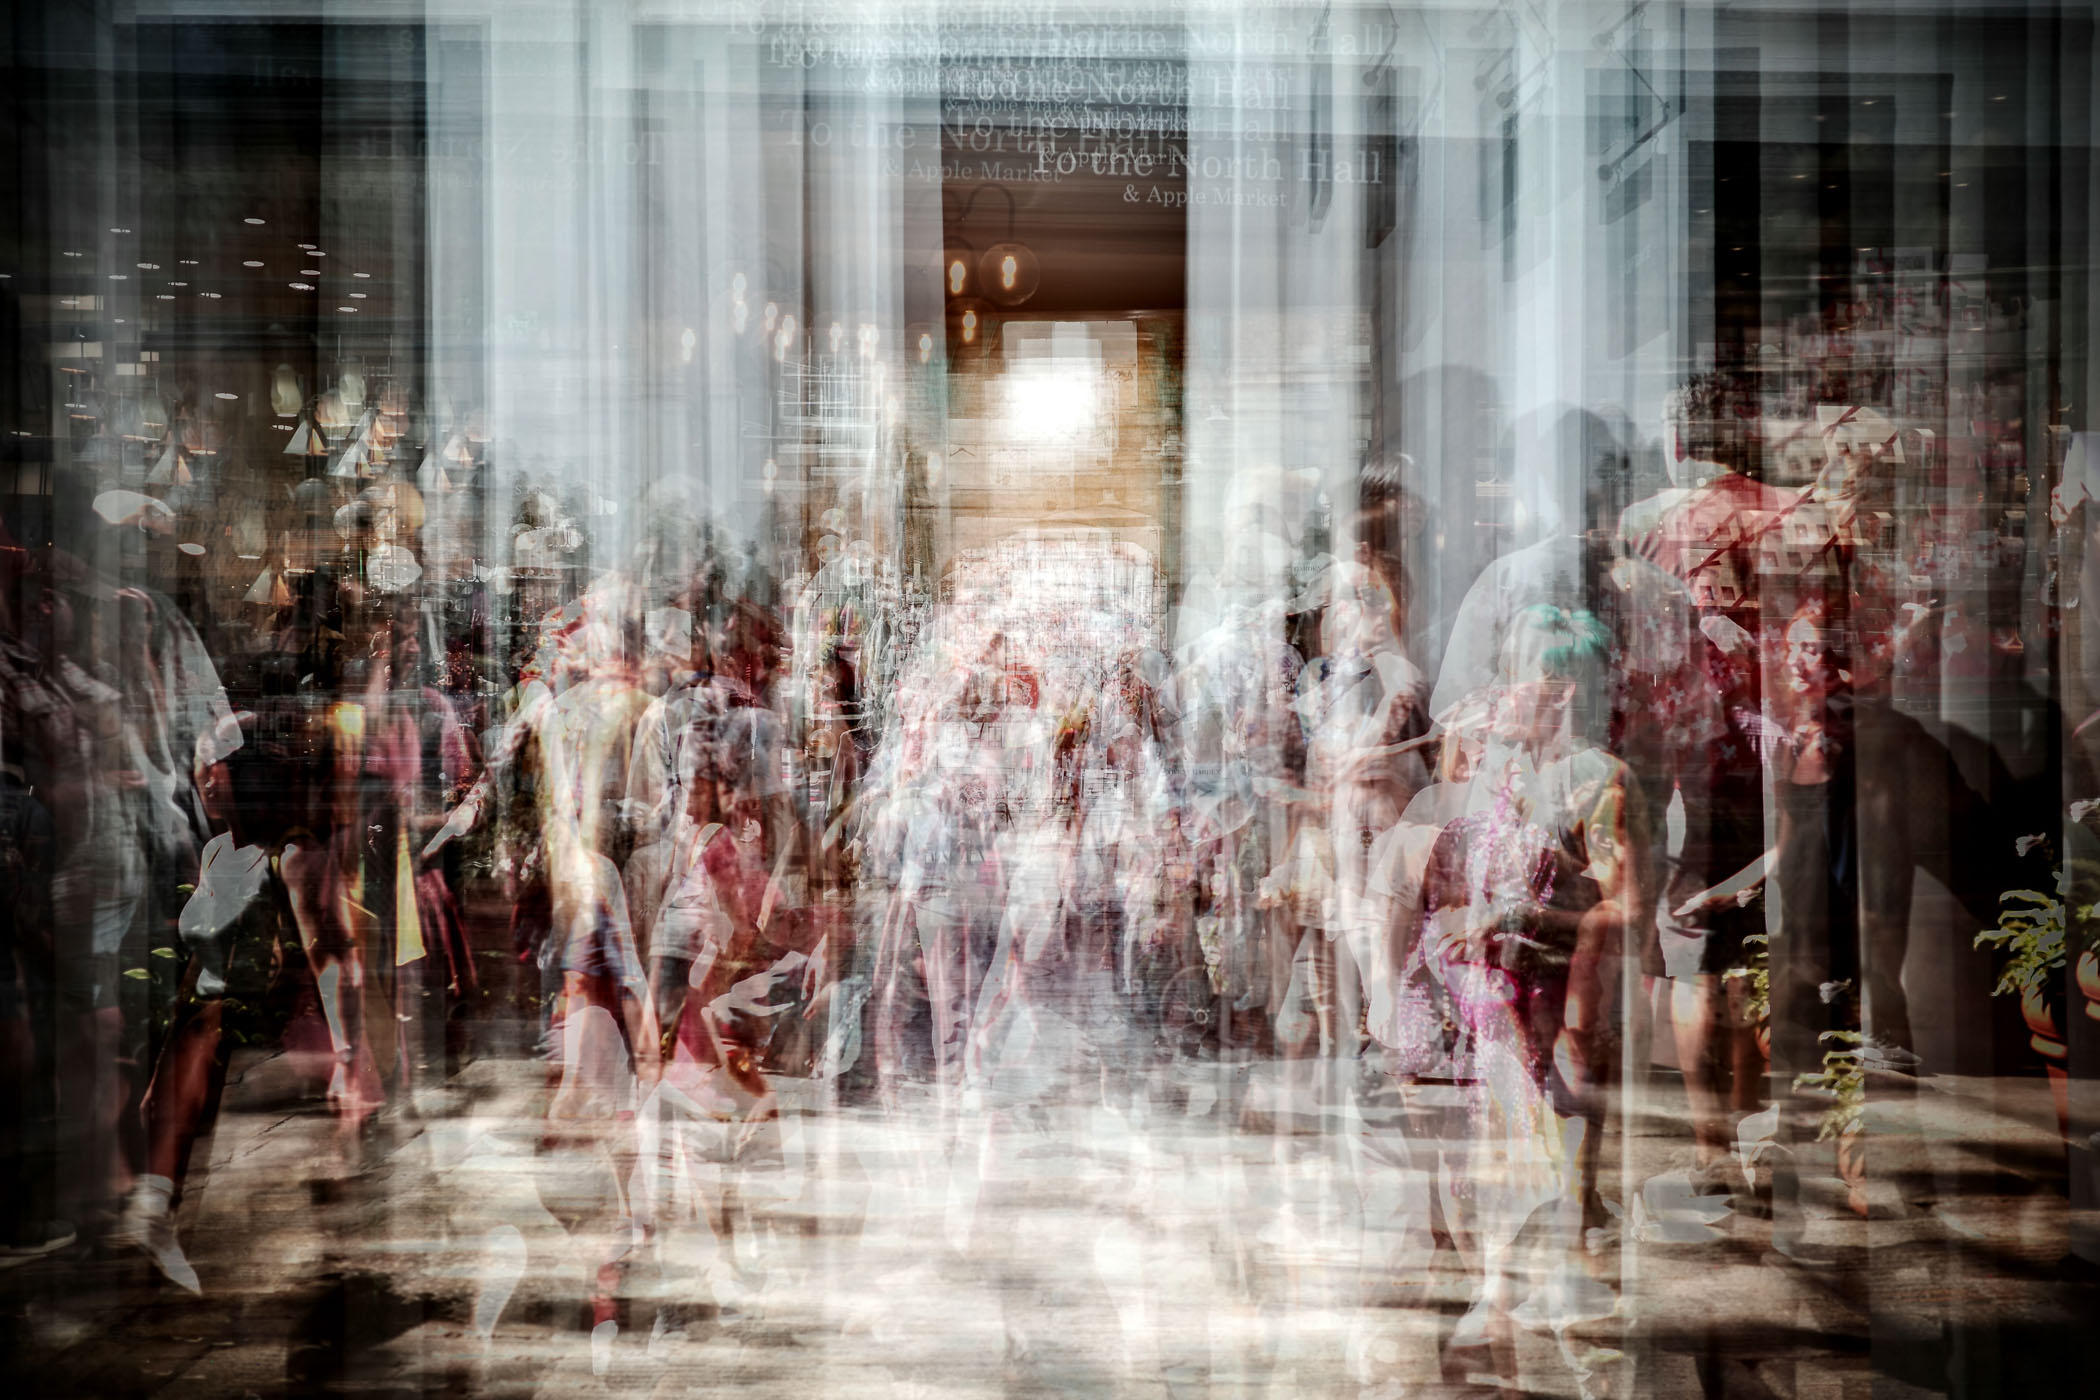
Ever onwards. Over 20,000 steps by now, and another break was due. I headed to Covent Garden, which is always a great spot for photography. Generally, I prefer it very early in the morning when it is nearly empty, and you can play with the light and shadow of the beautiful columns and architecture of the old market buildings. But here I was at 3 pm on a sweltering day in among roughly a billion tourists.
Pick one
I had a few goes at different compositions and like them all. I had to pick just one for this article, though, and it is this one above. This is within the market building itself, looking along one of the alleys between the big market areas.
I reverted to my original technique that I used for the phone box shot, which was also taken in an alley. With about three meters of alley width available, I just took the moved left and right across the alley trying to keep out of everyone’s way, taking low waist-high shots, eye-level shots and above-head shots at each position. I kept the focus point on the bright splodge in the middle.
The light and shadow works really well, and the floor ends up looking as though it might be black and white checked tiles. The people all merge into what appears to be flamboyant dress like one might see at a palace in the Renaissance era. The reflective surface on the left wall of the alley worked really well to enhance this effect. I really like this one.
Refining the recipe
By this point, I had settled on about thirty images per composite. Any more and it got a bit too fuzzy and unrecognisable. Any less and it was too “jagged” and clumsy looking.
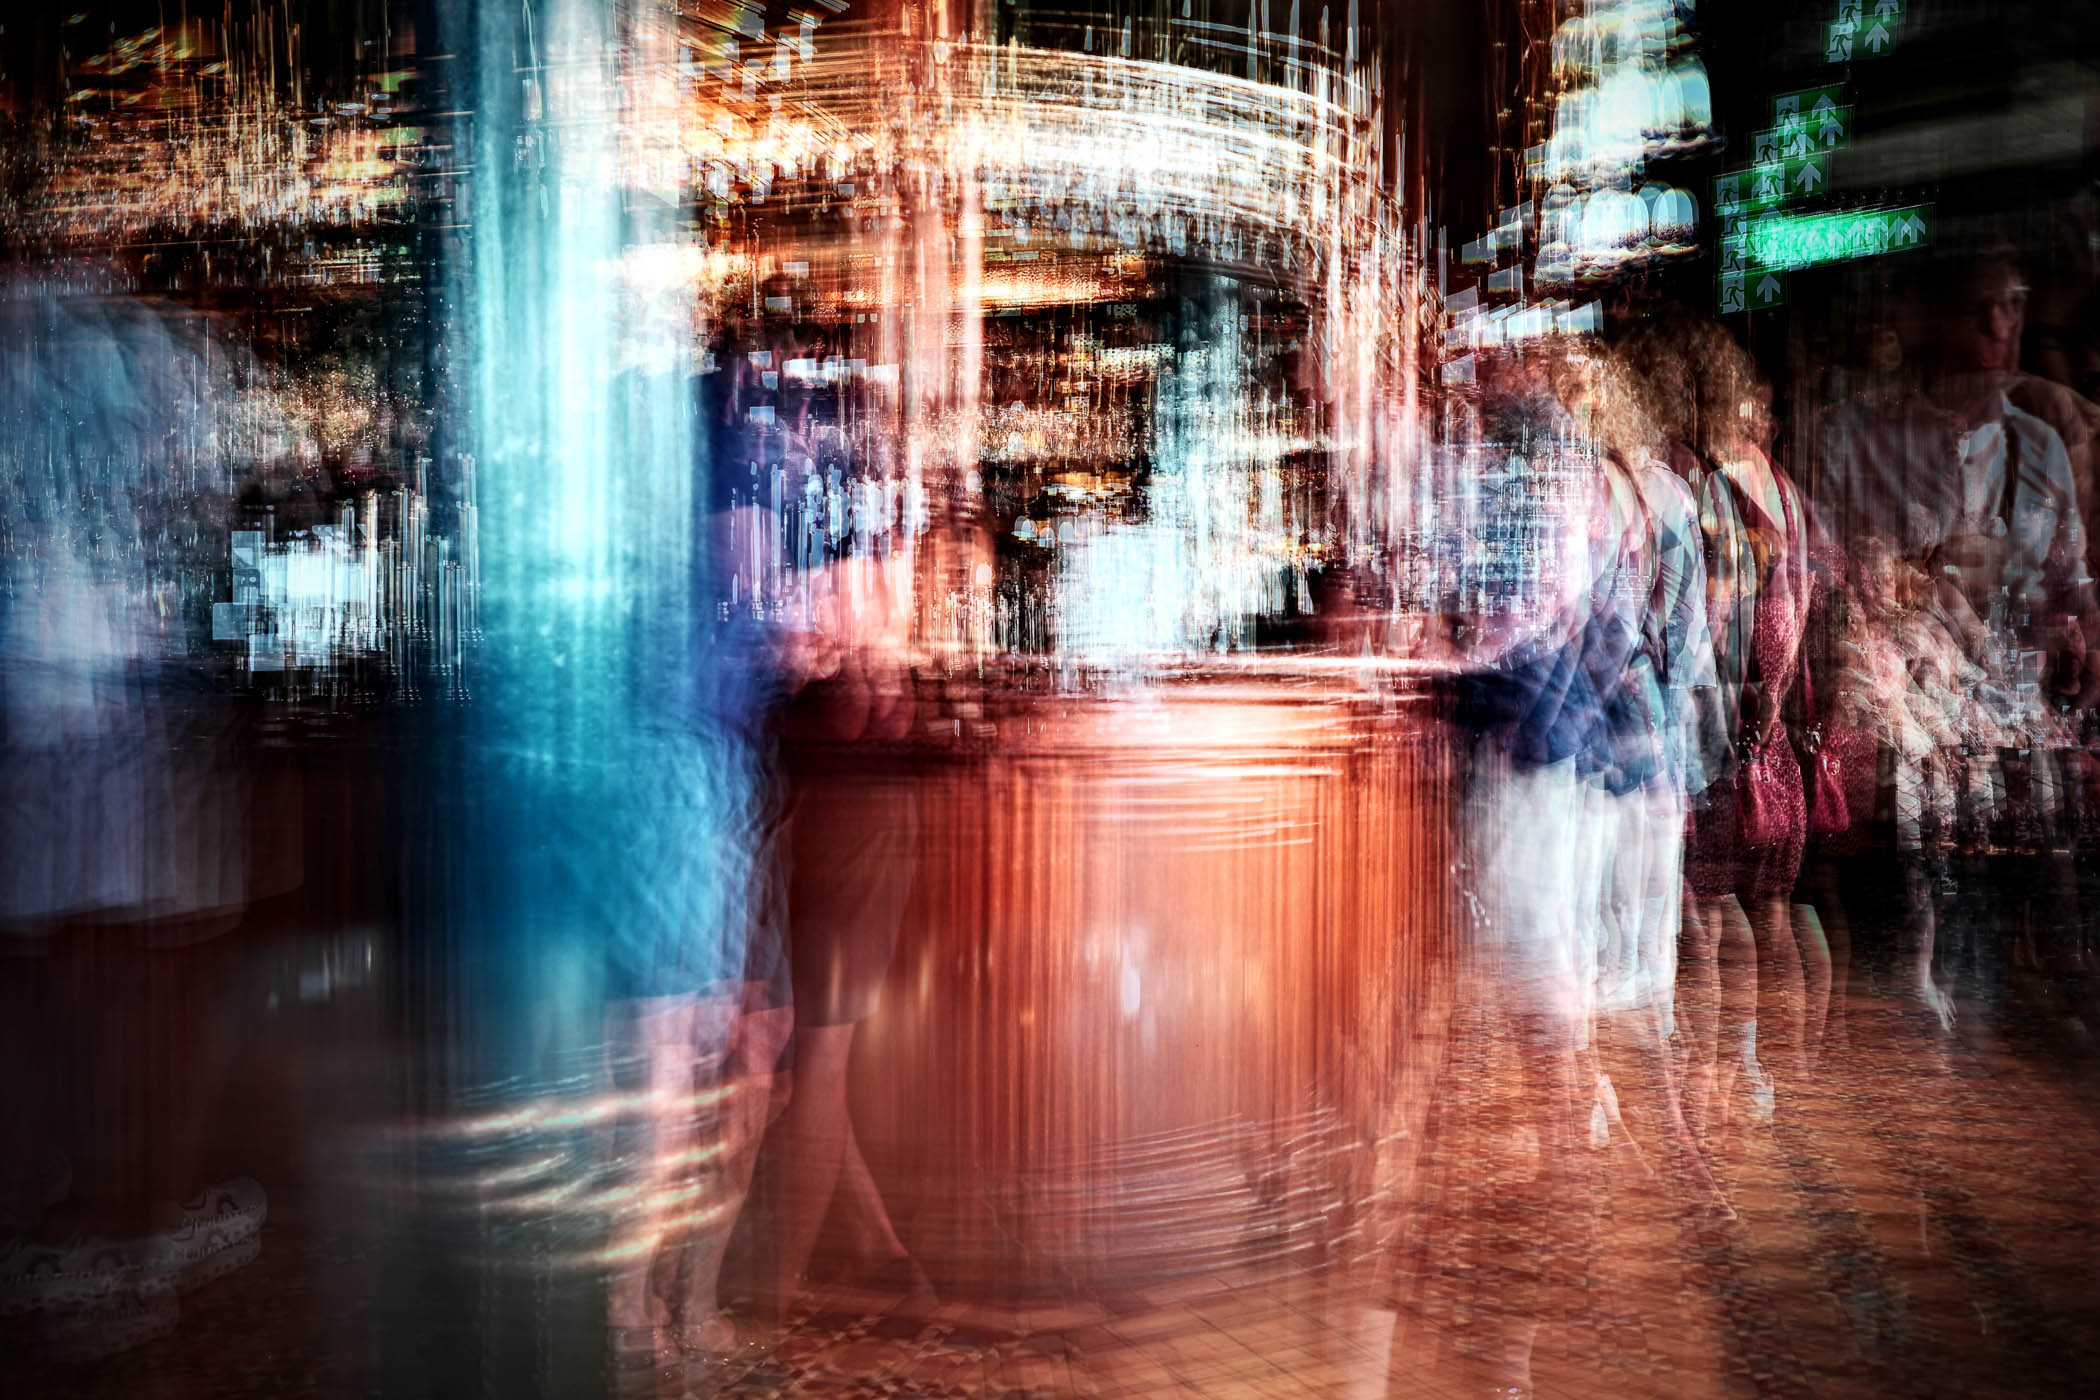
This was thirsty work, so I retired to a rather nice pub to wait for Mrs. T’s arrival. For this shot, I hardly moved at all. These were all taken from my position at a table near the bar, just moving the camera at most 30cm up, down, left and right.
Warmth
The copper of the bar furniture and the rich wood of the bar itself work really well to bring warmth to this shot. All the people look great, showing how busy the place is, and it just feels like a really lovely place to be in London after a long walk.
One important thing to note is the impact of this type of photography on your camera’s battery life. With each final image made up of tens of individual photographs, you will find that you can be taking hundreds of frames to create just a few composites.
Add to that the processing power needed in the camera to create the composites, and the battery gets chewed through pretty quickly. Just keep an eye on it and have a spare, or a charger, with you.
I’m sure some of you will be interested in the camera settings for these. I used the same settings throughout, just tweaking the exposure compensation a little when needed:
Summary of settings to create something completely different:
| Film simulation | Positive |
| Metering | Centre-weighted |
| File format | JPEG |
| Focus | Select AF |
| Mode | P |
| ISO | Auto |
| Drive mode | Multi-exposure |
| Composite mode | Average |
| Save Interim Images | Off |
| Post-processing | A bit of contrast & saturation added, slight vignette, shadows darkened a tad |
More to read:
Make a donation to help with our running costs
Did you know that Macfilos is run by five photography enthusiasts based in the UK, USA and Europe? We cover all the substantial costs of running the site, and we do not carry advertising because it spoils readers’ enjoyment. Any amount, however small, will be appreciated, and we will write to acknowledge your generosity.
Dear Andrew! I’m late to the party but I didn’t want to miss a big thank you. Your images are wonderful, certainly some of the most creative and surprising content I have seen on Macfilos (and elsewhere) so far. How generous to share it here. And also your text is most enjoyable. I am in awe. All the best, Jörg-Peter
Never too late Jörg-Peter! Many thanks for the kind feedback. It is really fantastic to see people like yourself enjoying my images and stories.
I love these. Soho Square Gardens and Tottenham Court Road are exquisite! Thank you so much.
Thanks Alan. Some “just work” better than others. After more exploration and testing, it definitely helps to have a clear and obvious subject. The amount of movement needs to be chosen per subject as well. It is a really intriguing method that I am enjoying a lot.
Excellent stuff, Andrew. I found it fascinating, and the resulting images are wonderful. I could imagine one of these on my wall. I am also pleased you used the little Ricoh, which is a vastly underrated camera, mainly because of its small size and modest looks. Most people cannot image what it can do. Even I sometimes consider it to be a “reserve” for a “proper camera”. Yet, despite the lack of viewfinder, it is a real grown up.
Thanks Mike. It seems not many other cameras have the “unlimited” composite facility that the little GRIII has.
Love these!
So fabulous and intriguing. I also appreciate your explanation of how you did each one.
Thanks for sharing.
Joel
You are very welcome – glad to have cheered your day a little.
Absolutely wonderful. Thanks
Brilliant. Just brilliant.
Much appreciated. Glad you enjoyed it.
Hi Andrew, I thought this was a fantastic article and a truly original way to use multiple exposure photography to create images that are both beautiful and unusual. Clearly, the ability of your GRIIIx to take an unlimited series of multiple exposures was crucial to your success. I have not found a way to do this on my SL2, but my LUMIX S5 does allow up to 4 exposures in a single frame. To reach thirty variations I would therefore have to take a series of multiple exposures and then stack them in Photoshop – much more cumbersome. Thanks for the tip about using the focus point as an anchor, while you adjust position. Once again, thanks for a superb article and series of images. All the best, Keith
Thanks Keith. it is very hard to work out which cameras have this unlimited frame compositing mode. I think the Olympus EM-5 type cameras have it and I am pretty sure I have the same on my Fuji X100V. Would be good if others can report into this thread if their cameras can do this.
Bit of Googling. The Fuji X100vi can do max 9 shot composites. Olympus EM5 also has a multiple exposure mode but it isn’t clear how many it can do from the manual, though it seems limited to 3 frames if in RAW mode.
These are great Andrew
Well Done!
Thanks Jono – that’s praise indeed coming from yourself.