
It is hard to connect to the people you work with these days, with many of us switching to remote work full time. In that setting, getting to know your colleagues in the way you would by having a chat at the coffee machine or over a joint lunch or dinner isn’t easy.
To remedy this somewhat, a colleague of mine decided to set up a series of Friday-morning virtual chats where everyone shares something that is not work-related. And that could be anything, such as music skills or sharing a passion for cooking.
I signed up to share as well, and I decided to reflect on what I picked up over the years that has helped me improve my photography. I decided to focus mostly on composition and storytelling since that can be done with any camera or smartphone. I didn’t bother with more technical aspects of photography.
Principles
In my ten-minute slot, I took the group through several principles that I’ve learned and are with me when I view a scene. Time was short, and many colleagues asked me to share more. I decided to type it out in my blog, so everyone can go through it at their own pace and perhaps this can be of use to some other readers. Sharing my experience, as an amateur in the truest sense of the word. Going through my principles, I realised there are more than I thought… So this will be a series of posts rather than just one.
This initial article will focus on the first principle that dwarfs everything else: light matters. This may seem completely obvious, and of course, it is. And yet, I have to admit that I forget it at times. Especially when I don’t have that much time, I am not deliberately out to create a photo, but just catching life as it happens.
A birthday, a nice scene on a walk, a vista on vacation: For me, this is probably how I take 95% of my photos. I am guessing that for many of you, this is no different. Therefore, it is kind of important to find a way to remind yourself to reflect on the light at that moment. This won’t take long. Look around you, see if this is the best light to capture what you want, and adjust accordingly. Also, don’t hesitate to take a few photos from different angles to see what works best.
Take the photo below, for instance. I snapped this while out biking. I just rode up a hill and was rewarded with a beautiful view of the Bavarian countryside. I took out my trusty tiny Ricoh GRIII and pressed the shutter.
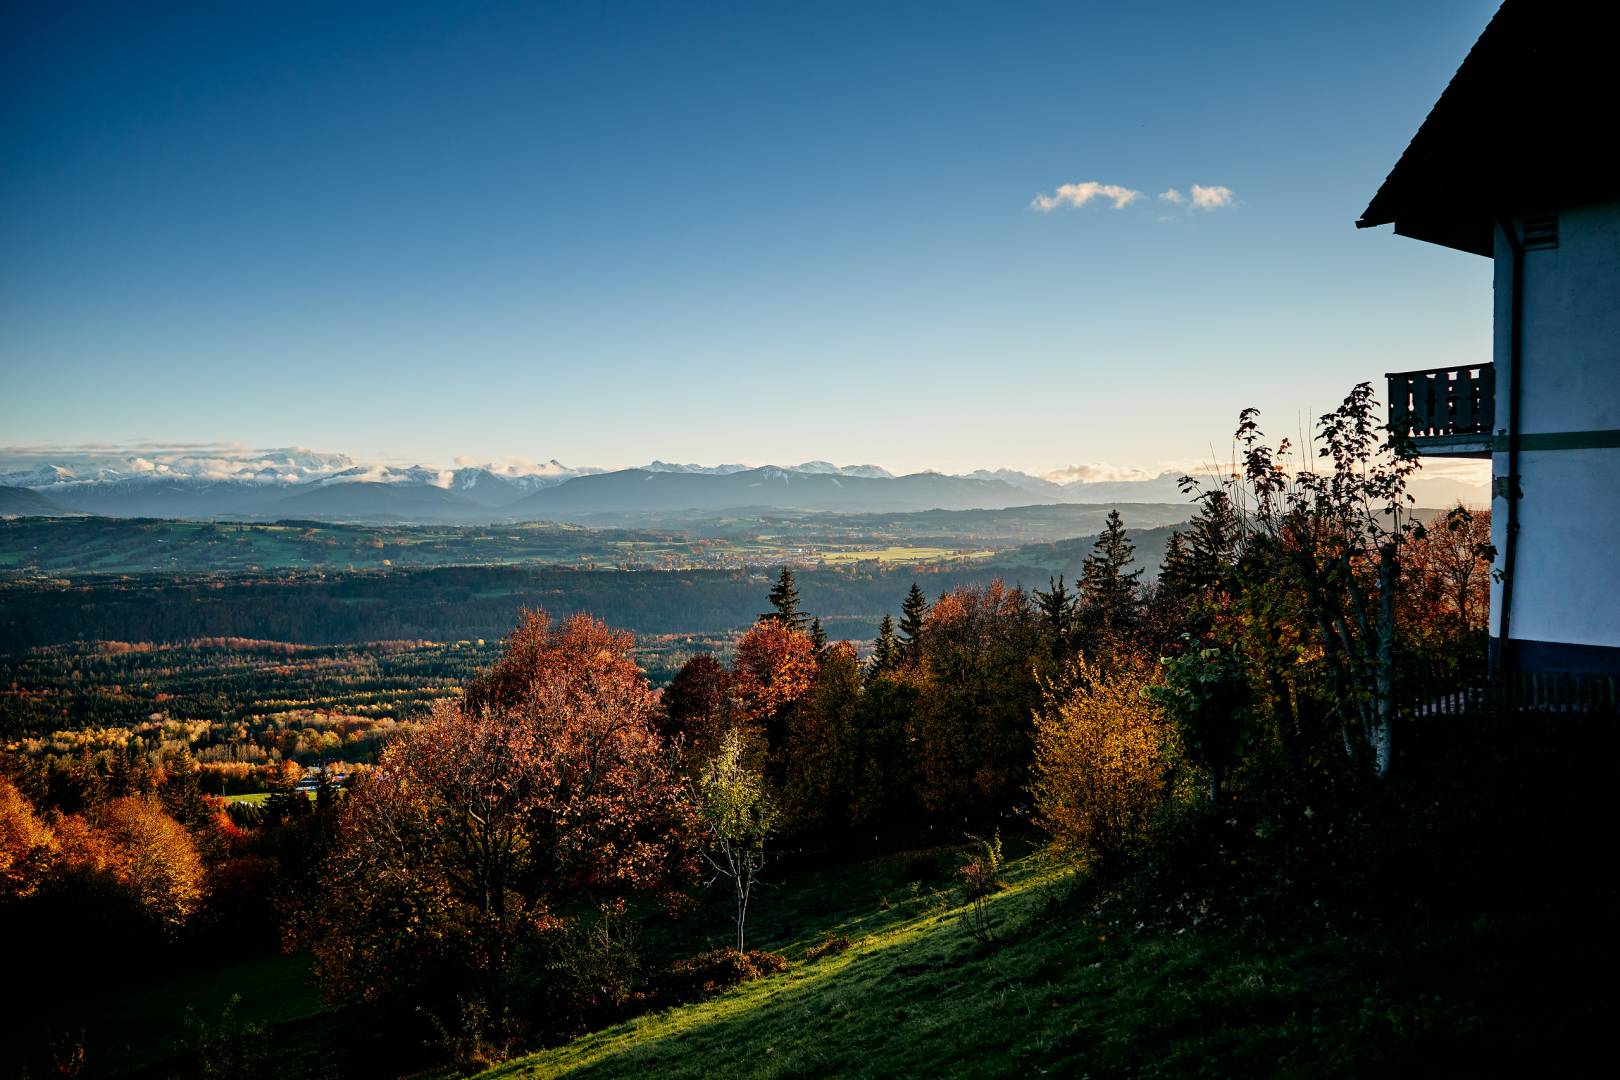
It’s a decent photo. The fall colours are captured, the house adds some dimension to the scene, and the tiny cloud renders the blue sky a little less boring. But then I became aware of the light. I walked about twenty meters to the left, and I was able to capture the scene in a very different way. This was the result:
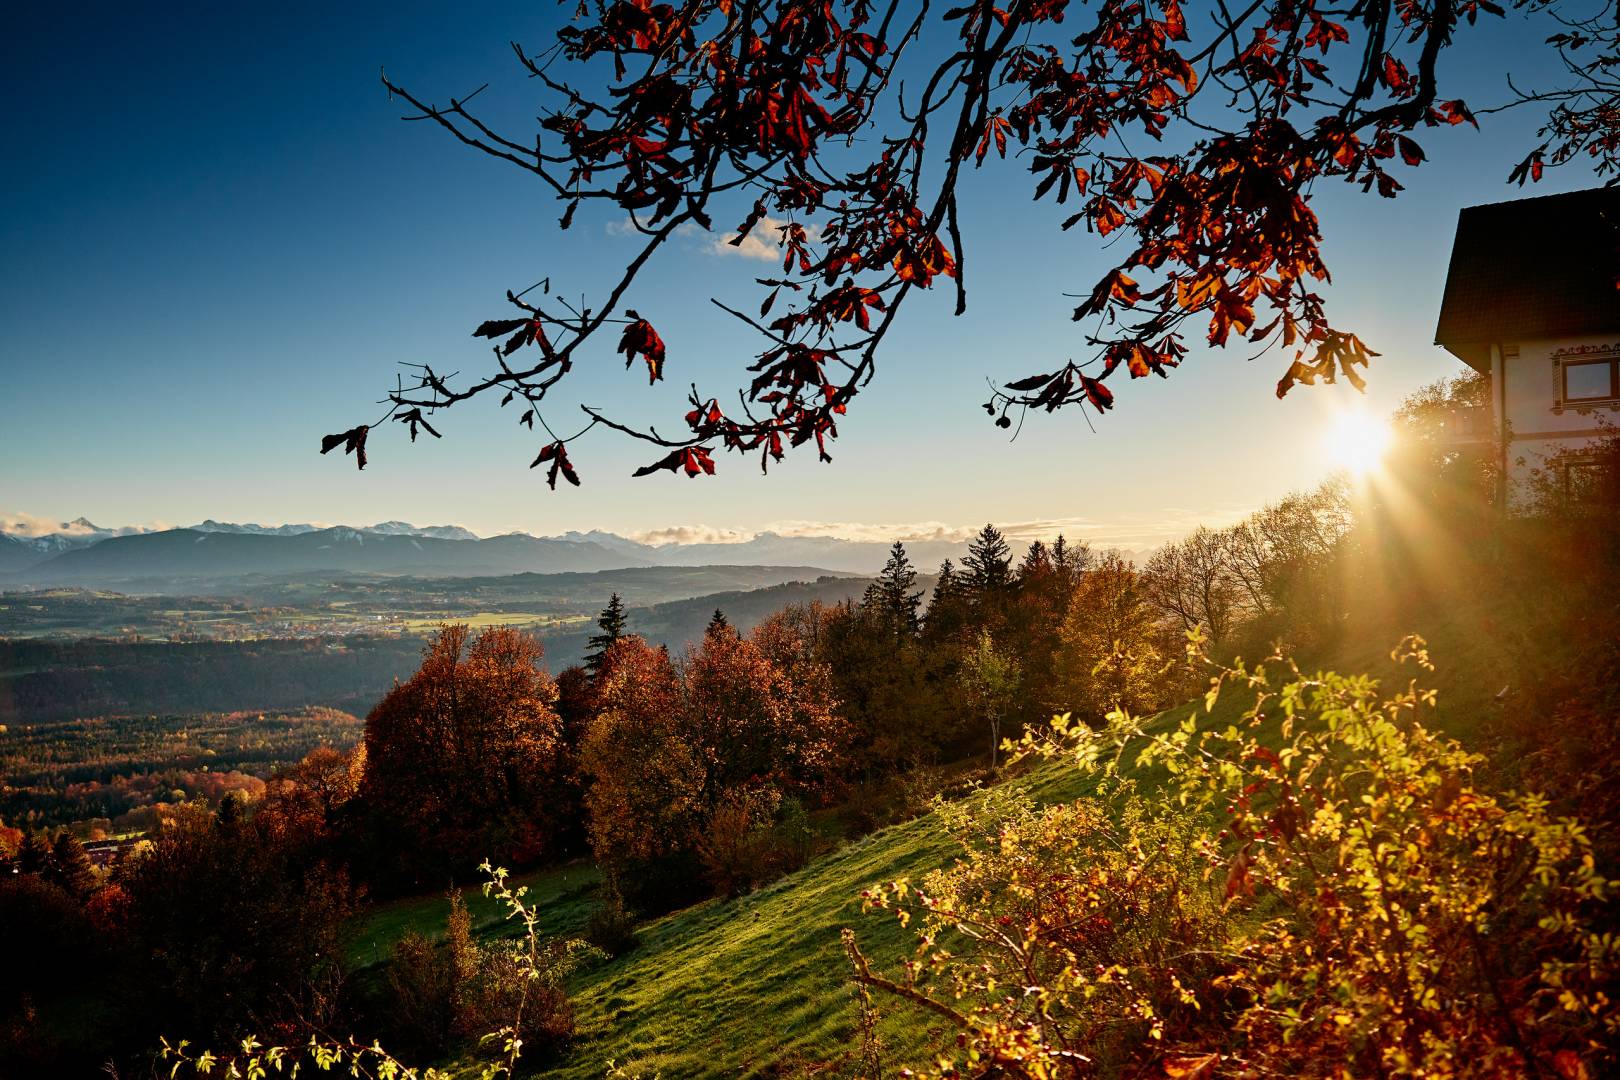
The light is now clearly visible and adds so much to the picture. The colours shine even more; you also get a sense of the time of day, and it just pops more. By reframing, I could also bring in some of the overhanging branches with their red leaves still on them. They were nicely lit by the setting sun as well. By becoming aware and moving a couple of meters, I was able to take a much better photo.
iPhone
Here is another example, from another bike ride. This time in the Netherlands, on one of my regular routes that take me through a woody area with some interesting gravelled roads. It was that time of day again where the sun has a beautiful golden glow. The trees and branches sliced up the light in many small beams. It was so pretty; I had to stop to take a photo—this time with my iPhone.
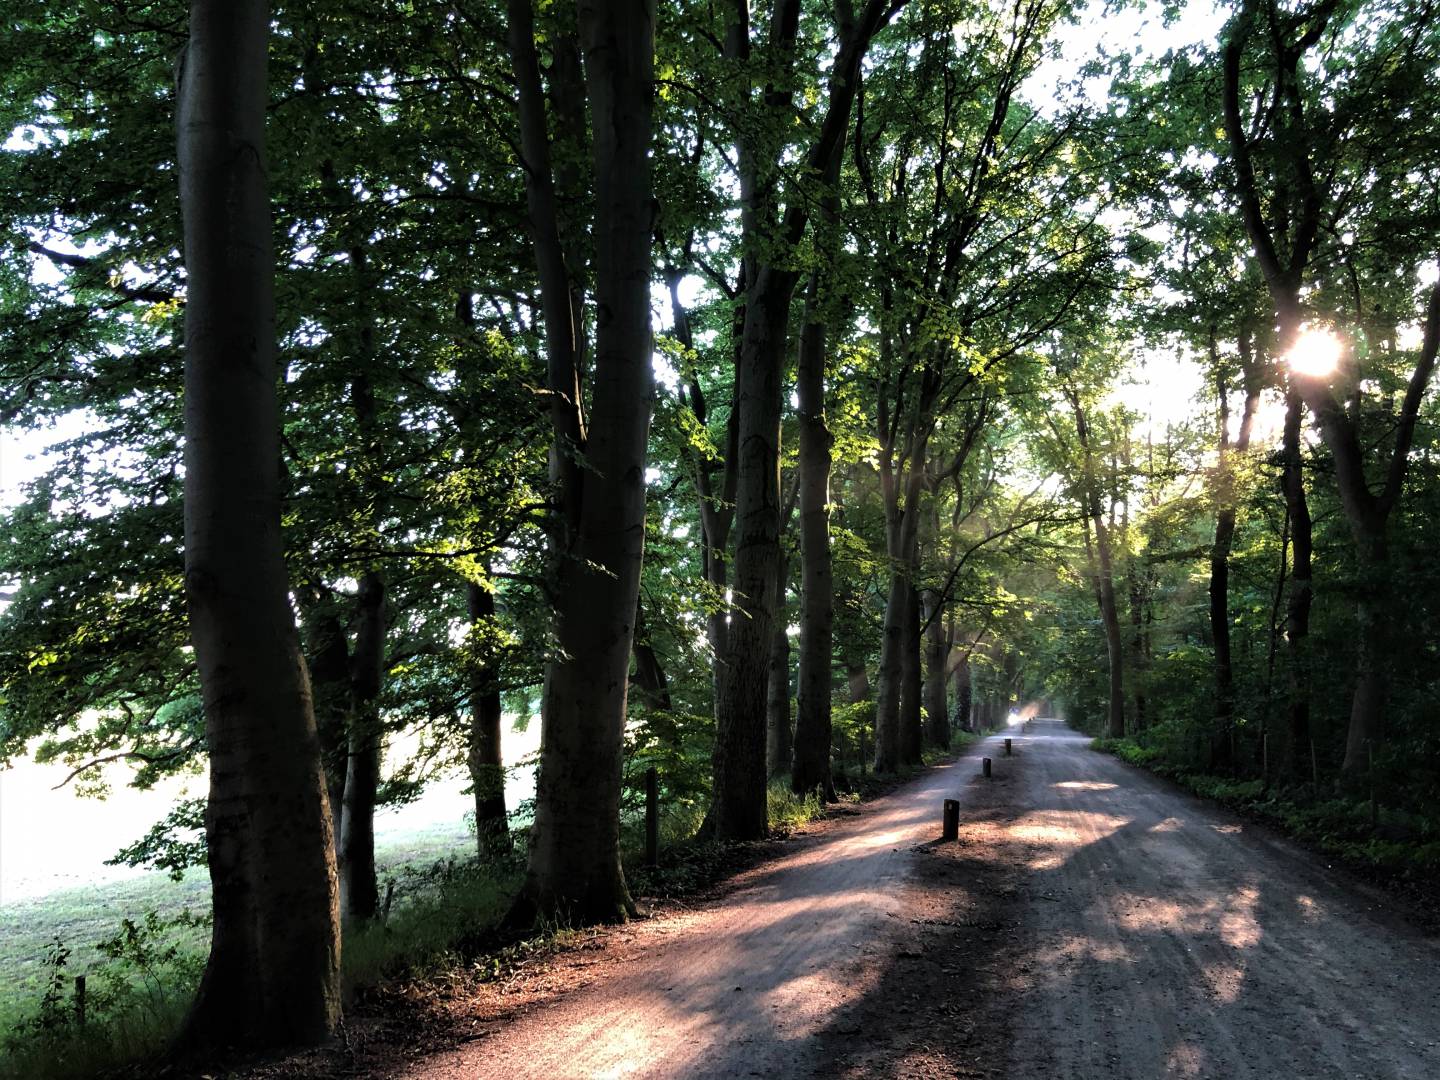
I took this photo within seconds of stopping. I am still in the middle of the road, I am taking the photo at eye height, and I am just not putting that much thinking into the photo. And then I realise that I can probably catch the light a bit better if I get a little lower. That means getting off my bike, and I decided to put the bike in the scene for some more visual context. Here is what my second shot looked like:
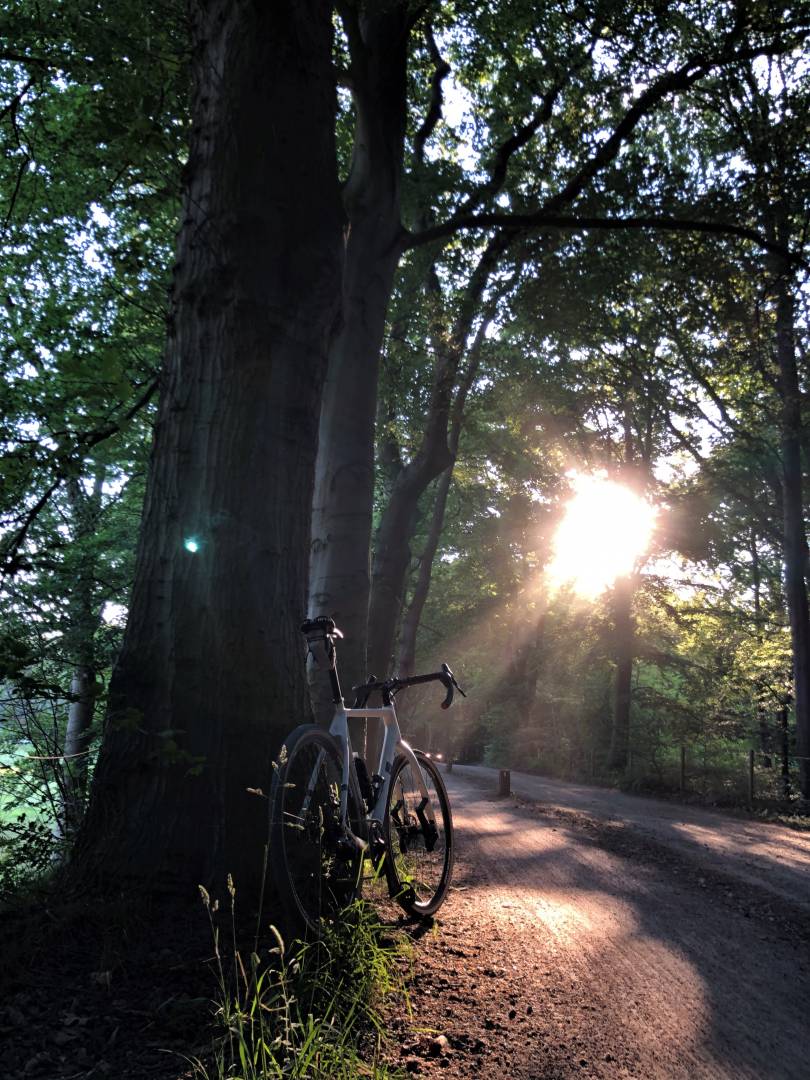
To my eyes, this is a better photo. The way the trunks and branches slice the beams comes across much more. You can still see the gravel road, but this time it has a dynamic line to it (more on that later).
Angle of the sun
Light changes throughout the day and the first thing any photography course will probably mention are the famous blue and golden hours. You can research more on the physics behind it, but I think we all know that the light from the sun when it is angled at either sunset or sunrise is exceptional. Soft and gentle, this light is very different from the harsh mid-day glare that creates deep shadows.
For this kind of light, you either enjoy it when it is there or plan for it. That makes this a bit more deliberate, but the result can be rewarding. The next example is an image I took while on one of my business trips to Budapest. I knew the weather forecast was going to help produce a pinky hue at sunrise. My alarm went off at 5:30 in the morning, and I had to walk a bit to get up the banks of the Danube for a good view. I almost missed it, but I was there just in time to take the following shots:


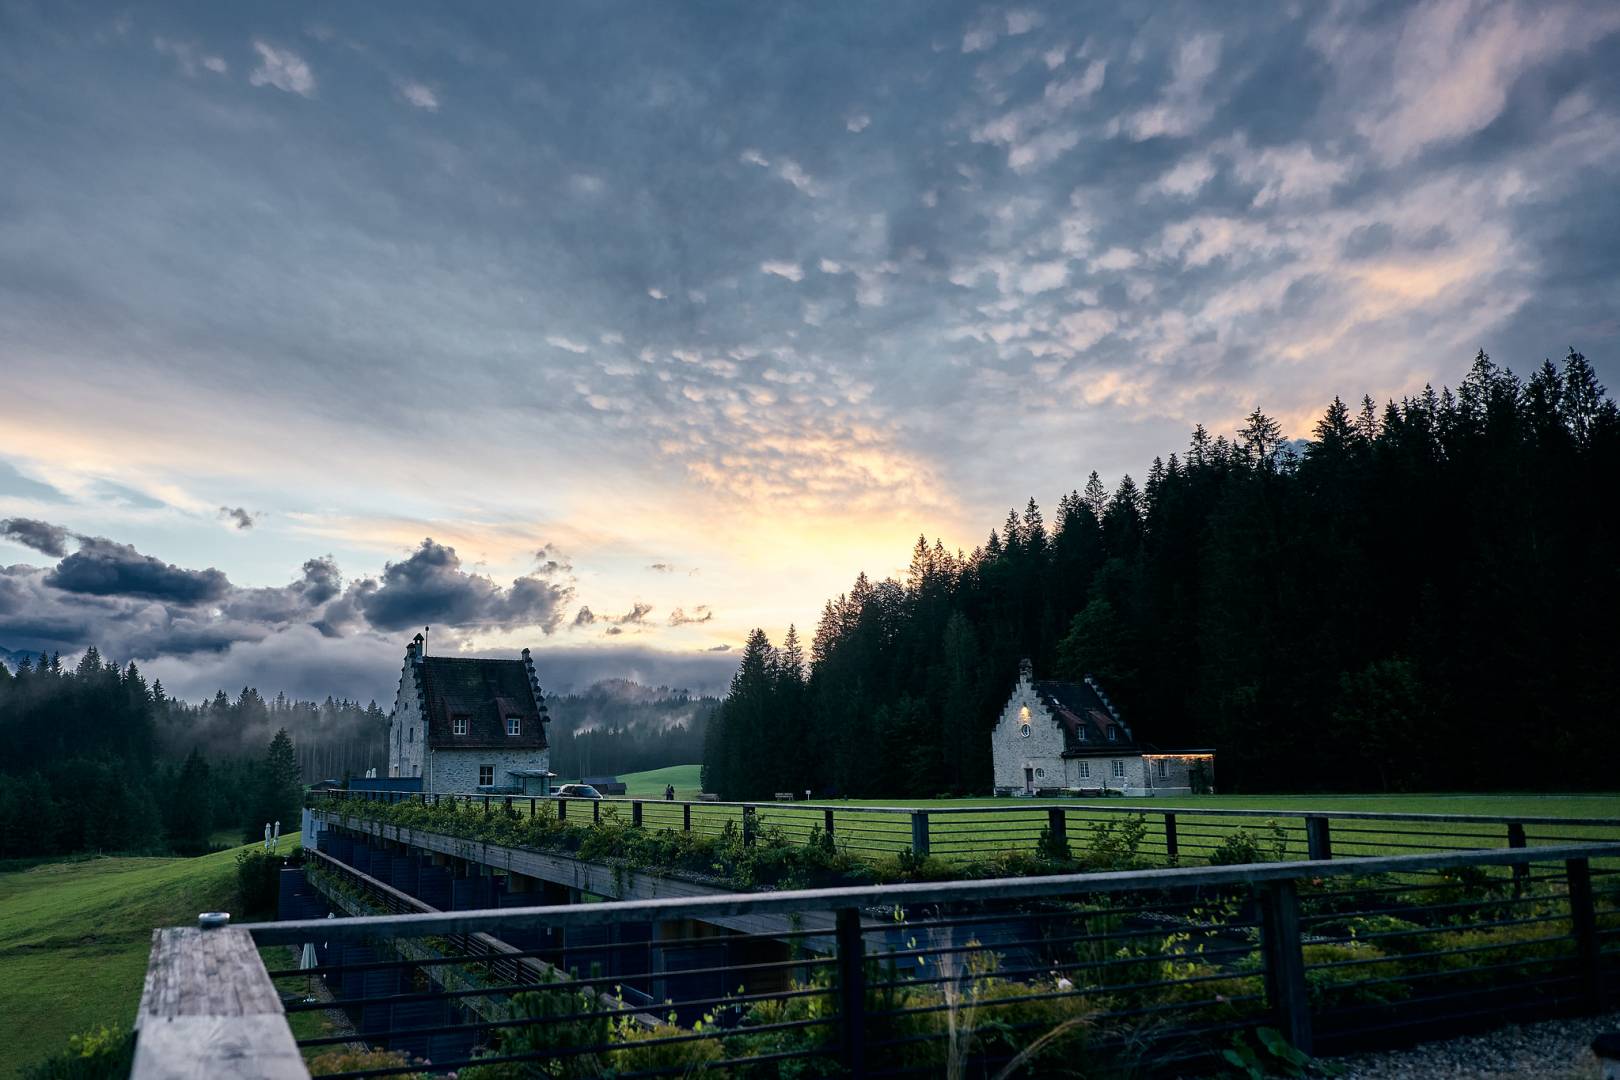
This light exists only in the early morning; there is no getting around it. And it is the same with the light we get when the sun sets. The next example was captured earlier this year in the south of Germany. The hotel we stayed in had these two small cottages at the entry of the grounds. I noticed that the sun would set behind the tree-line during the day and thought it would probably create an interesting backdrop for these two cottages. As with the photo above, this was a deliberate effort.
Choosing the time
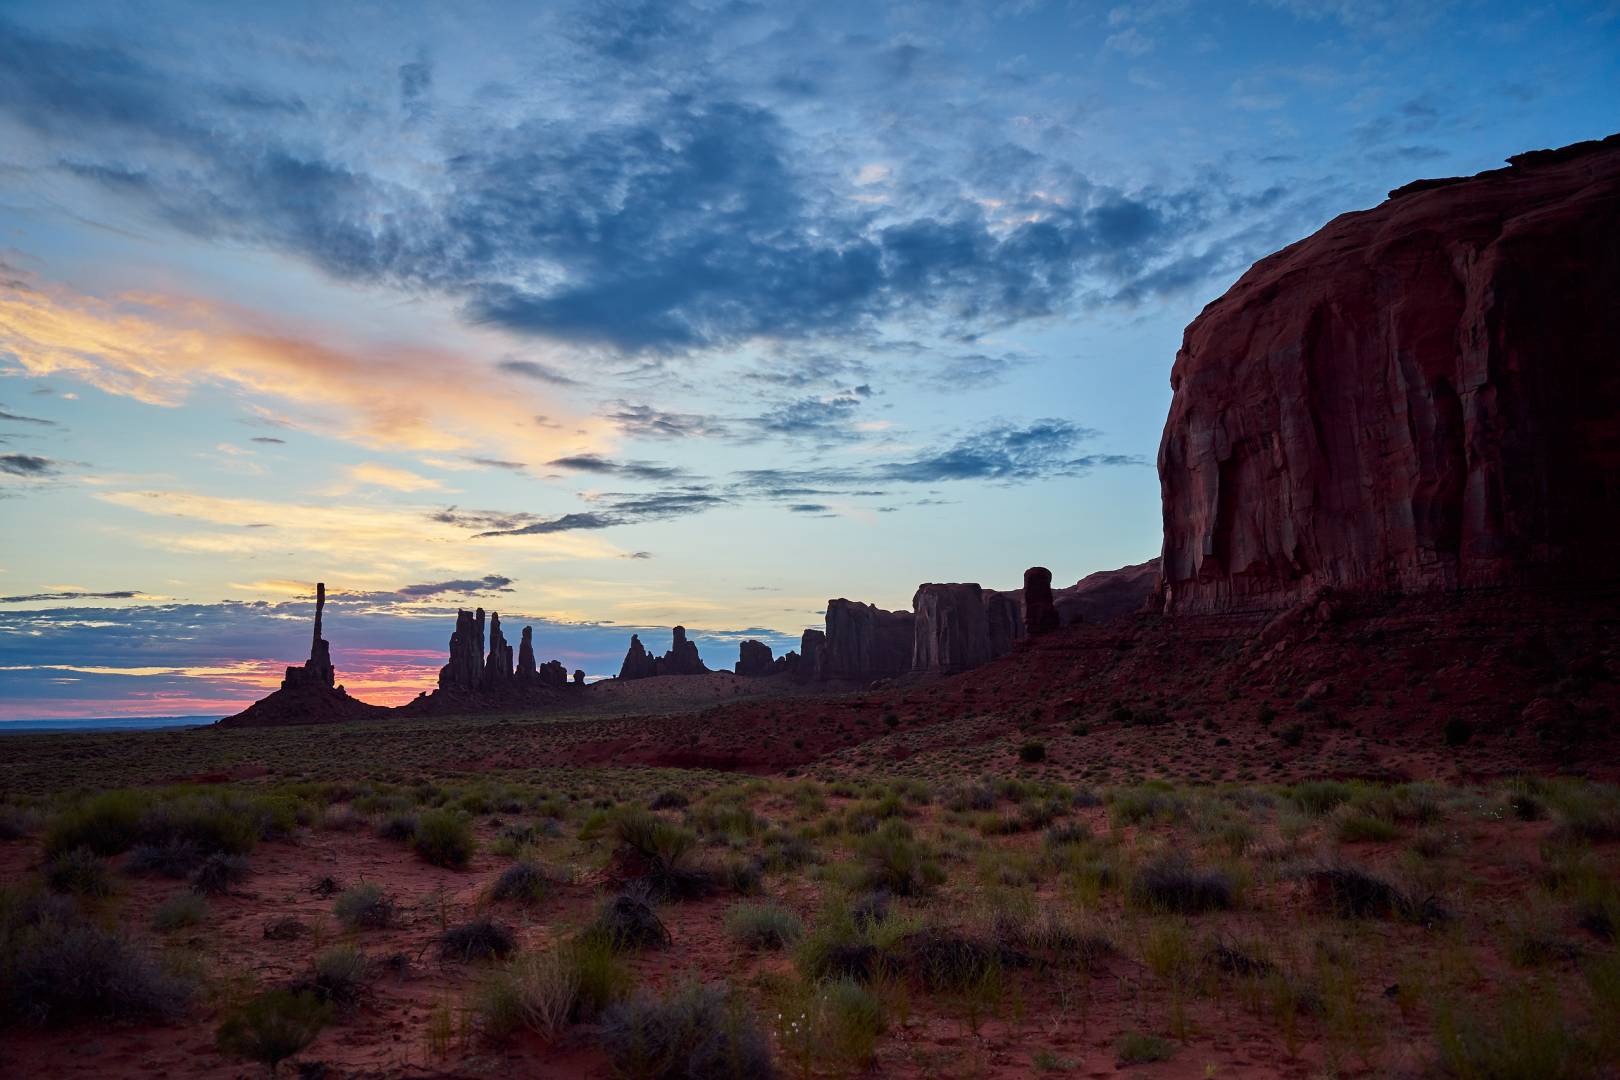
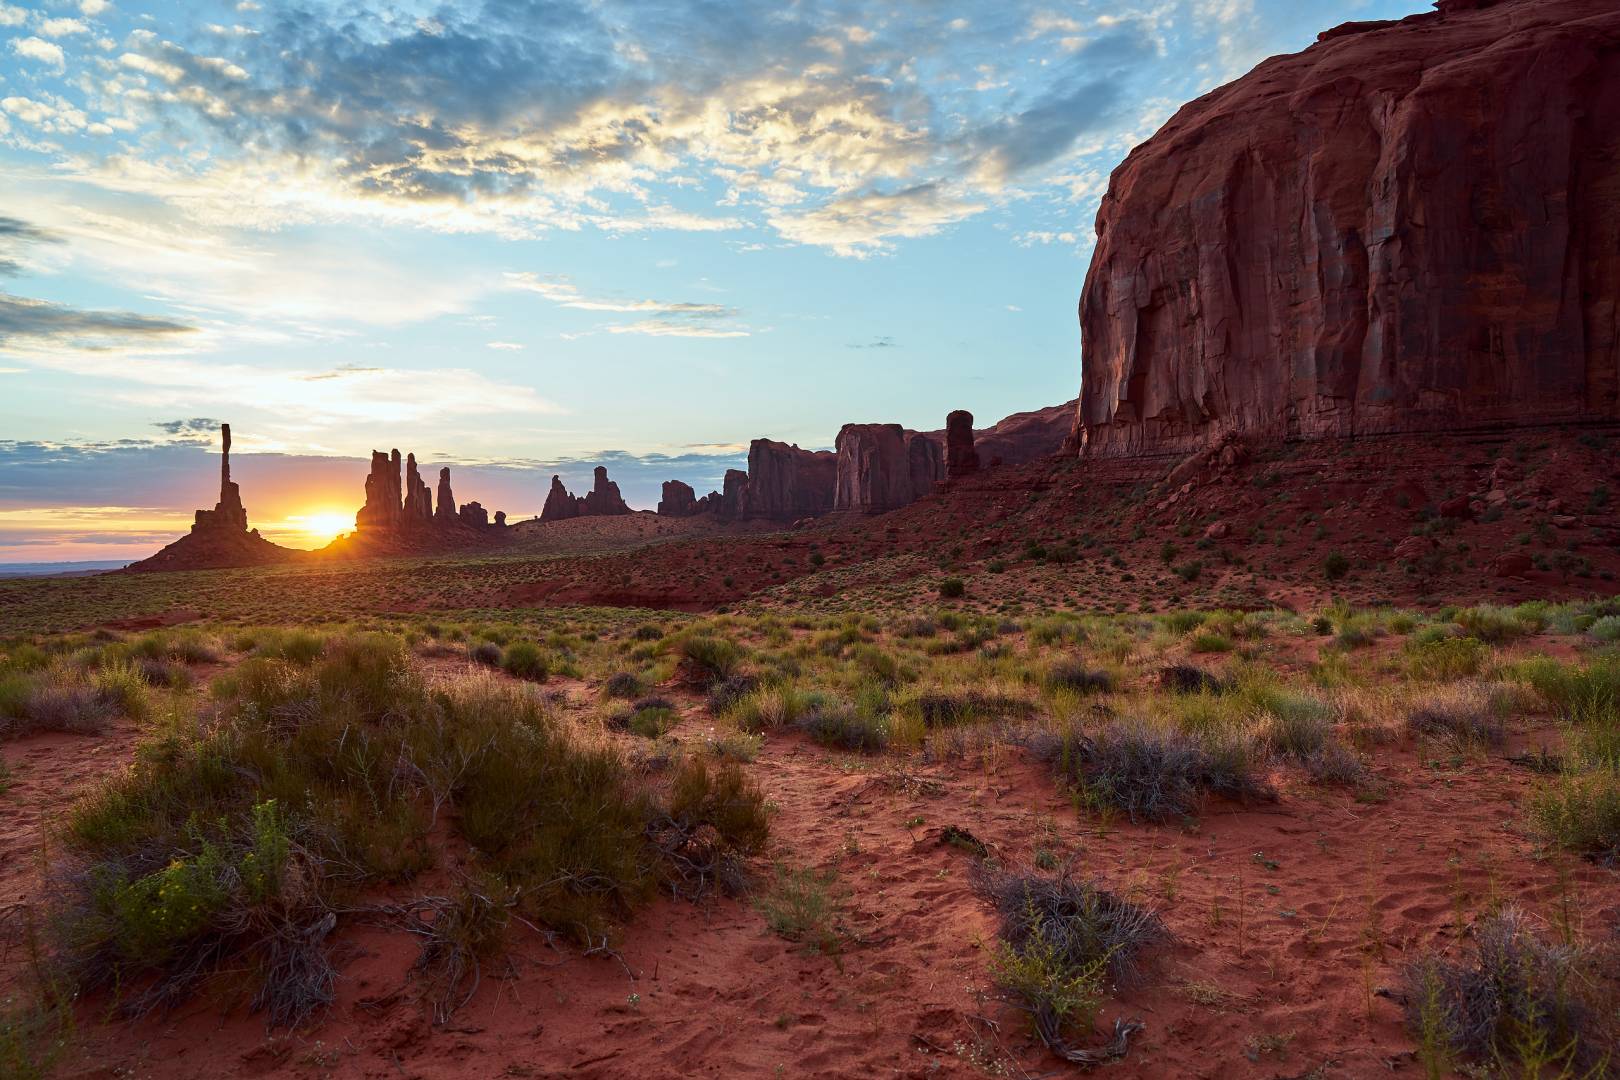
Timing is everything. The two examples below are from another, more deliberate photo. We stayed in the Monument Valley National Park in the US, and we booked a sunrise drive with a local guide. That meant getting up at four this time. No one said finding the right light was going to be easy… But what we got was well worth it. The landscape is amazing, and sunrise is a beautiful sight in such a spectacular environment. Even when being that deliberate, it comes down to being ready at the right time. The two shots below are a few minutes apart, and you can see the difference it makes when the sun just about appears in the second photo. It makes for a more interesting shot.
Light is not just about what time of day you shoot. It’s also about the weather—another thing you can’t control. But the weather can change, and then you need to be ready. If you are a professional landscape photographer, you might be able to wait a week for that perfect light. But, for most of us, we will have just one chance.
The shot below comes from a trip to Scotland. The Isle of Skye to be exact. Here we were, on a famous hike, taking in this amazing scenery and the sky was covered in grey clouds. It didn’t take anything away from the beauty of this place, and we enjoyed every bit of it. But as we progressed along the trail, the sky opened up, and I was in just the right position to take this photo:
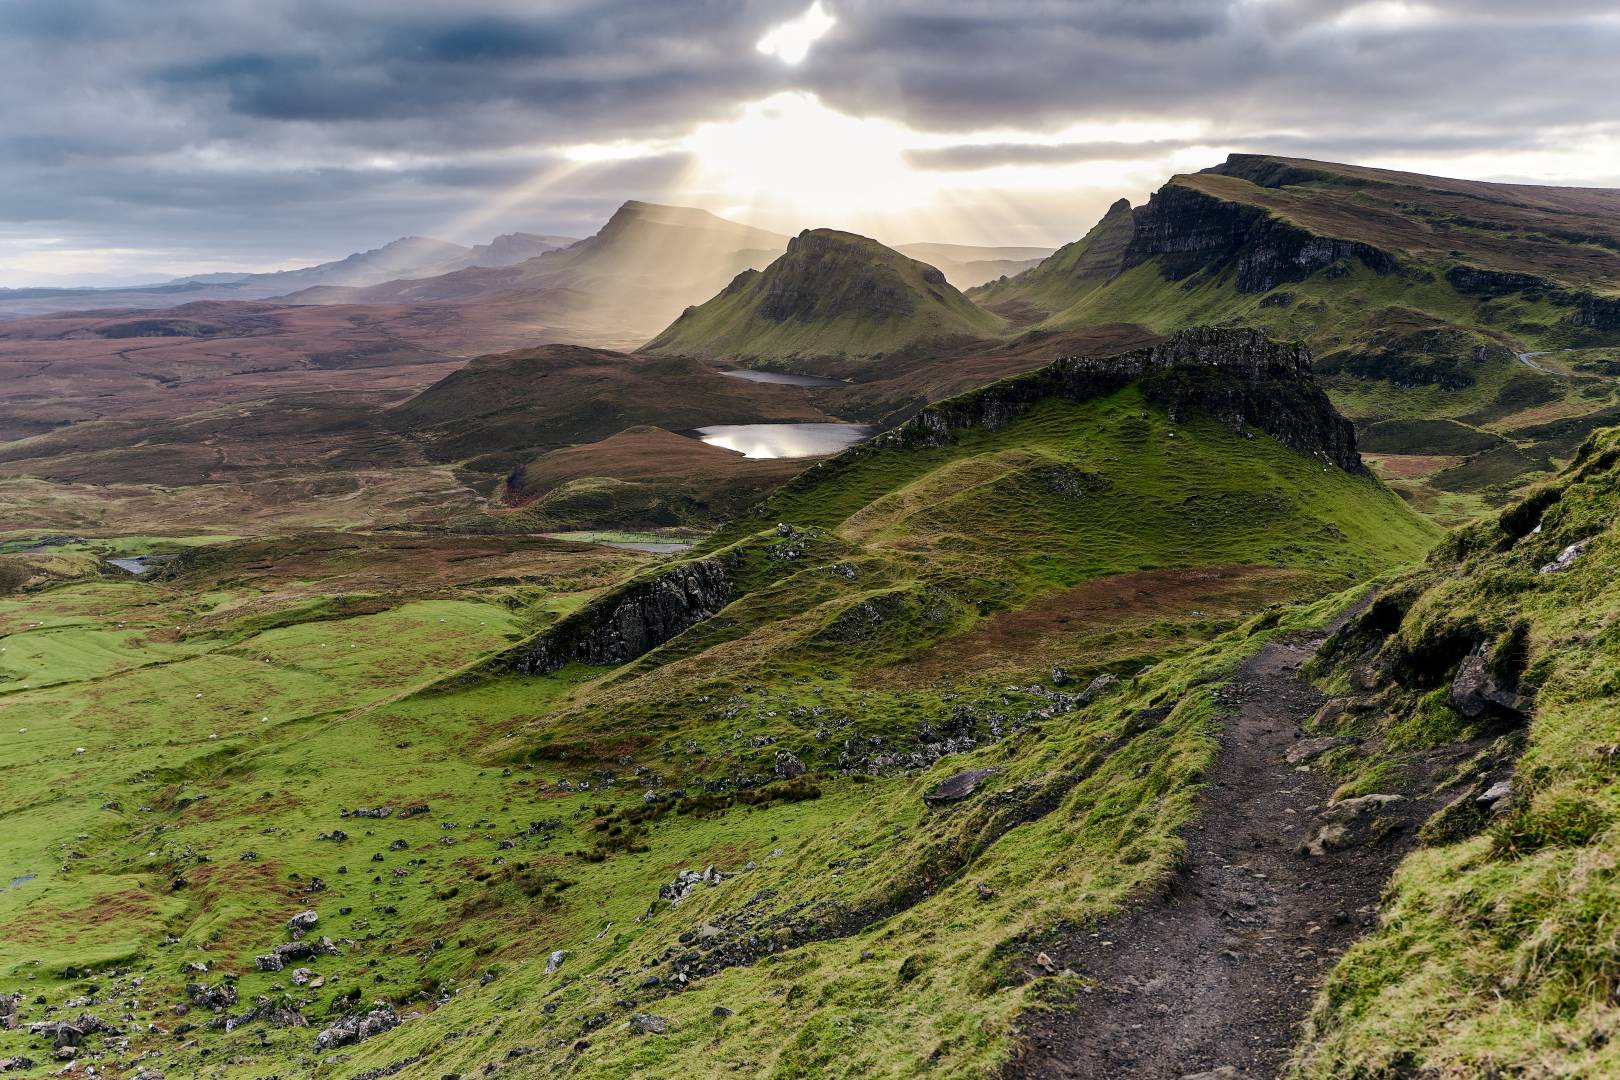
In this case, I was just lucky, and as we had the sun in our backs, it was a matter of paying attention and quickly taking the photo. The break in the clouds lasted for about five minutes, and then it was back to grey again. So sometimes, you just have to get lucky and capture the moment.
Too much light
But what do you do when you have too much light? When it is midday, and the sun is high above you and shining with great intensity? There are a few things to keep in mind. People shots are not great in this kind of light. That doesn’t always matter, as sometimes you simply want to take a photo as a memory of being somewhere. There are some mitigation tactics, though. Here is an example of a normal portrait of my lovely wife in harsh light conditions.
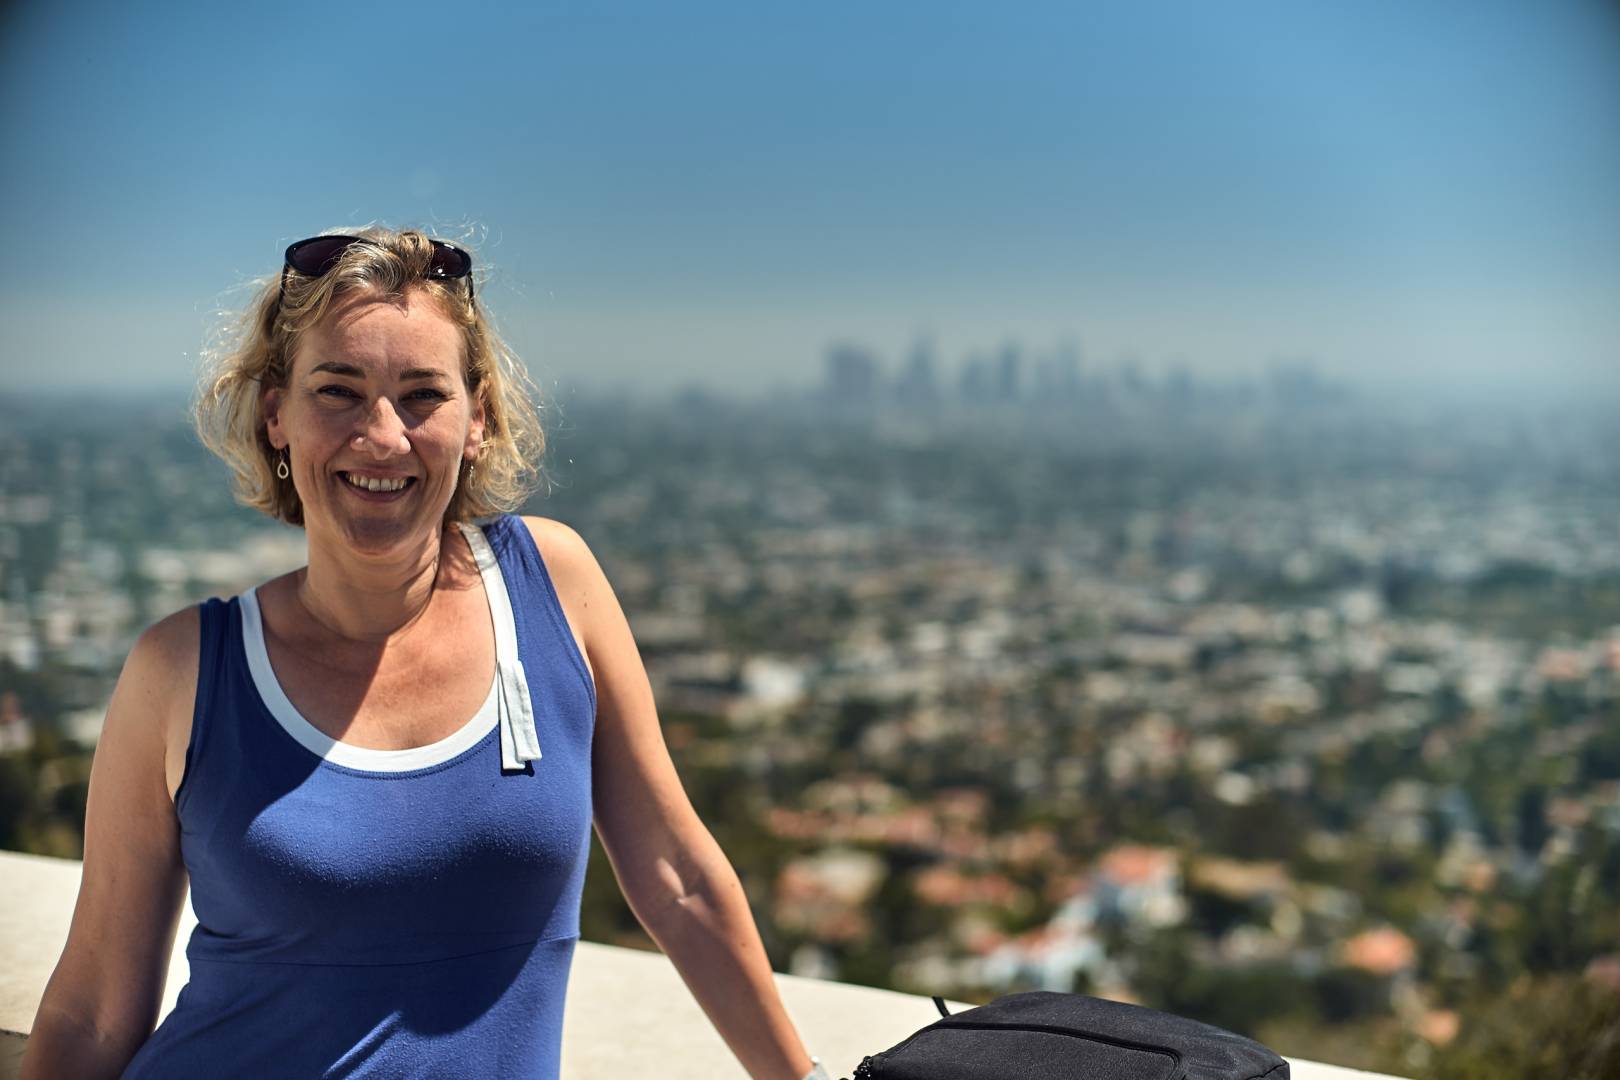
You can clearly see the hard shadows. The light comes from above, so the face is a mix of direct light and shadows, which is not great. Again, that doesn’t always matter. In this case, it is just a nice vacation photo of her with LA in the background. What you can do in these conditions is to ask your subject to look up a little. As a true amateur, I forget this most of the times. But sometimes I don’t, and then you get a better photo. Here is my wife again in similar conditions, this time, I asked her to look up a bit, and it takes away some of the mix of hard light and shadows on her face. Much better.
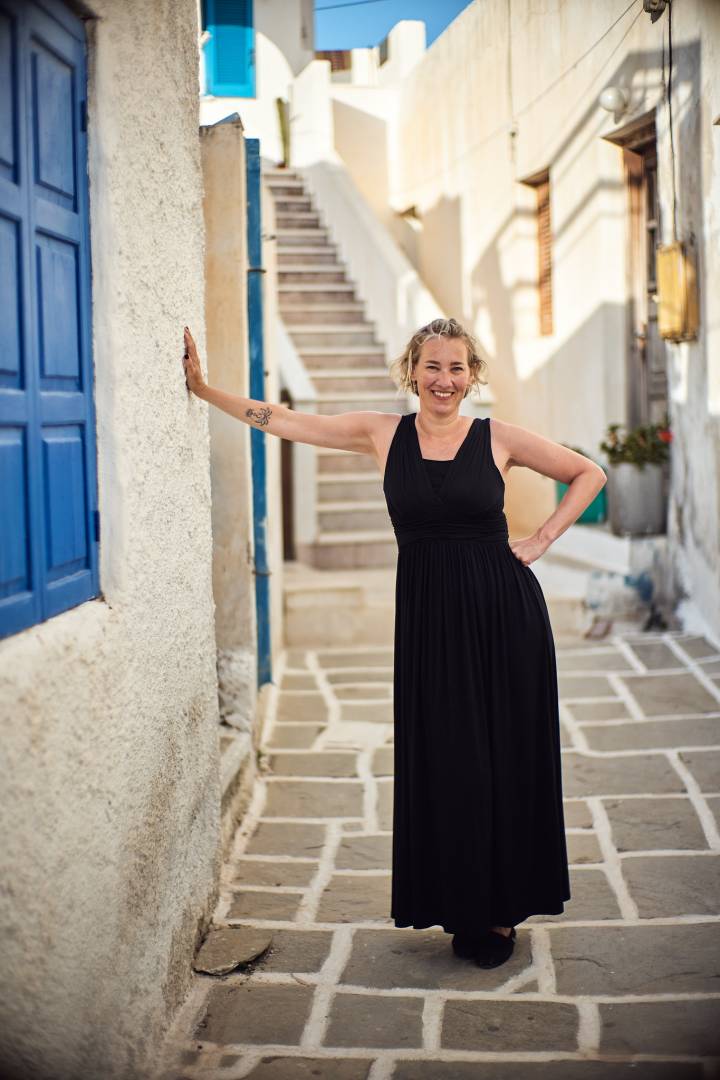
Another tactic is simply to move out of the direct sunlight. When the light is this strong, you can easily step into the shade, and you’ll see you will still have plenty of light to take a nice photo. See the example below of my wife again, but this time I asked her to walk just a few meters to the alley, and I was able to create an environment with more even light.
I quite like this portrait, and it’s one of my favourite shots of my wife. As you can imagine with me being an enthusiastic amateur photographer, I have quite a few photos of my wife. So my stating this is one of my favourites, says a lot about how you can still make memorable photos, even if you have to mitigate hard light.
Alternatively, you can choose to put the focus on the background and play with blurring the people in the shot. It is just enough to recognise them still, but they won’t have harsh shadows and ultra-bright light all over their faces. Harder to do with a phone and definitely not for every occasion, but worth giving a try nevertheless.
Another way to mitigate harsh, mid-day sunlight is to embrace it and make it a feature, instead of trying to reduce it. This could mean shooting straight into the direction of the light and including the sun in your composition. It will bring the harsh light into context. I took the photo below on a blistering day in Vienna.
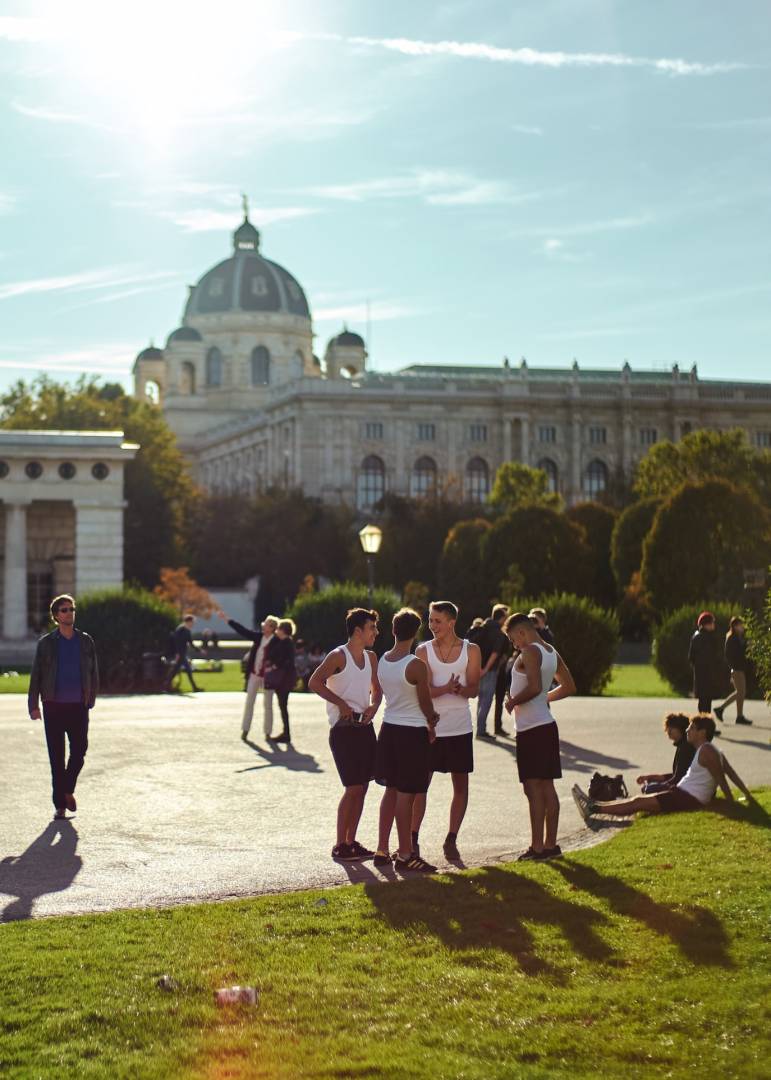
I chose to shoot against the sunlight. The shadows tell the story of how hard the light is and, by framing the sun in the top left corner of the shot, I made it part of the scene I was trying to capture around the group of young guys.
Direct sunlight
The next example of how you can make hard light work in a photo was taken in Yosemite National Park in the US. It was a scorching day, and we were at this particular spot sometime in the early afternoon. It was summer, so there was not as much water in the waterfall, but it still made for a nice shot. I climbed on a few boulders to get to the middle of the stream and.
In my first attempt, I framed the shot a bit tight without the sun in it, but that did not work. The waterfall was very shadowy, as it is also below, but there was no context for why that was. It simply looked like an underexposed photo. I can’t show it to you because I deleted it… But anyway, back to the one I kept. I decided to frame the waterfall with the sun directly over it.
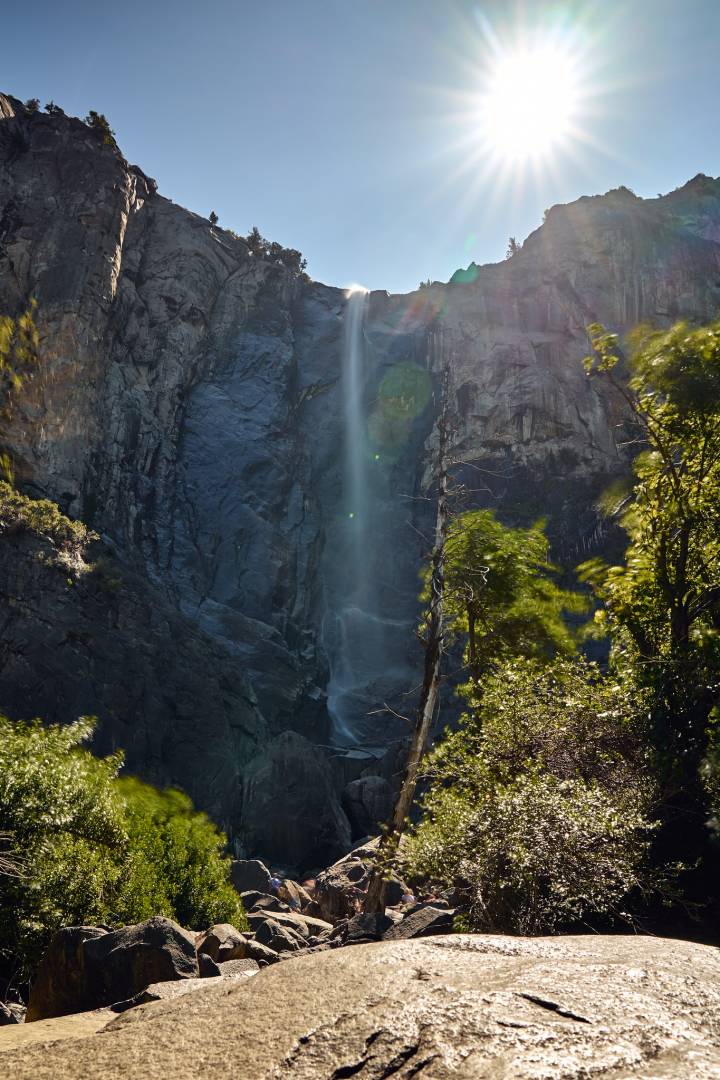
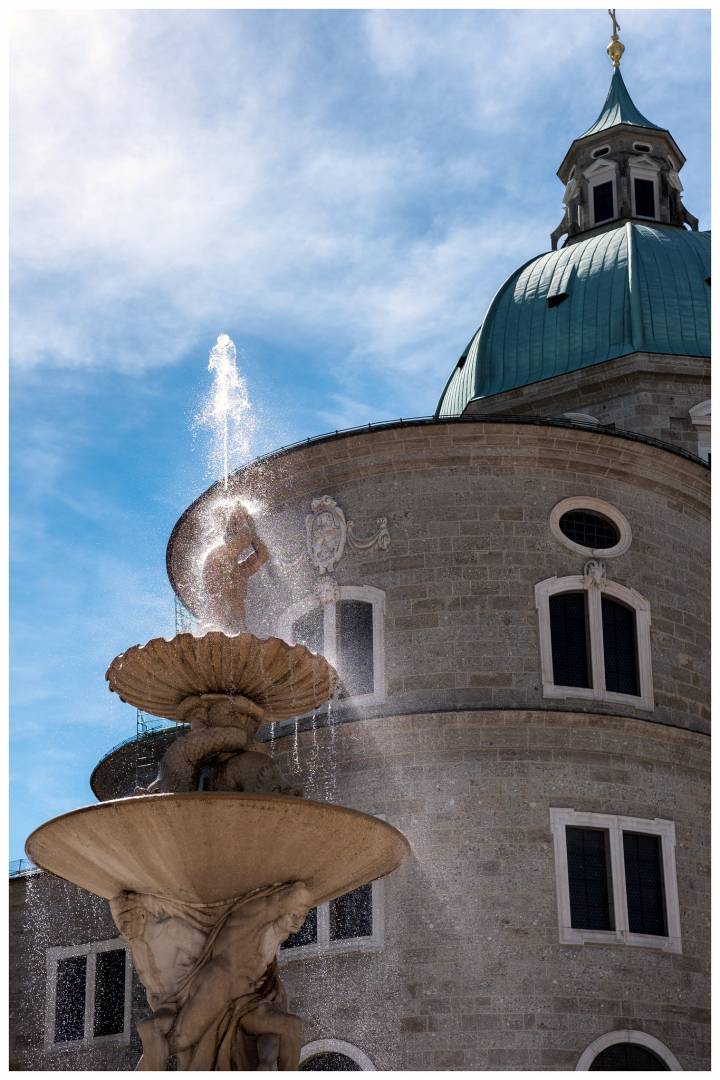
With the sun’s rays diagonally across the frame, it works. The waterfall is dark, but the balance is there because of the inclusion of the sun. The next shot was taken in Salzburg and, this time, I used the fountain to show the intensity of the light. The sun is just outside the top left corner of the frame, but you can see the water drops being lit by the rays. This emphasises the hard light and makes the drops stand out, which creates an interesting dynamic. This photo also works well from a proportionality perspective; I will come back to that in a later post on that topic alone.
Silhouette
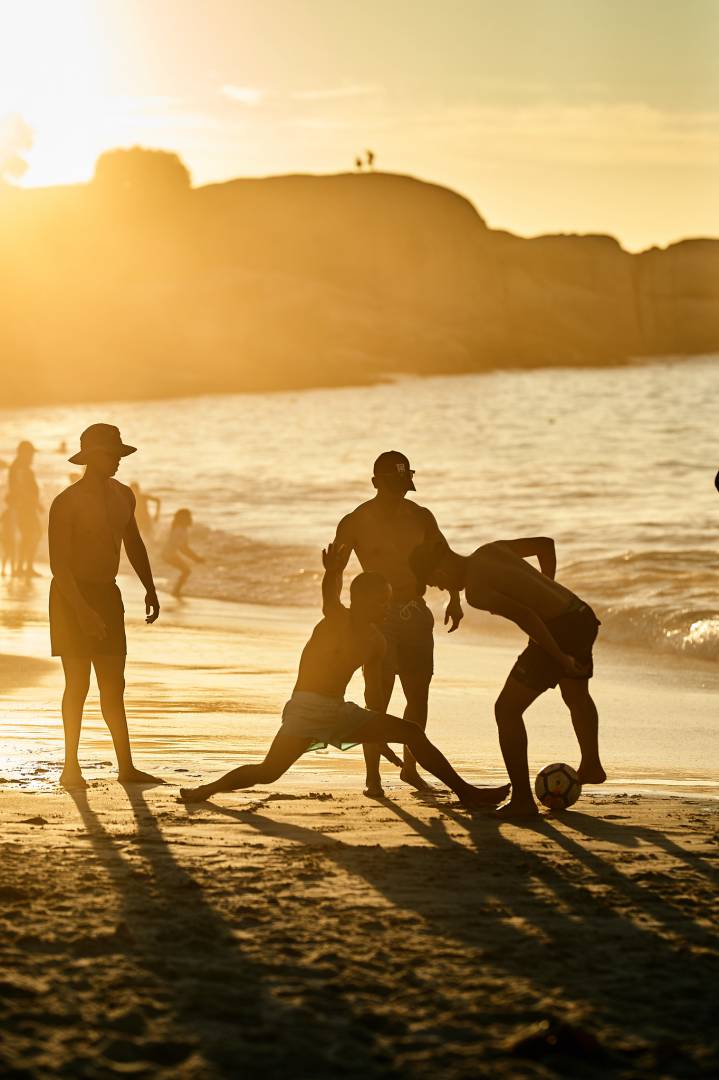
So don’t be afraid to bring the sun into your compositions. If you take that even further, you can start to play with silhouettes. You will need the sun to be a bit lower for that to work since most of your subject will be at the horizon level. You can get a bit lower to the ground to emphasise this as well. The photo below was taken on a beach in Cape Town. It was early in the evening, and the sun was starting to set. This created nice long shadows from the group of boys that were playing football near the shoreline. By placing them in front of the sun, you create this nice contour effect.
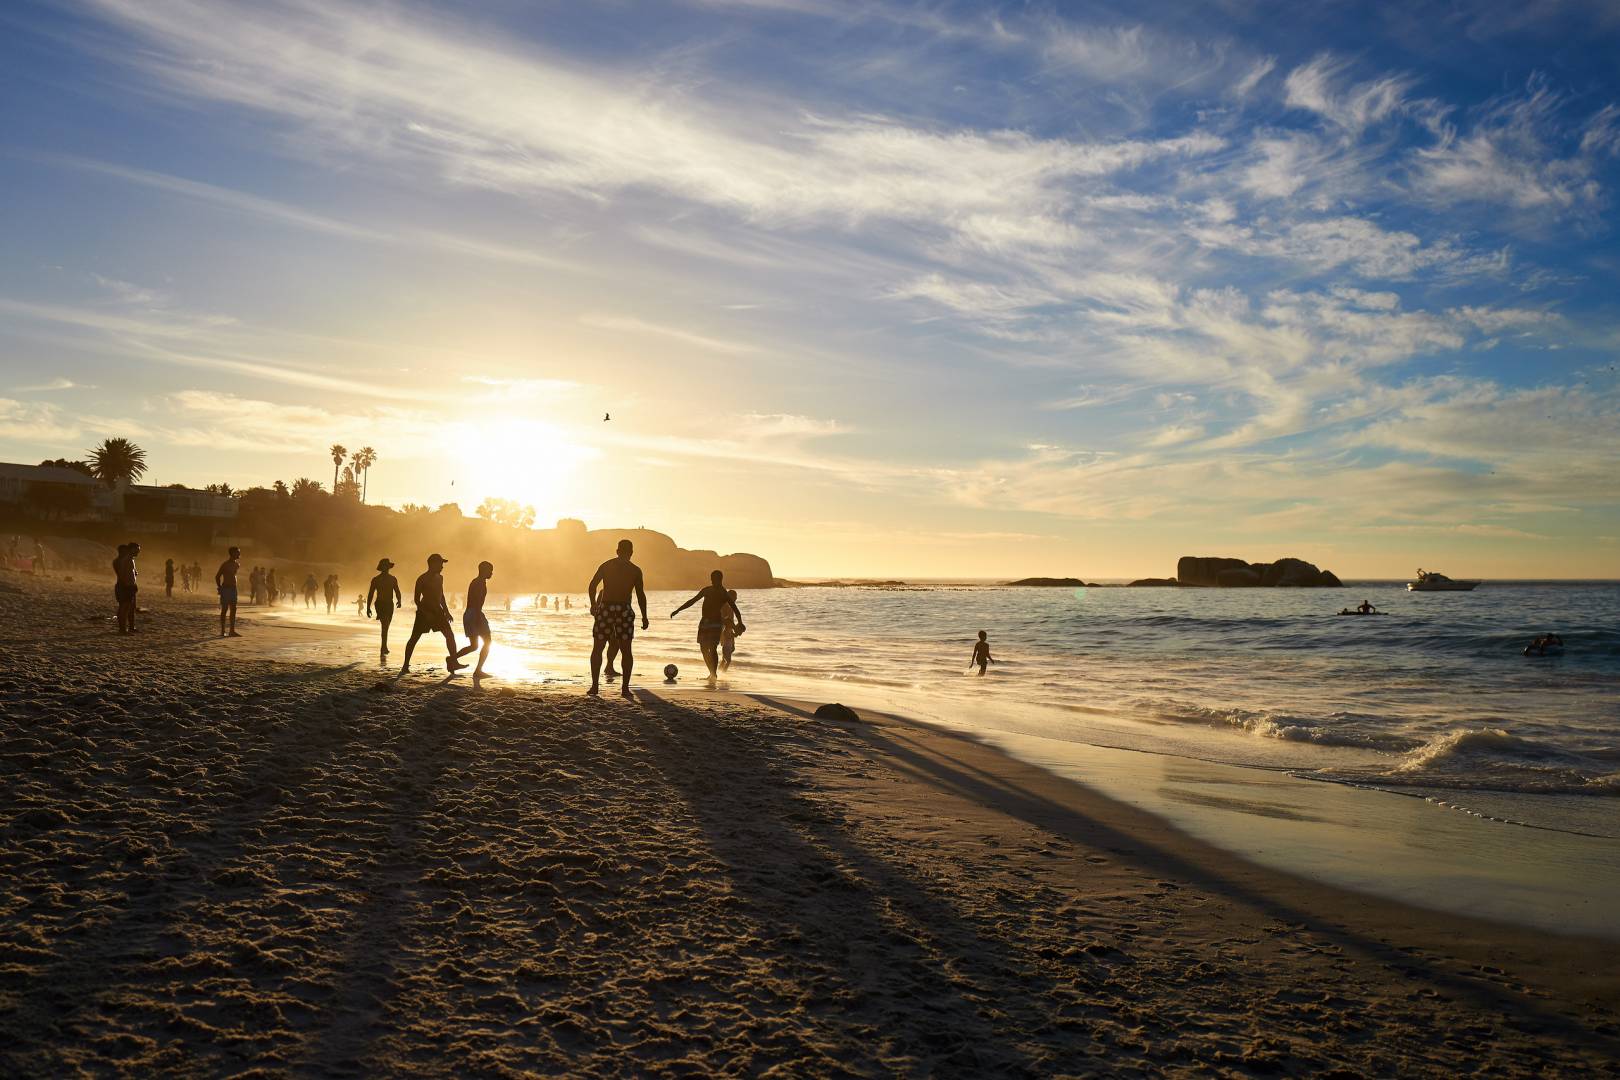
I moved towards the group some more and composed them even tighter by using a longer lens against the sun. I love how that creates this feeling of summer with the golden light outlining the footballers’ silhouettes.
Another example of this effect comes from Greece. Atop a small hill in one of the towns of Santorini was this bar with a canopy. This created a great backlit scene once the sun started to set. These kind of photographs are a little harder to with a smartphone because they require quite a bit of correction in editing. But it is not impossible to do it.

Light and dark
Finally, let’s talk about how you can shoot when there is intense light on a small part of your scene, and the rest is covered in darkness. I will do a separate post on shooting in the dark using high ISO or longer exposures, but this is something else. Here is an example that gives you an idea of the lighting conditions I am talking about.
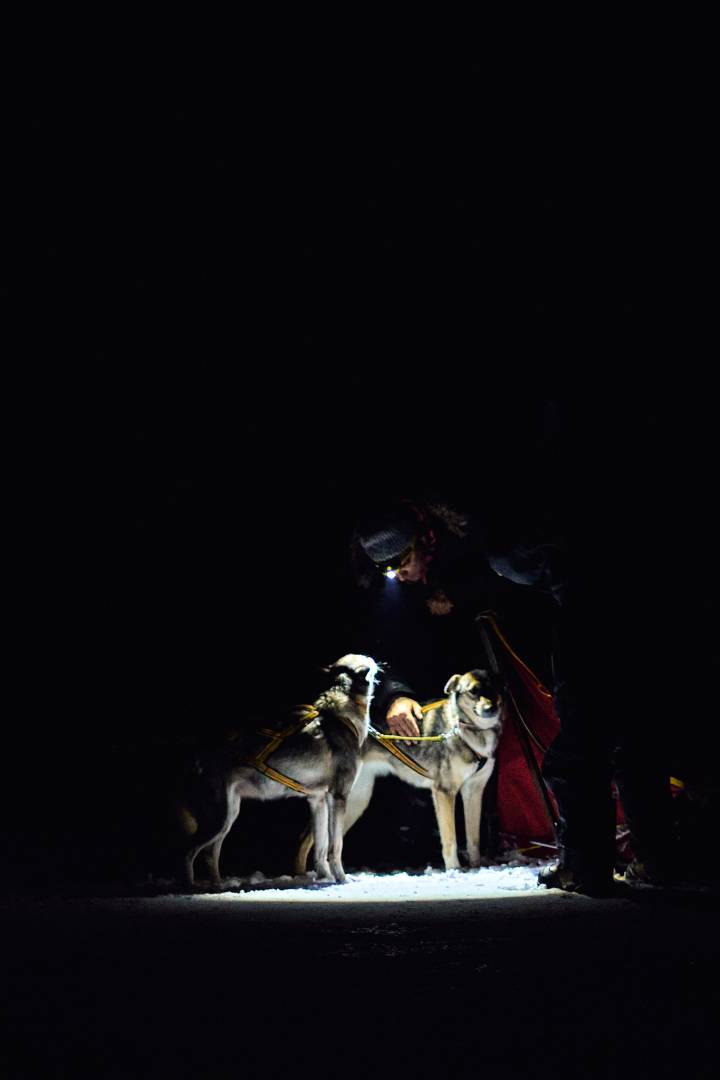
This was taken during a trip to the north of Norway in the middle of winter. We went dogsledding, and it was absolutely pitch black. Everyone had headlamps, and they created this nice effect in the photo above when the driver was looking down to pet the dogs. The isolation created by this light is great. It is also one of those moments you need to anticipate.
In this case, this guy and his sled were ahead of us, and I was waiting for the moment when he would look down towards the dogs. When he did, I was ready. As I will explain in the future article on shooting in the dark, this does require a little more technical knowledge. When you let the camera do the work on autopilot, you won’t always get what you are looking for. With a smartphone, this is hard to do. However, the AI in phones is getting better and better at dealing with low light.
Fortunately, there are also scenes when you do not need to respond to a situation so quickly, and this kind of light is more permanent for you to shoot. Take the next photo, captured on a street in London. The iconic red phone booth, barely visible in a dark alley.
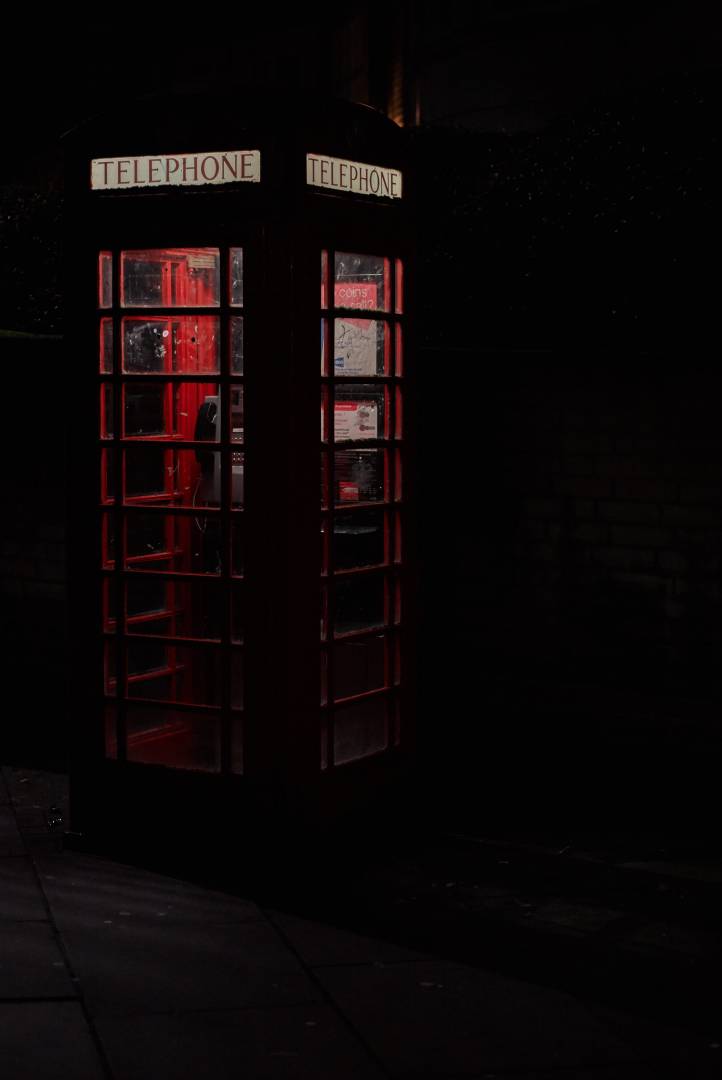
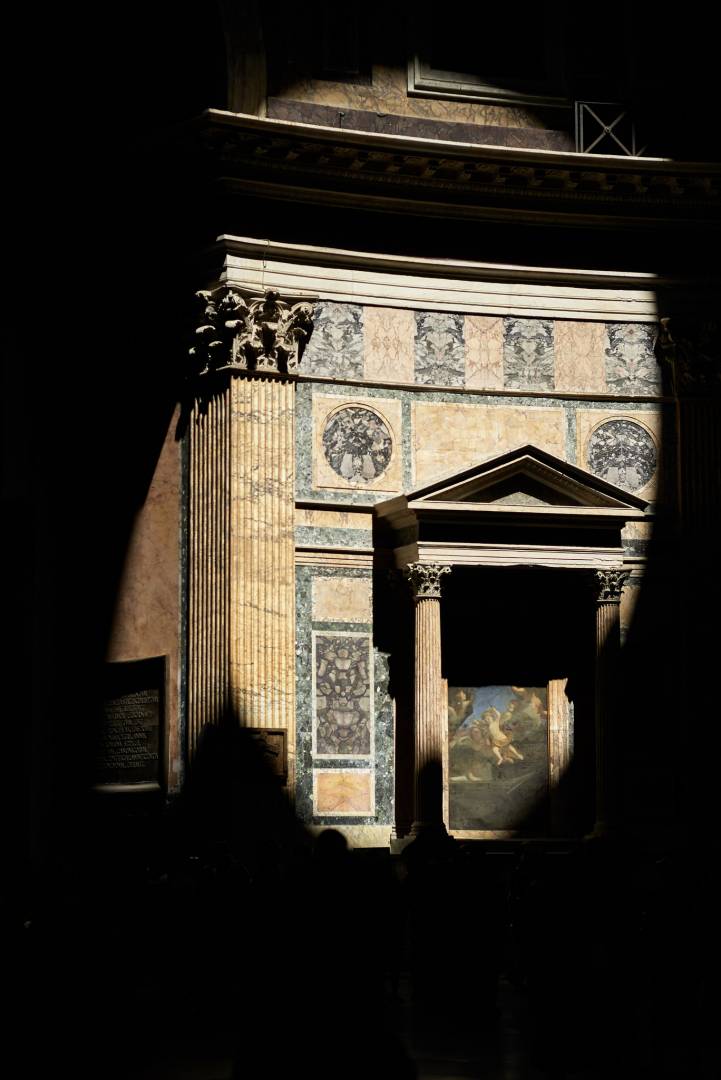
The reason this photo works is because it embraces the darkness. Just like embracing hard light, in this case, you should not want to make this scene too bright. It is meant to be dark because only then will the phone booth stand out the way it does. The final example comes from Rome, inside the Pantheon. With foundations dating back to the Roman era, this church has a large hole in its domed roof, which creates a beautiful light beam that slowly moves across the large room as the day passes. I captured it here when the light lit up one small section.
Bad light, good light?
Without light, there is no photography. And, as such, there really isn’t bad or good light. It’s just a matter of figuring out what to do with it. And if you are an amateur like me, who won’t scout and wait for the right light for hours or even days, you work with whatever the light is in the moment you want to capture something by using some of the tactics I described above. It does help experiment and see for yourself what different ways you can make the light work for you, instead of against you.
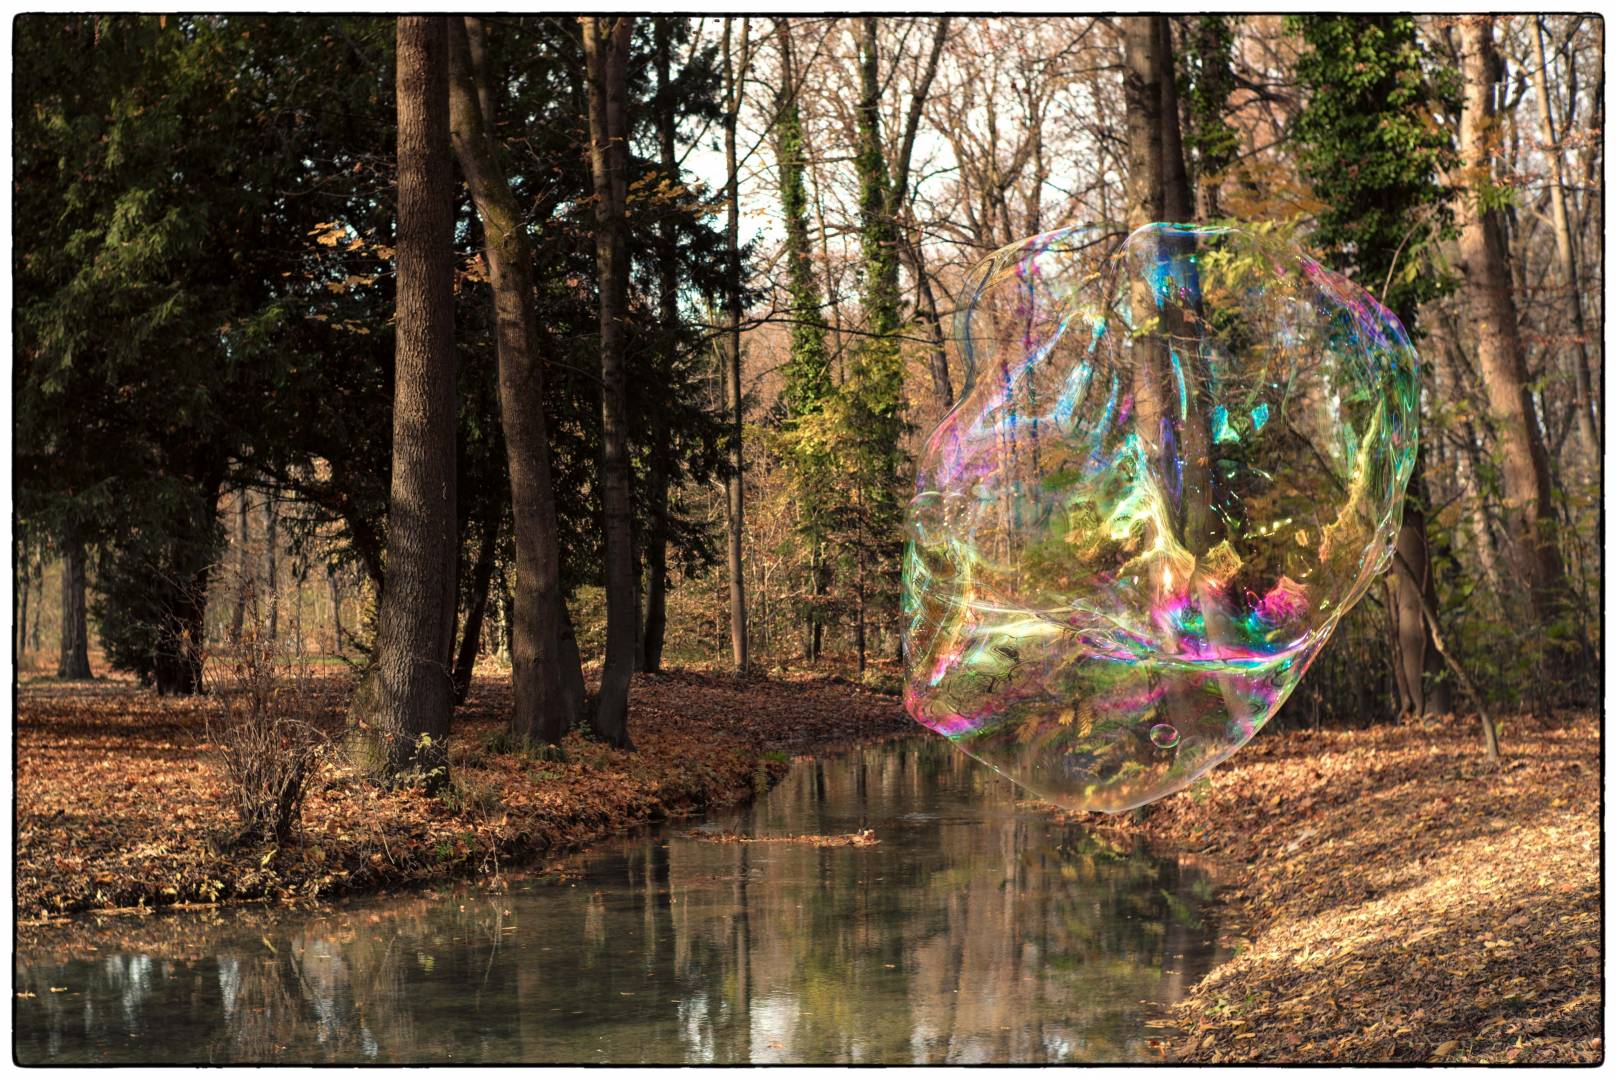
In my next post, I will write about how to tell stories with your photos. For now, I leave you with a final photo that pretty much sums up what light can do. A photo taken of a gigantic soap bubble, made by a street performer, in Munich’s English Garden. As the breeze gently moved the bubble over the stream, I pressed my shutter button and was happy to see how the light played with the soap, creating an eclectic mix of colours.
Dear Erwin, I already wanted to congratulate you to your good photos in the car story. The examples you are showing here are an excellent proof of your dedication to photography. Even if some of your advice is well-known to many serious amateurs, your images are stunning. I am looking forward to reading your next contributions. JP
Thanks! And yeah, I think the photos are more on point for this forum. I started to write the series for people with a little less experience. I have to say, just taking a moment and reflecting on how I work with the well-known photographic guidance, is a very satisfying experience. It helps me become a little bit more conscious in my application of some principles going forward. Glad you enjoyed the photos!
Great to see pictures which reflect the heart and soul of photography.
Your pictures, Erwin, give great pleasure. Thank you.
I am in the process, during lockdowns, of digitising my collection of colour transparencies: not to adjust in Photoshop, but simply to store them and reduce space consumption. Leica since 1973 and Zeiss Ikon Contaflex before. Mostly Kodachrome, a little Ektachrome, some Agfa CT 18. I am about to launch into pre-1970. I am delighted by both quality and pleasing colour and light. After the transparencies, the negatives!
A hugely satisfying exercise
Hi Andre, if you are digitizing a big or very big number of slides, this one could be very interesting to you: https://www.macfilos.com/2020/06/12/a-life-in-colour-slides-and-an-idea-how-to-save-some-memories/. JP
Nice photos, Erwin. Photography, by definition, does, of course, mean ‘drawing with light’. Painters had used the camera obscura for a long time before we learnt how to record and fix such images in the early 19th century. Painters had long been able to create what they saw or they wanted us to see on canvas. Once cameras became sufficiently controllable and darkroom techniques became sufficiently developed, then the possibilities of ‘drawing with light ‘ became greatly expanded and often required a great deal of knowledge eg Ansel Adams and the zone system. With today’s ‘digital wonders’ there are almost an infinite number of possibilities as regards exposure and that is what the little screen on the back is for. It is more important, however, to learn how to draw with light than to choose the ‘right camera’. A ‘better camera’ won’t give you better results unless you learn how to do that. The ultimate choices as regards exposure, both in camera and in post processing, should belong to the photographer and not to the camera.
William
Absolutely. I have changed equipment so many times in search of something better. In some cases, there is indeed something to be found. But often, the impact is marginal. Especially today when the level of sensor technology and optics is so high, there are no bad options on the market anymore. There is just your personal preference. But all the equipment on the market today is more than sufficient for 99% of us.
A thought provoking read. Thank you Erwin.
Well illustrated examples of the salient points you make.
The article reminded me of a coffee conversation that I had with John Shingleton (Macfilos’ Mr X1) more than a year ago. We considered whether photographers should be allowed to use their cameras for only two hours a day – one hour in the early morning, and one hour in the late afternoon. It would be a harsh discipline.
If you had been there we would have enjoyed your additional input of deliberately searching out shots into the sun.
Ha! That sounds like an interesting experiment. Wouldn’t want to miss the hard light though… But the aspect of applying constraints is interesting. Limiting yourself can increase your creativity. It is one of the reasons I am always drawn to prime lenses instead of a zoom for instance.
What an uplifting and interesting article, you have genuinely taken some wonderful images in this article. My only wish would have been to be present while you presented the item.
There are three images that standout for me in terms of quality and colour, firstly the Scotland landscape taken with the Q, what wonderfully rich Leica colours. The second is the Q beach shot, another image that look so colourfully rich. And finally, and I am a little biased in this one, the Beach Df shot.
That is not to take away from the others, this is such a wealthy collection of gems, that picking any one over another is a challenge. But it was the colours of the those three that stood out to me.
Thank you Dave! The light on that beach near Cape Town was something else. To be fair, the scenery is so beautiful, any light would work there….
Beautiful images and an “enlightening” article. Along My Leica camera I’ve been a gr shooter for almost two decades but haven’t upgraded to the GR iii. I’d appreciate if you could send some feedback imaging wise about the camera as it’s been on my mind for a while but haven’ t had the opportunity to try it yet. Thanks for sharing and looking forward to your future articles.
Jean
Thanks Jean! I love the GRIII, I find it very impressive. Very sharp and bright enough and even when that fails, their is sensor stabilization as well for working with lower shutter speed. Highly recommend it. I also did a write up on my blog: https://www.erwinhartenbergphoto.com/post/the-perfect-cycling-camera-my-review-of-the-ricoh-gr-iii-and-why-i-prefer-it-over-my-iphone
Thanks Erwin. I’ll go to the article straigthaway
Jean